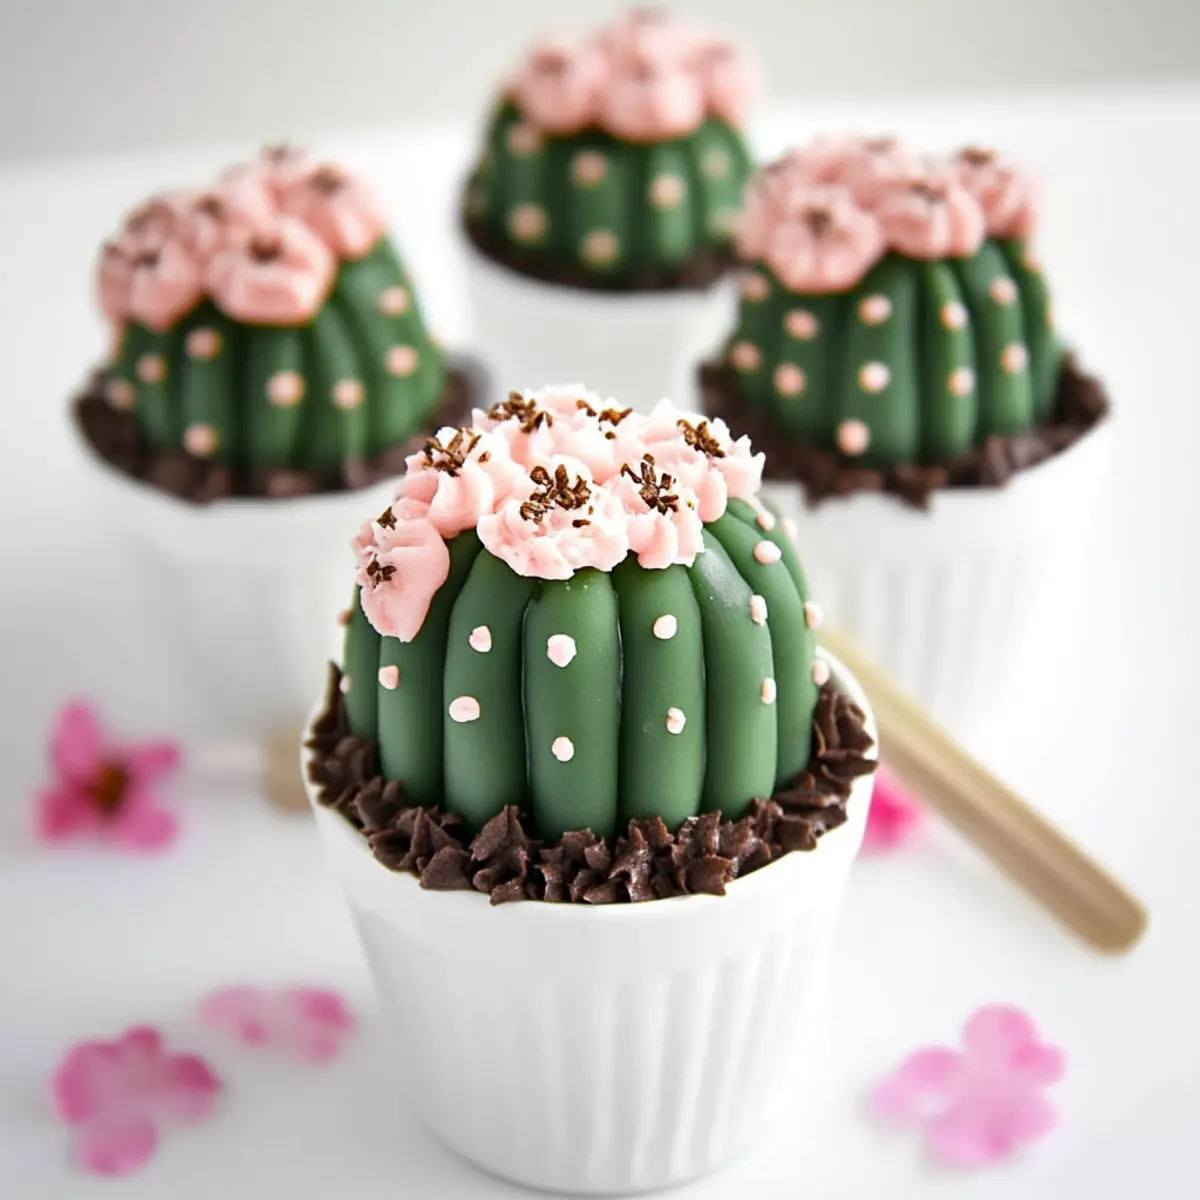
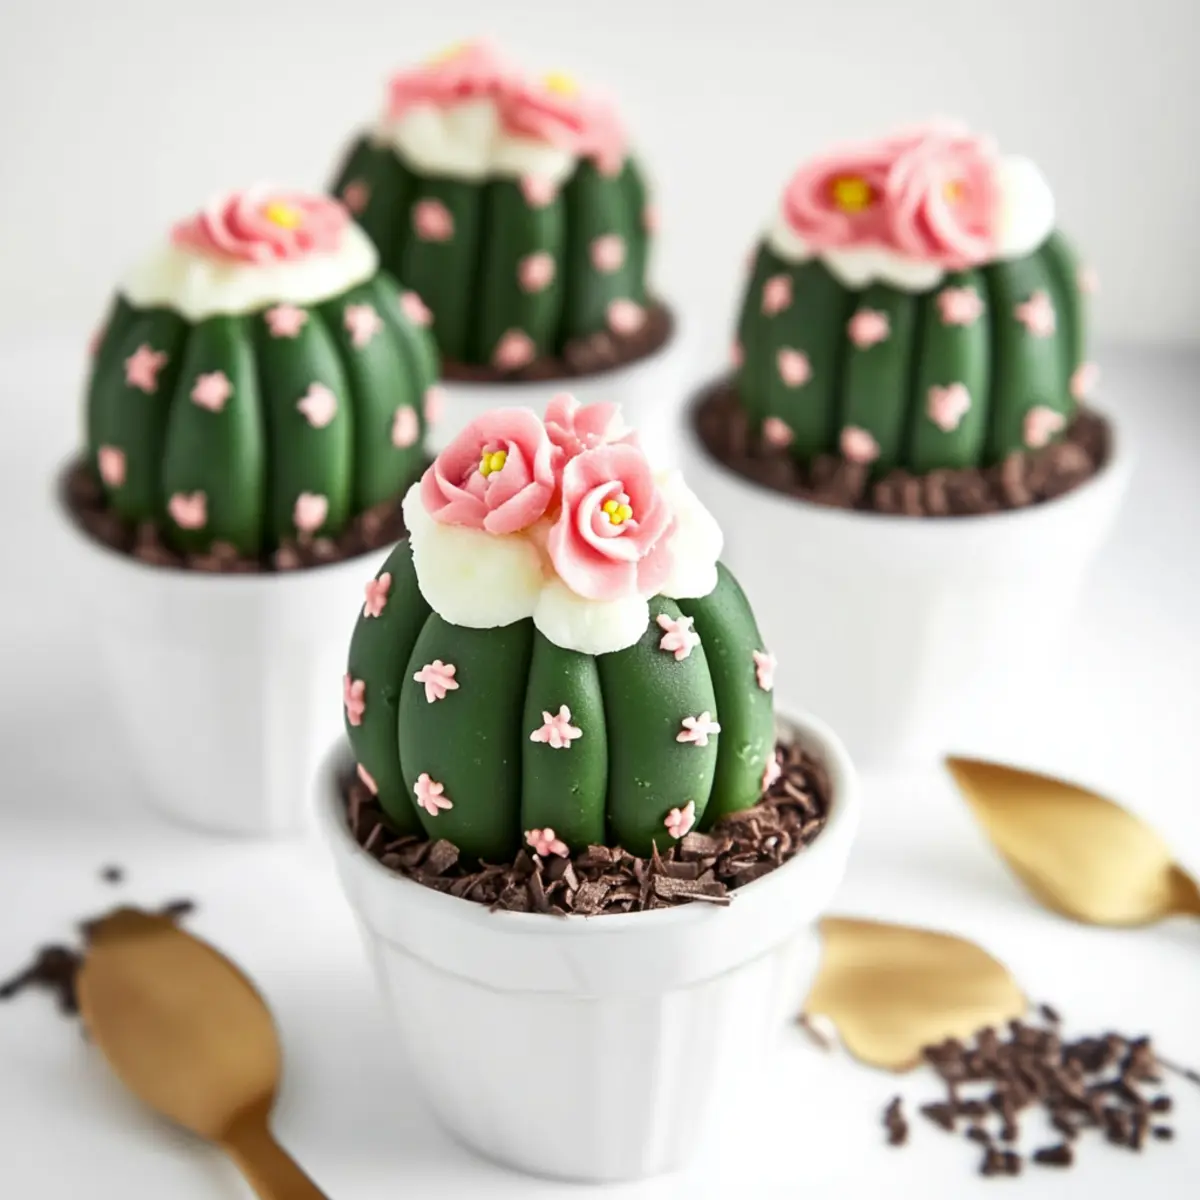
Mini Potted Cactus Cakes are not just desserts; they’re edible art pieces that evoke the whimsical charm of a desert landscape. With vibrant green frosting resembling cactus paddles and a delectable chocolate base, these treats bring a playful twist to any gathering. Imagine serving these delightful Cactus-Style Cake Pops at a garden party or a whimsical birthday bash, where they’ll have everyone buzzing with delight.
Jump to:
- <strong>Ingredients for Cactus-Style Cake Pops</strong>
- <strong>How to Make Cactus-Style Cake Pops</strong>
- <strong>Perfecting Cactus-Style Cake Pops Cooking Process</strong>
- <strong>Add Your Touch to Cactus-Style Cake Pops</strong>
- <strong>Storing & Reheating Cactus-Style Cake Pops</strong>
- FAQs About Cactus-Style Cake Pops
- What are Cactus-Style Cake Pops?
- How can I personalize my Cactus-Style Cake Pops?
- How long can I store Cactus-Style Cake Pops?
- Can Cactus-Style Cake Pops be made gluten-free?
- Conclusion for Cactus-Style Cake Pops
As you dive into this fun culinary adventure, anticipate the satisfying crunch of chocolate cookies and the creamy richness of the filling. Their charming presentation guarantees that these cute little cakes will be the centerpiece of your dessert table, sparking joy and nostalgia in every bite.
Why You'll Love This Cactus-Style Cake Pops
- This incredible Cactus-Style Cake Pops transforms simple everyday ingredients into restaurant-quality flavors that will blow your mind completely.
- Foolproof recipe techniques guarantee perfect results every single time, making even novice cooks feel like professional chefs instantly.
- Stunning visual appeal with gorgeous colors and mouthwatering aromas creates the ultimate Instagram-worthy dish for any special occasion.
- Endlessly adaptable for different dietary needs while working beautifully for meal prep, date nights, or entertaining large groups effortlessly.
Ingredients for Cactus-Style Cake Pops
Here’s what you’ll need to make this delicious Cactus-Style Cake Pops:
1 package 14.3 ounce crème-filled chocolate cookies: These Oreos form the base of the cake pops, providing perfect crunch and flavor.
8 oz. cream cheese: At room temperature, it helps bind the cookie mixture and adds a creamy texture.
2 cups powdered sugar: Sweetens the cream cheese mixture and thickens the glaze.
2 tablespoons light corn syrup: Adds shine and helps the glaze retain its consistency.
Milk or cream: Use to thin the glaze as needed, allowing for the perfect pour.
1/8 teaspoon moss green gel food color: Provides that vibrant cactus color, making each pop visually delightful.
White sprinkles jimmies: These give a beautiful finish, resembling the little blooms on a cactus.
1 egg: Necessary for the cupcake batter, ensuring a light and fluffy texture.
3 tablespoons milk: This is mixed with the egg to enhance moisture in the batter.
2 tablespoons vegetable or canola oil: Adds richness and helps keep the cupcakes moist.
1/2 teaspoon pure vanilla extract: For that added depth of flavor in your cupcakes.
1/4 cup hot coffee: Enhances the chocolate flavor in the cupcakes.
1/2 cup all-purpose flour: The foundational ingredient for the cupcake batter.
1/2 cup granulated sugar: Sweetens the cupcakes and balances the flavors.
1/4 cup unsweetened cocoa powder: Provides richness and deep chocolate flavor.
3/4 teaspoon baking powder: For leavening the cupcakes, making them rise perfectly.
Pinch of salt: Enhances the overall flavor of the cupcakes.
6 small pots: Perfect for serving your cactus-style creations, adding to the visual charm.
3/4 cup ready-made chocolate spread: Adds a luscious layer over the cupcakes, amplifying the chocolate experience.
3 tablespoons cocoa nibs: For a delightful crunch around the cactus portion, they add a gourmet touch.
Fondant flowers: These are the finishing touch, adding character and elegance to your cake pops.
How to Make Cactus-Style Cake Pops
Follow these simple steps to prepare this delicious Cactus-Style Cake Pops:
Step 1: Prepare the Cookie Mixture
Begin by pulverizing the chocolate cookies in a food processor until they resemble fine crumbs. Transfer the crumbs to a large bowl and mix them with cream cheese, kneading with your hands until thoroughly combined. Press the mixture tightly into the cavities of a silicone canelé mold, overflowing slightly. Use a knife to level the tops, then freeze for about an hour until solid.
Step 2: Make the Glaze
In a medium bowl, combine the powdered sugar and corn syrup. Add milk gradually, one tablespoon at a time, until you achieve a thick glaze. Stir in the moss green gel food color until well mixed. Depending on the consistency you want, you may add more milk to achieve a pourable glaze.
Step 3: Bake the Cupcakes
Preheat your oven to 350°F (175°C) and line a muffin pan with six cupcake liners. In a large glass measuring cup, mix the egg, milk, vegetable oil, vanilla, and hot coffee. In another bowl, combine flour, granulated sugar, cocoa powder, baking powder, and salt. Pour the wet mixture into the dry ingredients, stirring until just incorporated. Divide the batter evenly among the cupcake liners and bake for 13-15 minutes, or until the tops spring back when lightly touched. Allow cooling completely.
Step 4: Assemble Your Cakes
Once the cupcakes are cooled, cut off their domes, reserving them for later. Place a cupcake in each small pot, then spread about two tablespoons of chocolate spread over the cupcake. Gently place the frozen cookie cactus shape on top, pressing down slightly. Sprinkle cocoa nibs around the perimeter of the cactus where the chocolate spread is exposed.
Step 5: Decorate and Chill
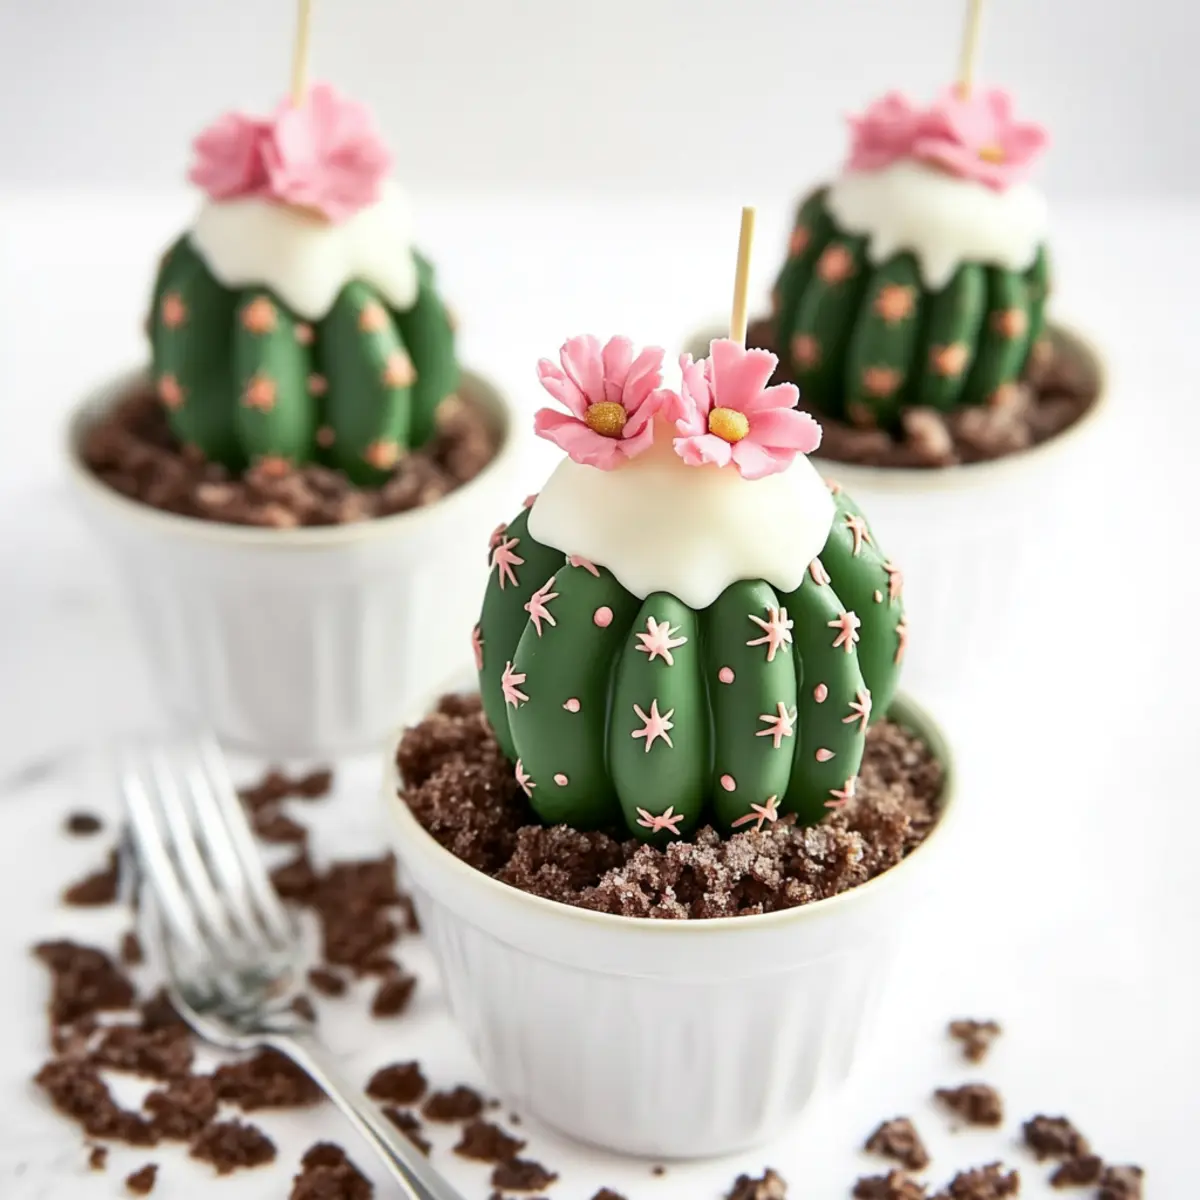
Drizzle the glaze over the cactus portion, allowing some to drip down the sides. Sprinkle white jimmies for that finishing touch, resembling little flowers. Finally, top each cactus with your favorite fondant flowers to enhance the visual appeal. Refrigerate for a final hour until the glaze is firm.
Step 6: Serve and Enjoy
Carefully transfer your Cactus-Style Cake Pops to your dessert table. Watch as jaws drop and mouths water! These delightful treats make any occasion sweeter. Grab a plate, serve them up, and prepare for the compliments to roll in.
These Cactus-Style Cake Pops not only captivate with their playful charm but also deliver a delightful blend of flavors and textures that everyone will adore. Whether it’s a garden party, a summer barbecue, or just a whim to brighten your day, these treats are bound to steal the show. Get ready to enjoy every chocolaty bite!
You Must Know About Cactus-Style Cake Pops
- This showstopping Cactus-Style Cake Pops delivers restaurant-quality results using simple ingredients you probably already have at home.
- The perfect balance of textures and flavors creates an unforgettable dining experience that will have everyone asking for seconds.
- Picture-perfect presentation with vibrant colors makes this dish absolutely Instagram-worthy and guaranteed to impress any dinner guest.
- Incredibly versatile recipe that works beautifully for weeknight dinners, meal prep, special occasions, or even outdoor entertaining sessions.
Perfecting Cactus-Style Cake Pops Cooking Process
Start with making the cookie mixture first while your cupcakes cool. After the cupcakes cool, prepare the glaze so it can set while you assemble everything. Finally, assemble your Cactus-Style Cake Pops in the small pots for a fun presentation.
Add Your Touch to Cactus-Style Cake Pops
Feel free to swap out the chocolate cookie base with vanilla cookies for a different flavor profile. You can also mix in chopped nuts, dried fruit, or different flavor extracts to personalize your Cactus-Style Cake Pops.
Storing & Reheating Cactus-Style Cake Pops
Store your Cactus-Style Cake Pops in the fridge for up to a week in an airtight container. To enjoy them later, let them sit at room temperature for about 30 minutes before serving to allow flavors to refresh.
Chef's Helpful Tips for Cactus-Style Cake Pops
- This professional-quality Cactus-Style Cake Pops relies on precise timing and temperature control to achieve restaurant-standard results consistently.
- Master the art of mise en place by prepping all ingredients beforehand, ensuring smooth execution and preventing any last-minute cooking disasters.
- The secret lies in layering flavors throughout the cooking process rather than seasoning only at the end for maximum depth.
- Pro tip: let the finished dish rest for optimal texture and flavor development before serving to hungry guests waiting eagerly.
Sharing these delightful little Cactus-Style Cake Pops has become a cherished tradition in my family. They never fail to bring smiles, especially when everyone discovers they’re edible desserts and not actual cactus plants.
FAQs About Cactus-Style Cake Pops
What are Cactus-Style Cake Pops?
Cactus-Style Cake Pops are delightful, miniature desserts that mimic the appearance of cacti in small pots. They combine a rich chocolate cookie base with a luscious cream cheese filling, topped with chocolate glaze and decorated to resemble cacti. These eye-catching treats are perfect for parties and gatherings, captivating both children and adults with their fun design and delicious flavors. Whether you’re celebrating a special occasion or simply want to impress your family, these adorable cake pops are bound to be a hit!
How can I personalize my Cactus-Style Cake Pops?
Personalizing Cactus-Style Cake Pops is easy and fun! You can swap the traditional chocolate cookie base for vanilla cookies, adding a unique flavor twist. Consider mixing in nuts, dried fruit, or different extracts to create a customized taste experience. You can also experiment with various sprinkles or edible decorations to give your cake pops a creative flair. This versatility makes them perfect for all kinds of events, ensuring each batch can reflect your individual style and preferences.
How long can I store Cactus-Style Cake Pops?
You can store Cactus-Style Cake Pops in an airtight container in the refrigerator for up to a week. To maintain their freshness, keep them chilled and avoid exposing them to moisture. This makes them ideal for prepping in advance for parties or festive occasions. When you’re ready to enjoy them, let them sit at room temperature for about 30 minutes. This helps enhance the flavors and ensures the perfect texture for a delightful bite.
Can Cactus-Style Cake Pops be made gluten-free?
Absolutely! You can easily adapt Cactus-Style Cake Pops to be gluten-free by substituting regular all-purpose flour with a gluten-free blend. Many brands offer great options for baking that yield similar textures and tastes. Additionally, ensure that all your other ingredients, including cocoa powder and cookie alternatives, are certified gluten-free. With these simple substitutions, everyone can savor these charming dessert treats, regardless of dietary restrictions.
Conclusion for Cactus-Style Cake Pops
Cactus-Style Cake Pops offer a fun and unique way to present desserts that are sure to impress anyone who sees them. With their delightful flavors and playful aesthetics, these treats make for great additions to any gathering or celebration. By personalizing the recipe and exploring different flavor combinations, you can create something truly one-of-a-kind. Enjoy the vibrant look and taste of Cactus-Style Cake Pops as you share them with family and friends, making sweet memories along the way.
Delicious Cactus-Style Cake Pops in Mini Potted Delights
Ingredients
Equipment
Method
- Pulverize the cookies to fine crumbs in a food processor. Combine the crumbs with the cream cheese in a large bowl and knead together with your hands. Press the cookie mixture into the cavities of the silicone canelé mold tightly until overflowing. Use a knife to cut away the excess cookie mixture, creating a flat even surface. Freeze until solid, about 1 hour. Remove from molds and place on a wire rack.
- Combine the powdered sugar and corn syrup in a medium bowl. Add milk 1 tablespoon at a time until a thick glaze is formed. Add food color; mix. Add additional milk until the mixture is thick but still pourable. Use a spoon to cover the cookie shapes with the glaze. Let stand until the excess glaze has run off the sides and then sprinkle with white jimmies. Refrigerate until firm, about 1 hour.
- Preheat oven to 350°F. Place 6 cupcake liners in a muffin pan. Combine the egg, milk, vegetable oil, vanilla, and coffee in a large glass measure. Stir together well. In a separate large bowl, combine the flour, sugar, cocoa powder, baking powder, and salt. Pour the wet ingredients into the dry ingredients and mix until incorporated. Divide the batter evenly between cupcake liners. Bake for 13-15 minutes, or until the tops spring back when touched. Let cool completely.
- Cut the domes off of the cupcakes and save for later. Place a cupcake in each pot and cover with 2 tablespoons of chocolate spread. Place the green cactus portion on top, pressing it into the cupcake slightly. Sprinkle cacao nibs around the edges of the cactus portion where the chocolate spread is exposed. Top each cactus with a fondant or ready-made flower.