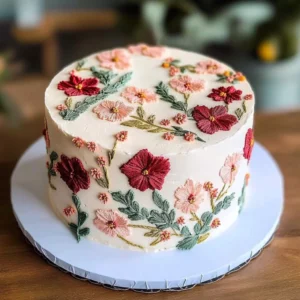
Imagine slicing into a cake that not only dazzles the eyes but also tempts the taste buds with layers of sweet, buttery goodness. An embroidery cake is not just a dessert; it’s a masterpiece that brings together elegant designs and delightful flavors, making every bite feel like a celebration. The vibrant colors and intricate patterns can easily steal the show at any gathering, whether it’s a birthday bash or an anniversary party, enticing everyone to take just one more slice.

Jump to:
Every time I see an embroidery cake, I’m transported back to my grandmother’s kitchen, where she would whip up her famous confections while humming her favorite tunes. The aroma of vanilla and almond wafting through the air was enough to make anyone forget their worries. This delightful cake isn’t just meant for special occasions; it’s a reminder of cherished memories and the joy of sharing delicious moments with loved ones. Get ready to embark on a flavor journey that promises to elevate your dessert game!
Why Is Embroidery cake So Irresistibly Good?
Delightful design: This cake’s stunning embroidery-like patterns make it a feast for the eyes, perfect for any celebration.
Simple ingredients: With everyday staples like flour, sugar, and eggs, you can create something extraordinary without a trip to specialty stores.
Quick prep: In just 30 minutes of prep and 25 minutes of baking, you’ll have a showstopper that won’t keep you in the kitchen all day.
Versatile flavors: Customize the buttercream frosting with vibrant colors and flavors to match any occasion or theme, ensuring it suits your unique style.
Crowd-pleaser: Its beautiful appearance and delicious taste will impress guests, making it a memorable centerpiece for birthdays, weddings, or family gatherings!
Embroidery cake Ingredients
- For the Cake
- 1 cup all-purpose flour – This forms the base of your cake, providing structure and texture.
- 1 cup granulated sugar – Sweetens the cake while helping to create a moist crumb.
- 1/2 cup unsalted butter (softened) – Adds richness and flavor to your cake; make sure it’s at room temperature for easy mixing.
- 2 large eggs – These bind the ingredients together and contribute to the cake’s moisture and fluffiness.
- 1/2 cup milk – Enhances the cake’s moisture and helps achieve a tender crumb.
- 1 tbsp baking powder – This leavening agent ensures your cake rises beautifully during baking.
- 1 tsp vanilla extract – Infuses a lovely flavor that complements the sweetness of the cake.
- 1/4 tsp salt – Enhances all the flavors in your cake, making them more pronounced.
- For the Buttercream Frosting
- 1 cup unsalted butter (softened) – Vital for a creamy texture; ensure it’s softened for easy blending.
- 4 cups powdered sugar – Provides sweetness and structure to your frosting; sift it for a smoother consistency.
- 1/4 cup heavy cream – Adds richness and helps achieve the perfect spreadable consistency for decorating.
- 1 tsp vanilla extract – Enhances the overall flavor of your frosting, making it irresistible.
- food coloring various colors (for decoration) – Use to create vibrant designs that mimic beautiful embroidery on your cake.
How to Make Embroidery cake
1. Preheat the oven to 350°F (175°C). Grease and flour a cake pan to ensure your cake releases easily after baking. The perfect start for your delightful Embroidery cake!
2. Cream together the softened butter and granulated sugar in a mixing bowl until light and fluffy. This will create a wonderful base that adds sweetness and moisture to your cake.
3. Add the eggs one at a time, mixing well after each addition. This step helps to incorporate air into the batter, leading to a light and airy texture.
4. Stir in the milk and vanilla extract, blending until smooth. The milk adds richness while the vanilla infuses a lovely aroma that fills your kitchen with warmth.
5. Combine the all-purpose flour, baking powder, and salt in another bowl. Gradually add this dry mixture to the wet ingredients, mixing until just combined for a tender crumb.
6. Pour the batter into the prepared cake pan and smooth the top with a spatula. This ensures even baking and creates a beautiful surface for decorating later.
7. Bake for 25-30 minutes or until a toothpick inserted into the center comes out clean. Your kitchen will soon be filled with delicious scents as it bakes!
8. Allow the cake to cool completely before frosting it. Patience is key here; cooling ensures that your buttercream frosting won’t melt when applied.
For the Buttercream Frosting:
9. Prepare the buttercream by beating the softened butter until creamy in texture. This step is crucial for achieving that exquisite fluffiness you’ll want on your cake.
10. Gradually add powdered sugar and heavy cream, mixing until smooth and fluffy. This luscious frosting will perfectly complement your embroidered designs!
11. Divide the frosting into separate bowls and tint with food coloring as desired. Get creative! This is where you can let your artistic side shine through.
12. Use a piping bag to create beautiful embroidery designs on the cooled cake, showcasing your talent and love in every swirl and twirl of frosting.
13. Let the decorated cake set before serving, allowing those intricate designs to firm up just enough for slicing later on.
Optional: Add edible glitter for an extra touch of sparkle!
Exact quantities are listed in the recipe card below.
Expert Tips
- Perfect Texture: Ensure your butter is softened, not melted, for a light and fluffy cake. This will help achieve that perfect texture in your embroidery cake.
- Egg Addition: Add eggs one at a time, mixing well after each. This helps emulsify the batter and prevents any curdling for a smooth cake base.
- Cool Completely: Allow the cake to cool completely before frosting. Frosting a warm cake can lead to sliding and unwanted mess on your beautiful embroidery cake designs.
- Color Mixing: When tinting your buttercream, start with a small amount of food coloring. You can always add more, but it’s hard to lighten the color once it’s too dark!
- Piping Practice: If you’re new to piping, practice your embroidery designs on parchment paper first. This will build your confidence and ensure clean lines on the actual cake.
- Set Time: Let the decorated embroidery cake set for at least 30 minutes before serving. This helps the frosting firm up and makes for cleaner slices!
How to Store and Freeze Embroidery cake

- Room Temperature: Keep your Embroidery cake covered with a cake dome or wrapped in plastic wrap for up to 3 days to maintain freshness.
- Fridge: If you need to store it longer, place the cake in an airtight container in the fridge for up to a week.
- Freezer: For extended storage, slice the Embroidery cake and wrap individual pieces tightly in plastic wrap and foil. Freeze for up to 3 months.
- Reheating: Allow frozen slices to thaw at room temperature before enjoying. You can also warm them gently in the microwave for a few seconds if desired.
Embroidery cake Your Way
Feel free to unleash your creativity and make this delightful cake uniquely yours with these fun twists!
- Gluten-Free: Substitute all-purpose flour with a 1:1 gluten-free baking blend for a light and fluffy texture. This way, everyone can enjoy the beauty of this cake without worry. Just ensure that your baking powder is also gluten-free for the best results!
- Lemon Zest: Add 1 tablespoon of fresh lemon zest to the batter for a bright, citrusy twist. The hint of lemon will complement the sweetness beautifully. It’s like a burst of sunshine in every slice, perfect for spring celebrations!
- Chocolate Lovers: Replace 1/4 cup of flour with unsweetened cocoa powder for a rich chocolate version. This indulgent twist will satisfy any chocolate craving while keeping the integrity of your embroidery design intact. Each slice will be a delightful surprise for your guests!
- Almond Extract: Swap vanilla extract with almond extract for a nutty flavor profile. This subtle change adds an aromatic depth that pairs wonderfully with your frosting. Your family and friends will be asking for seconds after tasting this luscious variation!
- Buttermilk Magic: Use buttermilk instead of regular milk to create an ultra-moist cake with a tender crumb. The tanginess from buttermilk enhances the overall flavor, making each bite memorable. It’s an easy switch that elevates your homemade treat!
- Spicy Kick: Incorporate a pinch of cayenne or cinnamon into the batter for a surprising hint of warmth. This unexpected touch can elevate the flavor and intrigue your taste buds. Just enough spice to keep things interesting without overwhelming sweetness!
- Nutty Crunch: Fold in 1/2 cup of finely chopped nuts, such as walnuts or pecans, into the batter for added texture. Not only do they provide crunch, but they also bring depth to the flavor profile. It’s a delightful way to enhance both taste and presentation!
Make Ahead Options
Preparing an embroidery cake is a delightful way to celebrate special occasions, and it’s perfect for meal prep! You can make the cake batter ahead of time by creaming together 1/2 cup of softened unsalted butter with 1 cup of granulated sugar, then adding in the 2 large eggs, 1/2 cup of milk, and 1 tsp of vanilla extract before combining with the dry ingredients. Once baked, your cake can be stored at room temperature for up to 24 hours or refrigerated for up to 3 days to maintain its moistness. The buttercream frosting can also be prepared in advance; simply beat together 1 cup of softened butter with 4 cups of powdered sugar and 1/4 cup of heavy cream, which will stay fresh in the fridge for about a week. When you’re ready to serve your stunning embroidery cake, simply frost it and add your colorful decorations using a piping bag. This way, you save time while still delivering a beautifully decorated treat!
Embroidery cake Recipe FAQs
What kind of flour should I use for the Embroidery cake?
All-purpose flour works beautifully for this recipe. It provides the right texture and structure for your cake. If you want a gluten-free option, you can try using a gluten-free all-purpose flour blend, but be sure to check that it contains a binder like xanthan gum.
How should I store my decorated Embroidery cake?
To keep your masterpiece fresh, store the decorated cake in an airtight container at room temperature for up to 2 days. If you need to keep it longer, refrigerate it for up to a week. Just remember that chilling may slightly alter the frosting’s texture, so allow it to come back to room temperature before serving.
Can I freeze the Embroidery cake?
Absolutely! You can freeze the un-frosted cake for up to 3 months. Just wrap it tightly in plastic wrap followed by aluminum foil to prevent freezer burn. When you’re ready to enjoy it, let it thaw in the fridge overnight before frosting and decorating.
How can I achieve different colors for my buttercream frosting?
Using food coloring is easy and fun! Start with a small amount of gel or liquid food coloring and mix it into your buttercream until you reach the desired shade. Always add a little at a time since colors can intensify quickly. For vibrant hues, gel colors work best as they don’t thin out your frosting.
What if my cake sinks in the middle after baking?
If your Embroidery cake sinks in the middle, it could be due to underbaking or too much liquid in the batter. Be sure to bake until a toothpick inserted into the center comes out clean, which usually takes about 25-30 minutes at 350°F (175°C). Letting the batter rest too long before baking can also lead to sinking, so try to pour it into the pan immediately after mixing.
How many servings does this Embroidery cake yield?
This recipe yields about 4 generous servings. Perfect for a small gathering or special occasion! If you’re expecting more guests, consider doubling the recipe and using two layers for an even more stunning presentation. Each serving has approximately 450 calories, making it a delightful treat without going overboard!
Embroidery Cake
Ingredients
Method
- Preheat the oven to 350°F (175°C). Grease and flour a cake pan.
- In a mixing bowl, cream together the softened butter and sugar until light and fluffy.
- Add the eggs one at a time, mixing well after each addition.
- Stir in the milk and vanilla extract.
- In another bowl, combine the flour, baking powder, and salt. Gradually add to the wet ingredients, mixing until just combined.
- Pour the batter into the prepared cake pan and smooth the top.
- Bake for 25-30 minutes or until a toothpick inserted into the center comes out clean.
- Allow the cake to cool completely before frosting.
- Prepare the buttercream frosting by beating the softened butter until creamy.
- Gradually add the powdered sugar and heavy cream, mixing until smooth and fluffy.
- Divide the frosting into separate bowls and tint with food coloring as desired.
- Use a piping bag to create embroidery designs on the cooled cake.
- Let the decorated cake set before serving.