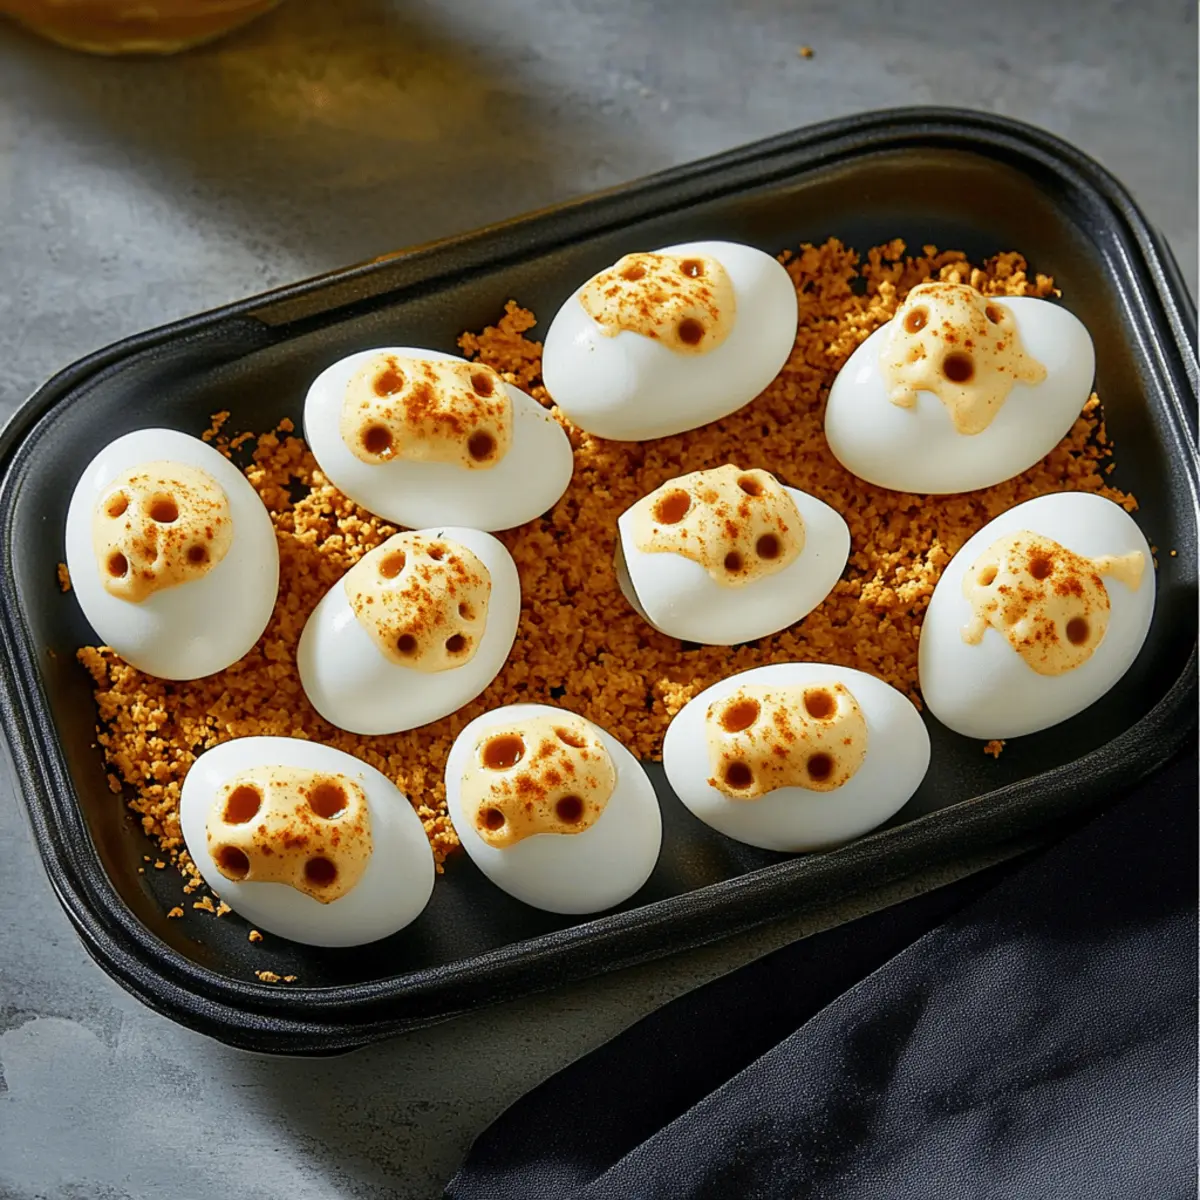
Sometimes the simplest ingredients can lead to the spookiest culinary creations. Skull-shaped deviled eggs are not only a delightful ode to Halloween but also a crowd-pleaser that balances flavor and fun. Just imagine the looks of surprise and laughter when your friends and family see these eerie yet scrumptious treats on the table.
Jump to:
- <strong>Ingredients for Skull-Shaped Deviled Eggs</strong>
- <strong>How to Make Skull-Shaped Deviled Eggs</strong>
- <strong>Perfecting Skull-Shaped Deviled Eggs Cooking Process</strong>
- <strong>Add Your Touch to Skull-Shaped Deviled Eggs</strong>
- <strong>Storing & Reheating Skull-Shaped Deviled Eggs</strong>
- FAQs About Skull-Shaped Deviled Eggs
- What is Skull-Shaped Deviled Eggs?
- How do I make my Skull-Shaped Deviled Eggs stand out?
- Can I prepare Skull-Shaped Deviled Eggs in advance?
- What are some variations for Skull-Shaped Deviled Eggs?
- Conclusion for Skull-Shaped Deviled Eggs
These Skull-Shaped Deviled Eggs become an instant hit at any Halloween party, family gathering, or festive potluck. With creamy yolks mixed with savory ingredients, the flavor is to die for while the fun presentation steals the show. Excited yet? Let’s dive into this delightful recipe that perfectly marries taste with creativity while adding a pinch of whimsy.
Why You'll Love This Skull-Shaped Deviled Eggs
- This incredible Skull-Shaped Deviled Eggs transforms simple everyday ingredients into restaurant-quality flavors that will blow your mind completely.
- Foolproof recipe techniques guarantee perfect results every single time, making even novice cooks feel like professional chefs instantly.
- Stunning visual appeal with gorgeous colors and mouthwatering aromas creates the ultimate Instagram-worthy dish for any special occasion.
- Endlessly adaptable for different dietary needs while working beautifully for meal prep, date nights, or entertaining large groups effortlessly.
Ingredients for Skull-Shaped Deviled Eggs
Here’s what you’ll need to make this delicious Skull-Shaped Deviled Eggs:
12 large eggs – Ensure they are fresh for the best flavor and texture.
1/4 cup mayonnaise – This creamy staple binds the filling and adds richness.
1/4 cup roasted sweet red pepper strips, finely chopped – These provide a sweet flavor and a pop of color.
2 teaspoons Dijon mustard – Its tangy bite is perfect for flavoring the yolk mixture.
2 teaspoons cider vinegar – This adds a slight acidity that balances the richness.
1 teaspoon paprika – Sprinkle in some smokiness to elevate the flavor profile.
1/4 teaspoon salt – Essential for enhancing all the flavors.
1/4 teaspoon pepper – A bit of spice to wake up your taste buds.
1 cup finely crushed corn chips – For that extra crunch and visual appeal.
Whole corn chips (optional) – Use these for garnishing your presentation.
How to Make Skull-Shaped Deviled Eggs
Follow these simple steps to prepare this delicious Skull-Shaped Deviled Eggs:
Step 1: Boil the Eggs
Place the eggs in a large pot and cover them with water. Turn the heat to high and once it reaches a rolling boil, cover the pot and remove it from the heat. Let the eggs sit for about 12 to 15 minutes.
Step 2: Cool and Peel
After the eggs are cooked, transfer them to an ice bath to cool for about 10 minutes. Once cooled, gently tap each egg to crack the shell and start peeling. Rinse under running water to remove any stubborn bits of shell.
Step 3: Prepare the Filling
Cut the eggs in half lengthwise and carefully remove the yolks into a mixing bowl. Mash the yolks with a fork until they are clumpy. Mix in the mayonnaise, chopped peppers, Dijon mustard, cider vinegar, paprika, salt, and pepper until everything is well combined and creamy.
Step 4: Create the Skulls
Here’s where the fun begins! Using a large straw, carefully poke holes to create eye sockets and a nose on each egg white, shaping them into skull forms. You can use a smaller straw for details like the mouth.
Step 5: Fill the Egg Whites
Spoon or pipe the yolk mixture generously back into the skull-shaped egg whites, making sure to fill them up nicely. The filling should be heaping and look inviting.
Step 6: Coat with Crunch
Pour the crushed corn chips into a shallow bowl. Dip each exposed yolk part into the chips, ensuring they stick well to make the finish perfectly crunchy.
To serve, arrange the skulls on a platter and if you desire, surround them with whole corn chips for added fun. Cover and refrigerate until it’s time to unveil your delightful creations. With every bite, you’ll find yourself reveling in the creamy, tangy taste balanced beautifully by the crunchy exterior – a truly out-of-this-world treat!
Get ready to impress your friends with these Skull-Shaped Deviled Eggs that not only tantalize the taste buds but also create a spectacular visual display worthy of any haunted gathering. Happy Halloween and enjoy your culinary adventure; may your deviled eggs reign supreme at the party!

You Must Know About Skull-Shaped Deviled Eggs
- This showstopping Skull-Shaped Deviled Eggs delivers restaurant-quality results using simple ingredients you probably already have at home.
- The perfect balance of textures and flavors creates an unforgettable dining experience that will have everyone asking for seconds.
- Picture-perfect presentation with vibrant colors makes this dish absolutely Instagram-worthy and guaranteed to impress any dinner guest.
- Incredibly versatile recipe that works beautifully for weeknight dinners, meal prep, special occasions, or even outdoor entertaining sessions.
Perfecting Skull-Shaped Deviled Eggs Cooking Process
Start by boiling and cooling your eggs first; this way, you have time to prepare the yolk filling. After mashing the yolks, focus on decorating the egg whites before filling them. This keeps everything organized and helps you avoid any kitchen chaos.
Add Your Touch to Skull-Shaped Deviled Eggs
Feel free to swap out mayonnaise for Greek yogurt for a healthier option. You can also add ingredients like diced jalapeños for spice or bacon bits for an extra crunch. The beauty of Skull-Shaped Deviled Eggs lies in your creativity!
Storing & Reheating Skull-Shaped Deviled Eggs
Store your Skull-Shaped Deviled Eggs in an airtight container in the refrigerator for up to 3 days. It’s best to keep the crushed corn chips separate until you’re ready to serve to maintain their crunchiness.
Chef's Helpful Tips for Skull-Shaped Deviled Eggs
- This professional-quality Skull-Shaped Deviled Eggs relies on precise timing and temperature control to achieve restaurant-standard results consistently.
- Master the art of mise en place by prepping all ingredients beforehand, ensuring smooth execution and preventing any last-minute cooking disasters.
- The secret lies in layering flavors throughout the cooking process rather than seasoning only at the end for maximum depth.
- Pro tip: let the finished dish rest for optimal texture and flavor development before serving to hungry guests waiting eagerly.
Sharing this delightful Skull-Shaped Deviled Eggs recipe reminded me of the last Halloween party I hosted, where my friends couldn’t stop raving about how delicious they were—a bittersweet victory when I realized I had to make them every year now!

FAQs About Skull-Shaped Deviled Eggs
What is Skull-Shaped Deviled Eggs?
Skull-Shaped Deviled Eggs are a fun and spooky take on the classic deviled egg appetizer. These eggs are halved, with the yolk mixture creatively piped into the egg whites to resemble a skull face. Topped with crunchy corn chips that create a delightful visual effect, they are perfect for Halloween gatherings, parties, or any festive occasion where you want to impress your guests while delivering delicious flavors.
How do I make my Skull-Shaped Deviled Eggs stand out?
To make your Skull-Shaped Deviled Eggs more visually appealing, consider adding colors and textures. Incorporate vibrant roasted red peppers for sweetness and garnish with a sprinkle of paprika or some fresh herbs for an extra pop. You can also experiment with different toppings, like crumbled bacon or spicy jalapeños, to give your guests a flavor surprise. The key is to mix creativity with classic ingredients to make these deviled eggs a showstopper.
Can I prepare Skull-Shaped Deviled Eggs in advance?
Yes, preparing Skull-Shaped Deviled Eggs in advance is possible, making them an ideal option for busy party planners. You can boil and prepare the eggs up to two days in advance. Just keep the egg whites and the filling separate until you’re ready to serve. This will ensure that the skins don’t get soggy, and that crunch factor remains intact. Assemble them fresh right before the party for the best presentation!
What are some variations for Skull-Shaped Deviled Eggs?
You can customize Skull-Shaped Deviled Eggs to match your taste. A simple variation includes using Greek yogurt instead of mayonnaise for a healthier twist. For those who appreciate a touch of spice, add chopped jalapeños or a dash of hot sauce to the yolk mixture. Maybe for a gourmet flair, incorporate truffle oil or smoked salmon—it all depends on your creativity and your guests’ preferences!
Conclusion for Skull-Shaped Deviled Eggs
In conclusion, Skull-Shaped Deviled Eggs are not only visually captivating but also deliciously satisfying. This fun twist on a classic dish brings a delightful element to your Halloween celebrations or any festive occasion. With various customization options available, you can make these Skull-Shaped Deviled Eggs truly your own. Prepare to wow your guests while offering them a tasty treat they won’t forget! Remember, the beauty of this recipe lies not only in its spooky appearance but also in the delicious flavors that bring smiles to every face.
Skull-Shaped Deviled Eggs Recipe for a Spooktacular Halloween
Ingredients
Equipment
Method
- Cut eggs lengthwise in half. Remove yolks, reserving whites.
- In a small bowl, mash yolks. Stir in mayonnaise, peppers, mustard, vinegar, paprika, salt and pepper until blended.
- Using a small and a large straw, decorate each egg white to make a skull with eyes, a nose and a mouth.
- Spoon or pipe yolk mixture into egg whites.
- Place crushed chips in a shallow bowl. Dip each exposed yolk into chips.
- Refrigerate, covered, until serving. If desired, garnish plate with whole corn chips.