The aroma of freshly baked donuts is enough to pull anyone’s heartstrings, but when you transform those sugary delights into irresistible donut-style cake pops, well, that’s just pure magic. These delightful little treats promise a masterclass in flavor and presentation, perfect for any occasion that calls for a touch of ageless charm and sweet nostalgia.

Jump to:
- <strong>Ingredients for Donut-Style Cake Pops</strong>
- <strong>How to Make Donut-Style Cake Pops</strong>
- <strong>Perfecting Donut-Style Cake Pops Cooking Process</strong>
- <strong>Add Your Touch to Donut-Style Cake Pops</strong>
- <strong>Storing & Reheating Donut-Style Cake Pops</strong>
- FAQs About Donut-Style Cake Pops
- What is Donut-Style Cake Pops?
- How do you make Donut-Style Cake Pops?
- Can I customize my Donut-Style Cake Pops?
- How should I store Donut-Style Cake Pops?
- Conclusion for Donut-Style Cake Pops
Imagine indulging in a bite-sized piece of heaven that combines the moist, rich flavors of your favorite cake donut hole, elegantly dressed in smooth, melted chocolate. Whether it’s a birthday party, holiday gathering, or just a cozy night in, these donut cake pops are bound to spark joy and smiles all around. You’ll be pleasantly surprised at how simple and fun they are to whip up, making them a perfect project for seasoned bakers and curious newbies alike.
Why You'll Love This Donut-Style Cake Pops
- These donut-style cake pops transform simple everyday ingredients into restaurant-quality flavors that will blow your mind completely.
- Foolproof recipe techniques guarantee perfect results every time, making even novice cooks feel like professional chefs instantly.
- Stunning visual appeal with gorgeous colors and mouthwatering aromas creates the ultimate Instagram-worthy dish for any special occasion.
- Endlessly adaptable for different dietary needs while working beautifully for meal prep, date nights, or entertaining large groups effortlessly.
Ingredients for Donut-Style Cake Pops
Here’s what you’ll need to make this delicious Donut-Style Cake Pops:
24 (6-inch) cake pop sticks – Essential for creating perfect pops that are easy to hold and enjoy.
24 old-fashioned cake donut holes – The star of the show! Choose your favorite flavor for an extra zing.
10-12 ounces melting wafers OR candy melts – Either option works wonders for a smooth, chocolatey coating; choose a fun color!
1 tablespoon coconut oil – This will add a touch of sheen to your melted chocolate, making it glisten beautifully.
Sprinkles – Because what’s a cake pop without a colorful shower of sprinkles to add that festive flair?
How to Make Donut-Style Cake Pops
Follow these simple steps to prepare this delicious Donut-Style Cake Pops:
Step 1: Line the Baking Sheet
Prepare your workspace by lining a baking sheet with parchment paper or wax paper to prevent sticking.
Step 2: Melt the Chocolate
In a microwave-safe bowl, combine the melting wafers or candy melts with the coconut oil. Heat in 30-second increments, stirring after each interval until the mixture is completely melted and smooth.
Step 3: Insert the Sticks
Dip the end of each cake pop stick into the melted chocolate, then insert it about two-thirds of the way into a donut hole. This will help the stick stay put when you dip the entire pop. Place them on the lined baking sheet.
Step 4: Chill the Cake Pops
Pop the cake pops into the freezer for about 5 minutes or into the fridge for 10 minutes to allow the chocolate to set and chill, ensuring it holds the stick firmly.
Step 5: Dip the Cake Pops
Remove them from the freezer or fridge and dip each donut cake pop into the melted chocolate, swirling it gently to let the excess drip off. This step is key to achieving that perfect, smooth finish.
Step 6: Add the Sprinkles
While the chocolate is still wet, sprinkle colorful sprinkles over the top! This is your time to get creative. Place the finished pops back on the baking sheet or into a cake pop stand so they can set.
After about 15 to 20 minutes at room temperature, your donut-style cake pops will be ready to dazzle everyone with their sweetness. Serve them on a platter, and watch as they instantly steal the spotlight! Feel free to get playful with flavor variations by mixing different donut types and chocolate coatings.
As you enjoy crafting these delightful treats, don’t forget to savor the bonding moments they create with family or friends. So gather your ingredients, roll up your sleeves, and let your creative side shine with these fabulous donut-style cake pops. They’ll not only be a treat to eat but also a joyful experience to make!

You Must Know About Donut-Style Cake Pops
- This showstopping Donut-Style Cake Pops delivers restaurant-quality results using simple ingredients you probably already have at home.
- The perfect balance of textures and flavors creates an unforgettable dining experience that will have everyone asking for seconds.
- Picture-perfect presentation with vibrant colors makes this dish absolutely Instagram-worthy and guaranteed to impress any dinner guest.
- Incredibly versatile recipe that works beautifully for weeknight dinners, meal prep, special occasions, or even outdoor entertaining sessions.
Perfecting Donut-Style Cake Pops Cooking Process
To perfect the cooking process, start by melting your chocolate while preparing the donut holes. Insert sticks into the holes first, then chill them to firm up before dipping them in the melted chocolate. This method ensures a smooth coating and perfect pops every time.
Add Your Touch to Donut-Style Cake Pops
Get creative with your Donut-Style Cake Pops by swapping chocolate for white chocolate or caramel melts. Try adding flavor extracts like vanilla or almond, or even crushed candies for a unique twist. The possibilities are endless to personalize your treat!
Storing & Reheating Donut-Style Cake Pops
Store your Donut-Style Cake Pops in an airtight container at room temperature for up to a week. If you need to reheat them, a quick blast in the microwave for about 10 seconds can soften them without melting the chocolate coating.
Chef's Helpful Tips for Donut-Style Cake Pops
- This professional-quality Donut-Style Cake Pops relies on precise timing and temperature control to achieve restaurant-standard results consistently.
- Master the art of mise en place by prepping all ingredients beforehand, ensuring smooth execution and preventing any last-minute cooking disasters.
- The secret lies in layering flavors throughout the cooking process rather than seasoning only at the end for maximum depth.
- Pro tip: let the finished dish rest for optimal texture and flavor development before serving to hungry guests waiting eagerly.
Sharing these donut cake pops at a family gathering was a hit! My cousin’s reaction—eyes wide and wondering how something so simple could taste so delightful—was priceless and made the effort totally worthwhile.

FAQs About Donut-Style Cake Pops
What is Donut-Style Cake Pops?
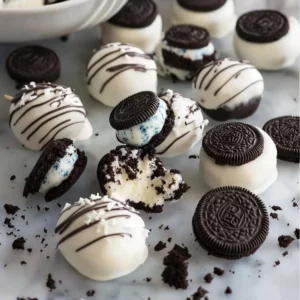
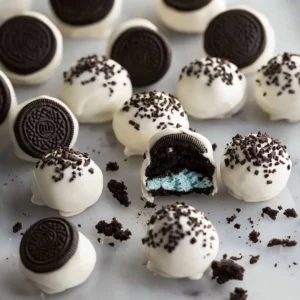
Donut-Style Cake Pops are delightful treats that combine the light and fluffy goodness of cake donuts with the fun and festivity of cake pops. These treats come together using classic donut holes, coated in melted chocolate or candy melts, and adorned with colorful sprinkles. Perfect for parties, gatherings, or just a sweet craving, they deliver a delicious flavor and an irresistible visual appeal. Not only are they quick and easy to make, but they also offer endless possibilities for customization with different coatings and toppings.
How do you make Donut-Style Cake Pops?
Making Donut-Style Cake Pops is a simple process that requires just a few ingredients. Start by inserting sticks into old-fashioned cake donut holes. After that, chill them briefly to ensure they hold the stick securely. Melt your choice of chocolate or candy melts, then dip each donut pop into the coating, allowing it to drip into a jaw-dropping chocolate layer. Finish by adding sprinkles and let them set at room temperature. It’s that easy!
Can I customize my Donut-Style Cake Pops?
Absolutely! One of the best parts about creating Donut-Style Cake Pops is the endless opportunities for customization. You can use different flavors of chocolate, like white chocolate or milk chocolate, to coat your pops. Additionally, try incorporating flavor extracts, such as vanilla or almond, or even crushed candies for a unique texture. Sprinkles, nuts, and drizzles of additional chocolate can all enhance the visual appeal and taste of your cake pops, making them truly personal.
How should I store Donut-Style Cake Pops?
To keep your Donut-Style Cake Pops fresh, store them in an airtight container at room temperature. They’ll stay delicious for up to a week. If you want to prolong their life, consider refrigerating them; however, be mindful that refrigeration can sometimes affect the chocolate’s texture. For a quick softening, a gentle blast in the microwave for about 10 seconds can rejuvenate your cake pops without melting the coating, making them irresistibly tasty when you’re ready to indulge again.
Conclusion for Donut-Style Cake Pops
Donut-Style Cake Pops are a delightful treat that combines the best flavors of donuts and cake into a fun, portable snack. With their colorful coating and easy customization, they can brighten up any party or snack table. Whether you create them for special occasions or casual gatherings, these treats will surely impress friends and family. Give this recipe a try, and join in on the fun of making and enjoying Donut-Style Cake Pops!
Delicious Donut-Style Cake Pops
Ingredients
Equipment
Method
- Line a baking sheet with parchment paper or wax paper.
- Add the melting wafers or candy melts and coconut oil into a microwave-safe bowl. Heat in 30-second increments, stirring after each one, until completely melted and smooth.
- Dip the end of the cake pop stick into the melted chocolate and then insert the stick 2/3 of the way into the donut hole. Place it on the prepared baking sheet.
- Repeat with the remaining donut holes and cake pop sticks.
- Place the donut cake pops into the freezer for 5 minutes, or the fridge for 10 minutes, to set and chill.
- Dip the donut cake pops into the melted chocolate. Swirl the cake pop in a circular pattern over the chocolate to allow the excess chocolate to drip off.
- Immediately add sprinkles to the cake pop. Place the cake pop onto the baking sheet or into a cake pop stand.
- Let the cake pops set at room temperature for 15-20 minutes until the chocolate is set and hardened.