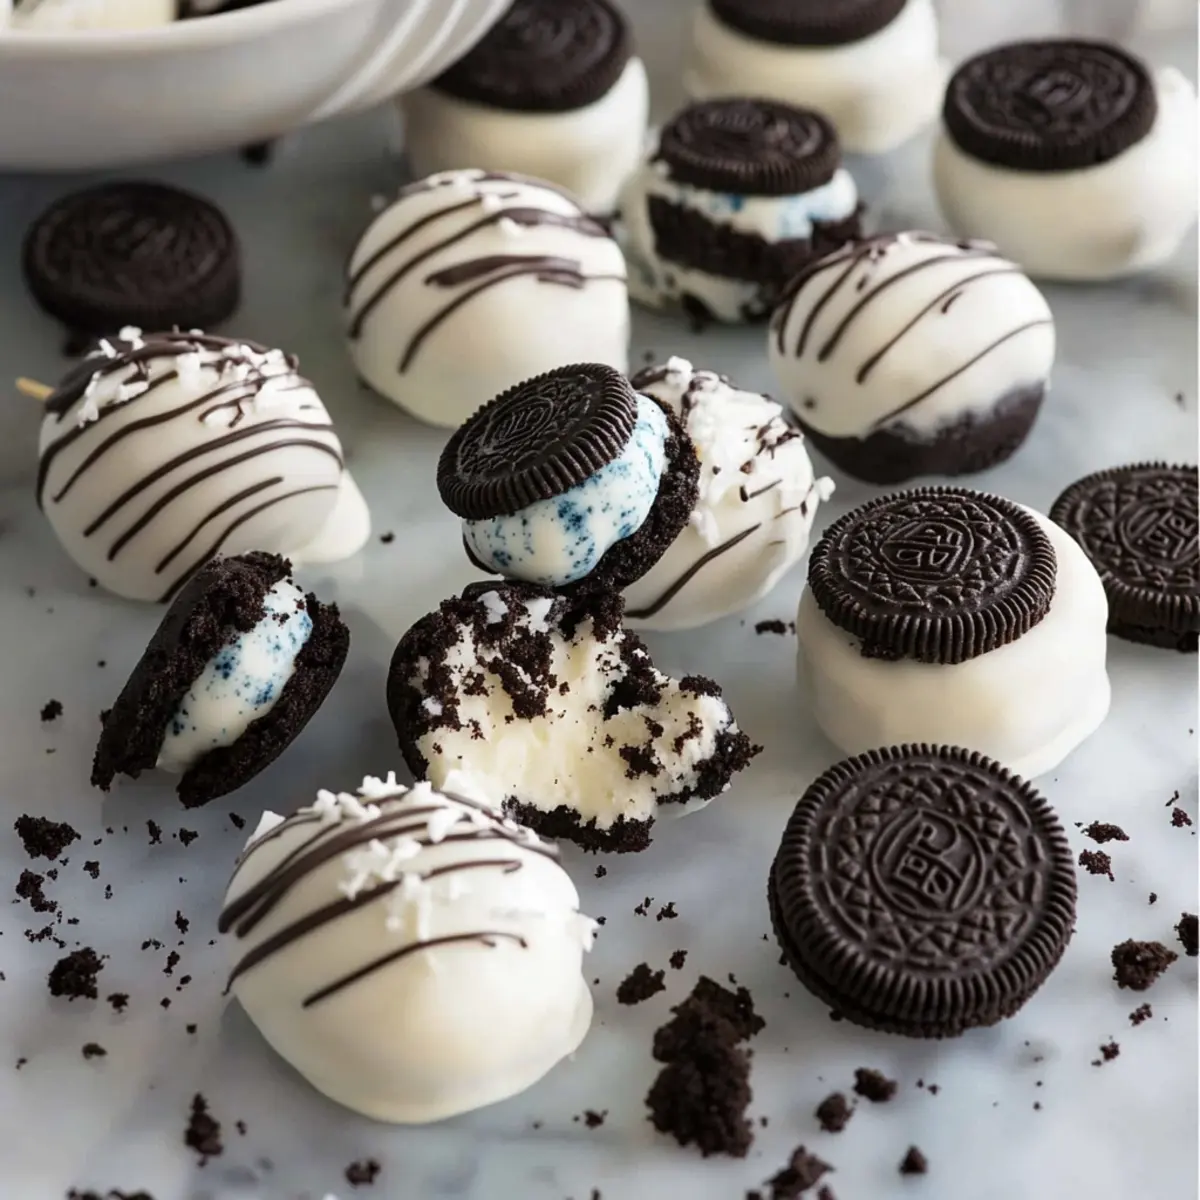
The moment you hear the phrase “Blue Oreo-Filled Cake Pops,” you know you’re in for a treat that?s both cute and decadent. Imagine biting into a sweet ball of creamy, Oreo bliss that surprises you with its vibrant blue hue?one that makes your inner child squeal with delight! Packed with rich flavors and the perfect crunch, these little delights are not just a feast for the taste buds; they’re also a visual extravaganza that will light up any occasion.
Jump to:
- <strong>Ingredients for Blue Oreo-Filled Cake Pops</strong>
- <strong>How to Make Blue Oreo-Filled Cake Pops</strong>
- <strong>Perfecting Blue Oreo-Filled Cake Pops Cooking Process</strong>
- <strong>Add Your Touch to Blue Oreo-Filled Cake Pops</strong>
- <strong>Storing & Reheating Blue Oreo-Filled Cake Pops</strong>
- FAQs About Blue Oreo-Filled Cake Pops
- What are Blue Oreo-Filled Cake Pops?
- How do I make Blue Oreo-Filled Cake Pops?
- Can I customize Blue Oreo-Filled Cake Pops?
- How should I store Blue Oreo-Filled Cake Pops?
- Conclusion for Blue Oreo-Filled Cake Pops
Nothing sets the mood for fun like these delightful Blue Oreo-Filled Cake Pops. They?re the perfect treat for birthdays, holiday gatherings, or even just a rainy afternoon when you need a pick-me-up. So grab your apron, and let?s embark on a sweet journey filled with laughter, deliciousness, and a sprinkle of creative flair.
Why You'll Love This Blue Oreo-Filled Cake Pops
- This incredible Blue Oreo-Filled Cake Pops transforms simple everyday ingredients into restaurant-quality flavors that will blow your mind completely.
- Foolproof recipe techniques guarantee perfect results every single time, making even novice cooks feel like professional chefs instantly.
- Stunning visual appeal with gorgeous colors and mouthwatering aromas creates the ultimate Instagram-worthy dish for any special occasion.
- Endlessly adaptable for different dietary needs while working beautifully for meal prep, date nights, or entertaining large groups effortlessly.
Ingredients for Blue Oreo-Filled Cake Pops
Here’s what you’ll need to make this delicious Blue Oreo-Filled Cake Pops:
38 Oreo cookies ? These are the stars of our show, blending beautifully with the cream cheese to create the cake pop filling.
1 package (8-ounce/226g) cream cheese, room temperature ? The creamy element that binds everything together and adds richness to the mixture.
1 cup (180g) white or dark chocolate melting wafers ? Choose your favorite chocolate for the outer coating, making sure it melts smoothly for a perfect dip.
Optional Decorations: Consider using extra Oreo crumbs, melted chocolate drizzle, or sprinkles for that fun pop of color and texture!
How to Make Blue Oreo-Filled Cake Pops
Follow these simple steps to prepare this delicious Blue Oreo-Filled Cake Pops:
Step 1: Prepare the Oreos
Start by placing the Oreos in a food processor. Pulse until they resemble fine crumbs. This step is critical as it creates the perfect base for our yummy bites.
Step 2: Mix the Filling
Transfer the cookie crumbs into a bowl. Add the cream cheese and beat on medium-low speed until the mixture is well combined and creamy. This luscious mixture is your pop’s soul!
Step 3: Roll into Balls
Using a tablespoon-sized cookie scoop, portion the Oreo-cream cheese mixture, and roll each portion into a ball. Place your freshly formed balls onto a parchment paper-lined baking sheet. Cover them up and pop them into the fridge for at least 1 hour, or up to 2 days if you like to procrastinate!
Step 4: Melt the Chocolate
When you’re ready to dip, place your chosen chocolate in a heat-proof bowl. Microwave on high for 30 seconds, then stir. Keep microwaving in 15-second increments, stirring between each, until the chocolate is smooth and silky.
Step 5: Dip and Decorate
Take each chilled Oreo ball and dip it into the melted chocolate using a skewer or fork, letting the excess chocolate drip away. Place them back on the parchment paper and immediately sprinkle on any decorations you fancy.
Step 6: Chill and Serve
Refrigerate the dipped cake pops for about an hour until the chocolate sets. Once ready, serve them as a festive treat or use them as a fun centerpiece for your dessert table!
Now that you’ve made these tempting Blue Oreo-Filled Cake Pops, get ready to watch them disappear faster than you can say “sweet tooth!” Whether you’re popping them in your mouth or sharing with friends, they’re sure to be a hit. Enjoy the rich, creamy, and delightful experience of every single bite!
You Must Know About Blue Oreo-Filled Cake Pops
- This showstopping Blue Oreo-Filled Cake Pops delivers restaurant-quality results using simple ingredients you probably already have at home.
- The perfect balance of textures and flavors creates an unforgettable dining experience that will have everyone asking for seconds.
- Picture-perfect presentation with vibrant colors makes this dish absolutely Instagram-worthy and guaranteed to impress any dinner guest.
- Incredibly versatile recipe that works beautifully for weeknight dinners, meal prep, special occasions, or even outdoor entertaining sessions.
Perfecting Blue Oreo-Filled Cake Pops Cooking Process
Begin by preparing the cake batter. Bake it according to your recipe and let it cool. While the cake is cooling, make the filling. Once both are ready, crumble the cake and mix with the filling to form uniform balls, then dip in chocolate.
Add Your Touch to Blue Oreo-Filled Cake Pops
Why not switch things up? Try adding crushed candy bars, chocolate chips, or even peanut butter to the filling. You can also customize the chocolate coating with different colors of melting wafers or sprinkles that match the occasion, making it even more festive!
Storing & Reheating Blue Oreo-Filled Cake Pops
Store the Blue Oreo-Filled Cake Pops in an airtight container in the refrigerator for up to a week. To enjoy them warm, simply microwave for about 5-10 seconds. Always keep an eye to prevent them from melting too much.
Chef's Helpful Tips for Blue Oreo-Filled Cake Pops
- This professional-quality Blue Oreo-Filled Cake Pops relies on precise timing and temperature control to achieve restaurant-standard results consistently.
- Master the art of mise en place by prepping all ingredients beforehand, ensuring smooth execution and preventing any last-minute cooking disasters.
- The secret lies in layering flavors throughout the cooking process rather than seasoning only at the end for maximum depth.
- Pro tip: let the finished dish rest for optimal texture and flavor development before serving to hungry guests waiting eagerly.
When I first made Blue Oreo-Filled Cake Pops for a friend’s birthday, the kids devoured them in minutes! The smiles on their faces made the effort so worthwhile, and it sparked a new birthday tradition in our circle.
FAQs About Blue Oreo-Filled Cake Pops
What are Blue Oreo-Filled Cake Pops?
Blue Oreo-Filled Cake Pops are delightful, no-bake treats made by combining crumbled cake and a creamy Oreo filling, all coated in colorful melted chocolate. These pops are perfect for celebrations and are easy to customize with various decorations. The striking blue color makes them visually appealing and ideal for themed parties. They are not only fun to make but also offer a delicious blend of flavors that will satisfy both kids and adults. Whether you serve them at a birthday bash or a casual gathering, these cake pops are sure to impress.
How do I make Blue Oreo-Filled Cake Pops?
Making Blue Oreo-Filled Cake Pops is quite simple! Start by baking your favorite cake and letting it cool. Next, crumble the cooled cake and mix it with a creamy Oreo filling. Roll the mixture into bite-sized balls and chill until firm. Once ready, dip the balls in melted chocolate or candy coating and let them harden. You can add sprinkles or drizzle with chocolate for extra flair. The full process takes a bit of time but is incredibly rewarding as you achieve a tasty and beautiful treat.
Can I customize Blue Oreo-Filled Cake Pops?
Absolutely! One of the best things about Blue Oreo-Filled Cake Pops is their versatility. You can mix in different flavors like peanut butter or mint into the filling for a unique twist. Additionally, you can choose different colors of chocolate to match your theme or occasion, and decorate them with fun toppings like crushed candies or edible glitter. This allows for personal creativity and makes every batch of cake pops a one-of-a-kind treat, tailored to your taste and style.
How should I store Blue Oreo-Filled Cake Pops?
To maintain their freshness, store Blue Oreo-Filled Cake Pops in an airtight container in the refrigerator for up to a week. For longer storage, they can be frozen for up to three months. When you?re ready to enjoy them, simply thaw them in the fridge for a few hours or microwave them for a few seconds to warm them slightly. This ensures they remain delicious and ready to please your taste buds whenever you crave them!
Conclusion for Blue Oreo-Filled Cake Pops
Blue Oreo-Filled Cake Pops are an exciting and visually stunning treat that brings joy to any occasion. With their vibrant color and delicious taste, they are sure to impress guests of all ages. This easy no-bake recipe allows for endless customization, ensuring that every batch is unique. Whether for a birthday celebration or a casual get-together, these cake pops make dessert fun and memorable. Don’t miss out on the chance to try these Blue Oreo-Filled Cake Pops at your next gathering!
Delicious Blue Oreo-Filled Cake Pops
Ingredients
Equipment
Method
- Place the Oreos in a food processor and pulse until ground into fine crumbs.
- Transfer the crushed Oreos to a large mixing bowl. Add the cream cheese and beat on medium-low speed until combined.
- Using a tablespoon-sized cookie scoop, portion the mixture and roll into balls. Place on a parchment paper-lined baking sheet. Cover and refrigerate for at least 1 hour.
- Melt the chocolate in a heat-proof bowl using the microwave, stirring every 15 seconds until completely melted.
- Dip each chilled ball in the melted chocolate and place back on parchment paper. Immediately add desired decorations.
- Chill the dipped balls for 1 hour or until set.