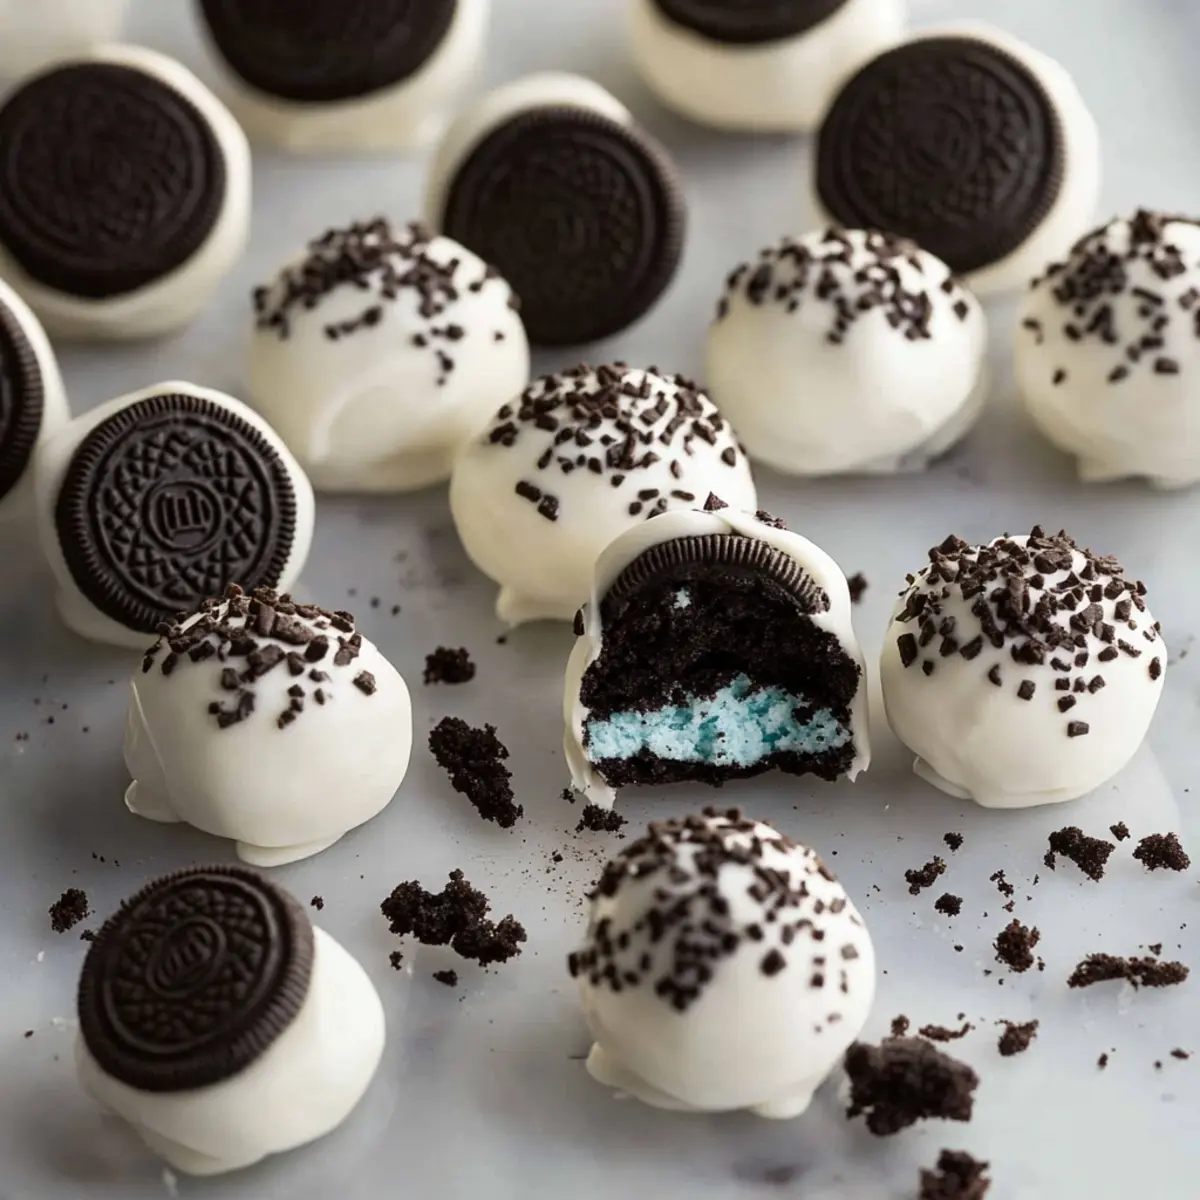
When life gives you Oreos, it?s time to make some fantastically fun Blue Oreo-Filled Cake Pops. Picture this: a deliciously creamy, sweet mixture hiding within a vibrant blue shell that would make even the most stylish peacock envious. As you take a bite, the rich chocolate flavor mingles beautifully with the faint sweetness of cream cheese, leaving you grinning from ear to ear. I remember the first time I made these little balls of joy?it was a rainy Saturday, and my friends and I decided to turn our gloomy day into a colorful celebration with these delightful treats. Perfect for parties or just because you can, these cake pops will brighten anyone?s day.
Jump to:
- <strong>Ingredients for Blue Oreo-Filled Cake Pops</strong>
- <strong>How to Make Blue Oreo-Filled Cake Pops</strong>
- <strong>Perfecting Blue Oreo-Filled Cake Pops Cooking Process</strong>
- <strong>Add Your Touch to Blue Oreo-Filled Cake Pops</strong>
- <strong>Storing & Reheating Blue Oreo-Filled Cake Pops</strong>
- <strong>FAQs About Blue Oreo-Filled Cake Pops</strong>
- What are Blue Oreo-Filled Cake Pops?
- How do I store Blue Oreo-Filled Cake Pops?
- Can I customize Blue Oreo-Filled Cake Pops?
- How do I make the chocolate coating for Blue Oreo-Filled Cake Pops?
- <strong>Conclusion for Blue Oreo-Filled Cake Pops</strong>
What?s more, the versatility of the Blue Oreo-Filled Cake Pops means you can whip them up for nearly any occasion?birthday parties, potlucks, or even for a sweet surprise for someone special. They?re a sheer delight to the eyes and a tasty chalice of happiness for the mouth. So, roll up your sleeves, grab those Oreos, and let?s create a treat that your family and friends won?t stop raving about.
Why You'll Love This Blue Oreo-Filled Cake Pops
- This incredible Blue Oreo-Filled Cake Pops transforms simple everyday ingredients into restaurant-quality flavors that will blow your mind completely.
- Foolproof recipe techniques guarantee perfect results every single time, making even novice cooks feel like professional chefs instantly.
- Stunning visual appeal with gorgeous colors and mouthwatering aromas creates the ultimate Instagram-worthy dish for any special occasion.
- Endlessly adaptable for different dietary needs while working beautifully for meal prep, date nights, or entertaining large groups effortlessly.
Ingredients for Blue Oreo-Filled Cake Pops
Here’s what you’ll need to make this delicious Blue Oreo-Filled Cake Pops:
38 Oreo cookies ? Choose Original or Double Stuf for an extra creamy center; these will form the base.
1 (8-ounce) package cream cheese ? Ensure it?s at room temperature for easy mixing, giving that luscious, creamy filling.
1 cup melting chocolate (white or dark) ? Use your favorite type, whether melting wafers or chocolate chips; they lend a beautiful outer coat.
Optional Decorations: Get creative! Include Oreo crumbs, melted chocolate drizzle, or colorful sprinkles for that extra flair.
How to Make Blue Oreo-Filled Cake Pops
Follow these simple steps to prepare this delicious Blue Oreo-Filled Cake Pops:
Step 1: Crush the Oreos
Start by placing the Oreo cookies in a food processor. Pulse until you have fine crumbs that resemble sand. This may remind you of some past beach vacation?minus the sunburn.
Step 2: Mix with Cream Cheese
Transfer the crushed Oreos into a large mixing bowl. Add in the room temperature cream cheese. Using an electric mixer, beat until everything is combined and no lumps remain. You want a smooth, velvety filling that makes you want to dive in with a spoon.
Step 3: Form the Cake Pops
Use a tablespoon-sized cookie scoop to portion out the Oreo mixture. Roll each piece into balls, about 1 inch in diameter. Place these delightful balls onto a parchment paper-lined baking sheet and refrigerate for at least an hour or up to two days if you can resist the temptation.
Step 4: Melt the Chocolate
In a heat-proof bowl, add your melting chocolate. Microwave it on high for 30 seconds, then stir. Continue microwaving in 15-second increments until melted and silky smooth. If it?s too thick, mix in a teaspoon of vegetable oil; this will help you achieve a glossy finish.
Step 5: Dip the Cake Pops
Once your Oreo balls are chilled, it?s time for their makeover! Using a skewer or fork, dip each ball into the melted chocolate, rolling it around to coat completely. Place them back on the parchment paper and sprinkle with Oreo crumbs or sprinkles while the chocolate is still melted. Get creative?this is your chance to make them pop!
Step 6: Set and Serve
Chill the dipped cake pops in the refrigerator for about an hour or until the chocolate coating sets. They are now ready to dazzle your friends and family. Serve them individually on cake pop sticks for added charm or display them on a festive platter for everyone to admire.
Transport your newfound treats to a gathering, or indulge in a couple (or ten) while binging your favorite show. There you have it?a guaranteed hit with a fun twist that?ll turn heads and sweeten hearts. Enjoy your dazzling Blue Oreo-Filled Cake Pops, and don?t forget to share (or not)!
You Must Know About Blue Oreo-Filled Cake Pops
- This showstopping Blue Oreo-Filled Cake Pops delivers restaurant-quality results using simple ingredients you probably already have at home.
- The perfect balance of textures and flavors creates an unforgettable dining experience that will have everyone asking for seconds.
- Picture-perfect presentation with vibrant colors makes this dish absolutely Instagram-worthy and guaranteed to impress any dinner guest.
- Incredibly versatile recipe that works beautifully for weeknight dinners, meal prep, special occasions, or even outdoor entertaining sessions.
Perfecting Blue Oreo-Filled Cake Pops Cooking Process
Sift through the steps: first, prepare your cake mix, then let it cool completely before filling it with that delightful crushed Oreo and cream cheese mixture. Finally, coat the pops with chocolate for a sweet finish.
Add Your Touch to Blue Oreo-Filled Cake Pops
Consider swapping regular Oreos for flavored varieties, like mint or peanut butter, to give your cake pops a unique twist. You could also add a splash of blue food coloring to amplify the theme.
Storing & Reheating Blue Oreo-Filled Cake Pops
Store your Blue Oreo-Filled Cake Pops in an airtight container in the refrigerator for up to two weeks. To enjoy any leftovers, just let them come to room temperature before serving for the best flavor and texture.
Chef's Helpful Tips for Blue Oreo-Filled Cake Pops
- This professional-quality Blue Oreo-Filled Cake Pops relies on precise timing and temperature control to achieve restaurant-standard results consistently.
- Master the art of mise en place by prepping all ingredients beforehand, ensuring smooth execution and preventing any last-minute cooking disasters.
- The secret lies in layering flavors throughout the cooking process rather than seasoning only at the end for maximum depth.
- Pro tip: let the finished dish rest for optimal texture and flavor development before serving to hungry guests waiting eagerly.
Sharing my first experience making Blue Oreo-Filled Cake Pops brings back memories of my brother’s birthday, where these little creations vanished before I could savor one myself.
FAQs About Blue Oreo-Filled Cake Pops
What are Blue Oreo-Filled Cake Pops?
Blue Oreo-Filled Cake Pops are a delightful treat that combines cake and Oreos, all coated in a sweet chocolate shell. They typically consist of a moist cake mix, crushed Oreo cookies, and cream cheese, providing a rich and creamy center. The vibrant blue color adds a fun twist, perfect for celebrations like birthday parties or baby showers. You can customize these cake pops by mixing different flavored Oreos or adding festive toppings, making them a versatile dessert that everyone will adore.
How do I store Blue Oreo-Filled Cake Pops?
To ensure your Blue Oreo-Filled Cake Pops stay fresh and tasty, store them in an airtight container in the refrigerator. They can last up to two weeks, making them a great make-ahead option for parties or gatherings. If you have leftovers, simply allow them to come to room temperature before serving for the best flavor and texture. Always remember to place parchment paper between layers of cake pops to avoid sticking.
Can I customize Blue Oreo-Filled Cake Pops?
Absolutely! Customizing Blue Oreo-Filled Cake Pops is easy and fun. You can use various Oreo flavors, like mint or peanut butter, to change the taste profile. Adding blue food coloring to the cake mix or chocolate coating intensifies the theme. You can also decorate with different toppings, such as sprinkles, drizzles of colored chocolate, or even edible glitter. The possibilities are endless, allowing your creativity to shine through.
How do I make the chocolate coating for Blue Oreo-Filled Cake Pops?
Making the chocolate coating for your Blue Oreo-Filled Cake Pops is simple. Begin by melting your choice of chocolate, whether that’s candy melts or real chocolate chips, in a microwave-safe bowl. Heat it in 30-second bursts, stirring in between, until it?s smooth and pourable. If it’s too thick, you can add a small amount of vegetable oil to achieve the desired consistency. Once melted, dip each cake pop into the chocolate, letting any excess drip off before placing it on parchment paper to set.
Conclusion for Blue Oreo-Filled Cake Pops
Blue Oreo-Filled Cake Pops are a delightful blend of flavors and colors that can brighten any occasion. Their easy preparation makes them perfect for both seasoned bakers and novices alike. Remember to customize them with various flavors and decorations for an added twist. By following the steps outlined here, you can create a batch of Blue Oreo-Filled Cake Pops that are not only visually stunning but also deliciously satisfying for everyone. Enjoy sharing these treats at your next gathering!
Delicious Blue Oreo-Filled Cake Pops
Ingredients
Equipment
Method
- Prepare your cake mix according to the package instructions and let it cool completely.
- In a large mixing bowl, combine the crushed Oreos and cream cheese, mixing until well combined.
- Scoop the Oreo mixture using a tablespoon-sized cookie scoop and roll into balls.
- Arrange the balls on a parchment paper-lined baking sheet, covering them with plastic wrap. Refrigerate for at least 1 hour.
- Melt the chocolate in a microwave-safe bowl, heating in 30-second intervals, stirring until smooth.
- Dip each chilled ball into the melted chocolate using a skewer or fork, then place back on parchment paper.
- Top with optional Oreo crumbs or sprinkles immediately after coating.
- Chill the dipped balls for another hour until set in the refrigerator.