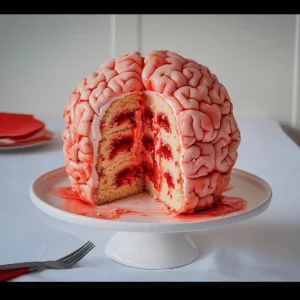
Biting into a slice of Vanilla Raspberry Brain Cake is like diving into a whimsical world where flavors dance and colors shine. Imagine the creamy buttercream melding with the tartness of raspberries, all encased in a soft, fluffy cake. It’s a treat that looks as fun as it tastes, perfect for spicing up birthdays, Halloween parties, or simply an afternoon coffee break with friends.
Jump to:
- <strong>Ingredients for Brain Cake</strong>
- <strong>How to Make Brain Cake</strong>
- <strong>Perfecting Brain Cake Cooking Process</strong>
- <strong>Add Your Touch to Brain Cake</strong>
- <strong>Storing & Reheating Brain Cake</strong>
- FAQs About Brain Cake
- What is Brain Cake?
- How can I customize my Brain Cake?
- How should I store my Brain Cake?
- Can I make Brain Cake in advance?
- Conclusion for Brain Cake
Whenever I whip up this quirky cake, I’m reminded of the joy and laughter that comes with sharing food. It’s the kind of dessert that steals the show and elicits gasps and giggles, making it an instant favorite at any gathering. So if you’re looking to impress your guests or just sweeten up your day, this Vanilla Raspberry Brain Cake is your ticket to deliciousness.
Why You'll Love This Brain Cake
- This incredible Brain Cake transforms simple everyday ingredients into restaurant-quality flavors that will blow your mind completely.
- Foolproof recipe techniques guarantee perfect results every single time, making even novice cooks feel like professional chefs instantly.
- Stunning visual appeal with gorgeous colors and mouthwatering aromas creates the ultimate Instagram-worthy dish for any special occasion.
- Endlessly adaptable for different dietary needs while working beautifully for meal prep, date nights, or entertaining large groups effortlessly.
Ingredients for Brain Cake
Here’s what you’ll need to make this delicious Brain Cake:
1 1/2 cups (195g) flour – Use all-purpose flour for a light and airy texture; for gluten-free, consider a 1:1 blend.
1 tsp baking powder – This helps your cake rise, ensuring it’s fluffy and delightful.
1/2 tsp baking soda – Another rising agent that contributes to a light cake, particularly in combination with buttermilk.
1/4 tsp salt – Essential for enhancing the flavors in your cake.
1/2 cup (120ml) buttermilk – Adds moisture and tang; feel free to substitute with regular milk and a touch of vinegar.
1/4 cup (55g) butter – Use unsalted butter at room temperature for rich flavors in your batter.
1 cup (200g) sugar – Sweetens the cake to perfection; consider using brown sugar for a deeper flavor.
1/4 cup (60ml) canola oil – Keeps the cake moist and tender; any neutral oil works well here.
2 eggs – Room temperature eggs help emulsify the mixture, ensuring even rising.
2 tsp vanilla extract – Pure vanilla extract is best for a rich flavor.
2 drops red or pink food dye – Just a touch for a fun color that adds to the festive vibe.
1 cup frozen raspberries – These provide the delightful tartness in the jam filling and decorate the cake.
1 tbsp sugar – Sweetens the raspberries for the filling.
1/2 lemon – Juiced to bring brightness to your raspberry jam.
1 tbsp cold water – Helps in making the cornstarch slurry for thickening.
2 tsp cornstarch – A thickening agent for your raspberry filling to achieve a jam-like consistency.
2 cups butter – Softened to create that beautifully creamy frosting.
4 cups icing sugar – Sweetens and thickens your buttercream to the perfect spreadable texture.
1 1/2 tbsp heavy cream – Adds richness to your frosting; optional, but highly recommended.
1 tsp salt – Balances the sweetness in your frosting.
2 tsp vanilla bean paste – For a gourmet touch and delicious specks of vanilla.
2-3 drops pink food dye – Perfect for creating a stunning brain cake effect.
How to Make Brain Cake
Follow these simple steps to prepare this delicious Brain Cake:
Step 1: Preheat and Prepare
Preheat your oven to 350°F (175°C). Grease and flour three 6-inch round cake pans, and don’t forget to line the bottoms with parchment paper for easy release.
Step 2: Combine Dry Ingredients
In a medium-sized mixing bowl, whisk together the flour, baking powder, baking soda, and salt. Set this mixture aside while you focus on your wet ingredients.
Step 3: Cream the Butter and Sugar
In a large mixing bowl, beat together the softened butter and sugar until light and fluffy, about 2-3 minutes. Then, mix in the canola oil until everything is combined smoothly.
Step 4: Add Eggs and Vanilla
Add the eggs one at a time, making sure each is fully incorporated before adding the next. Blend in the vanilla extract and a few drops of food dye until you achieve your desired pink hue.
Step 5: Mix Dry and Wet Ingredients
Gradually add the dry ingredients to your wet mixture, alternating with the buttermilk. Start and end with the dry ingredients. Mix until just combined; do not overmix!
Step 6: Bake the Cake
Divide the batter evenly among the prepared pans. Bake for about 25-30 minutes or until a toothpick inserted in the center comes out clean. Cool in the pans for about 10 minutes before transferring the cakes to a wire rack to cool completely.
Once cooled, move on to the delicious raspberry filling and stunning buttercream frosting. This includes making raspberry jam, layering the cake, and final touches that not only add flavor but also incredible visual appeal. Your Vanilla Raspberry Brain Cake will quickly become a head-turner at any gathering! Get ready to slice into sweet delight and enjoy the applause!

This showstopping Brain Cake delivers restaurant-quality results using simple ingredients you probably already have at home. The perfect balance of textures and flavors creates an unforgettable dining experience that will have everyone asking for seconds. Picture-perfect presentation with vibrant colors makes this dish absolutely Instagram-worthy and guaranteed to impress any dinner guest. Incredibly versatile recipe that works beautifully for weeknight dinners, meal prep, special occasions, or even outdoor entertaining sessions.
Perfecting Brain Cake Cooking Process
Begin by preparing your ingredients so that everything is at hand when you need it. Start with the cake batter, bake it while preparing the raspberry filling, and let it cool. While the cake cools, whip up your buttercream and get everything ready for assembly.
Add Your Touch to Brain Cake
Feel free to swap out the raspberries for your favorite fruit; strawberries or blueberries make great alternatives. You can also experiment with different extracts or add a splash of almond extract for a unique twist. Want more fun? Try layering with alternating colors of frosting for a real showstopper!
Storing & Reheating Brain Cake
To store your Brain Cake, keep it in an airtight container in the refrigerator for up to five days. If you want to freeze it, slice the cake and wrap each piece in plastic wrap. Reheat by letting it come to room temperature for the best texture.
Chef's Helpful Tips for Brain Cake
- This professional-quality Brain Cake relies on precise timing and temperature control to achieve restaurant-standard results consistently.
- Master the art of mise en place by prepping all ingredients beforehand, ensuring smooth execution and preventing any last-minute cooking disasters.
- The secret lies in layering flavors throughout the cooking process rather than seasoning only at the end for maximum depth.
- Pro tip: let the finished dish rest for optimal texture and flavor development before serving to hungry guests waiting eagerly.
I remember the first time I made this Brain Cake for my best friend’s Halloween party. The look on everyone’s faces when they saw it was priceless—they thought it was an elaborate decoration until they realized it was dessert!
FAQs About Brain Cake
What is Brain Cake?
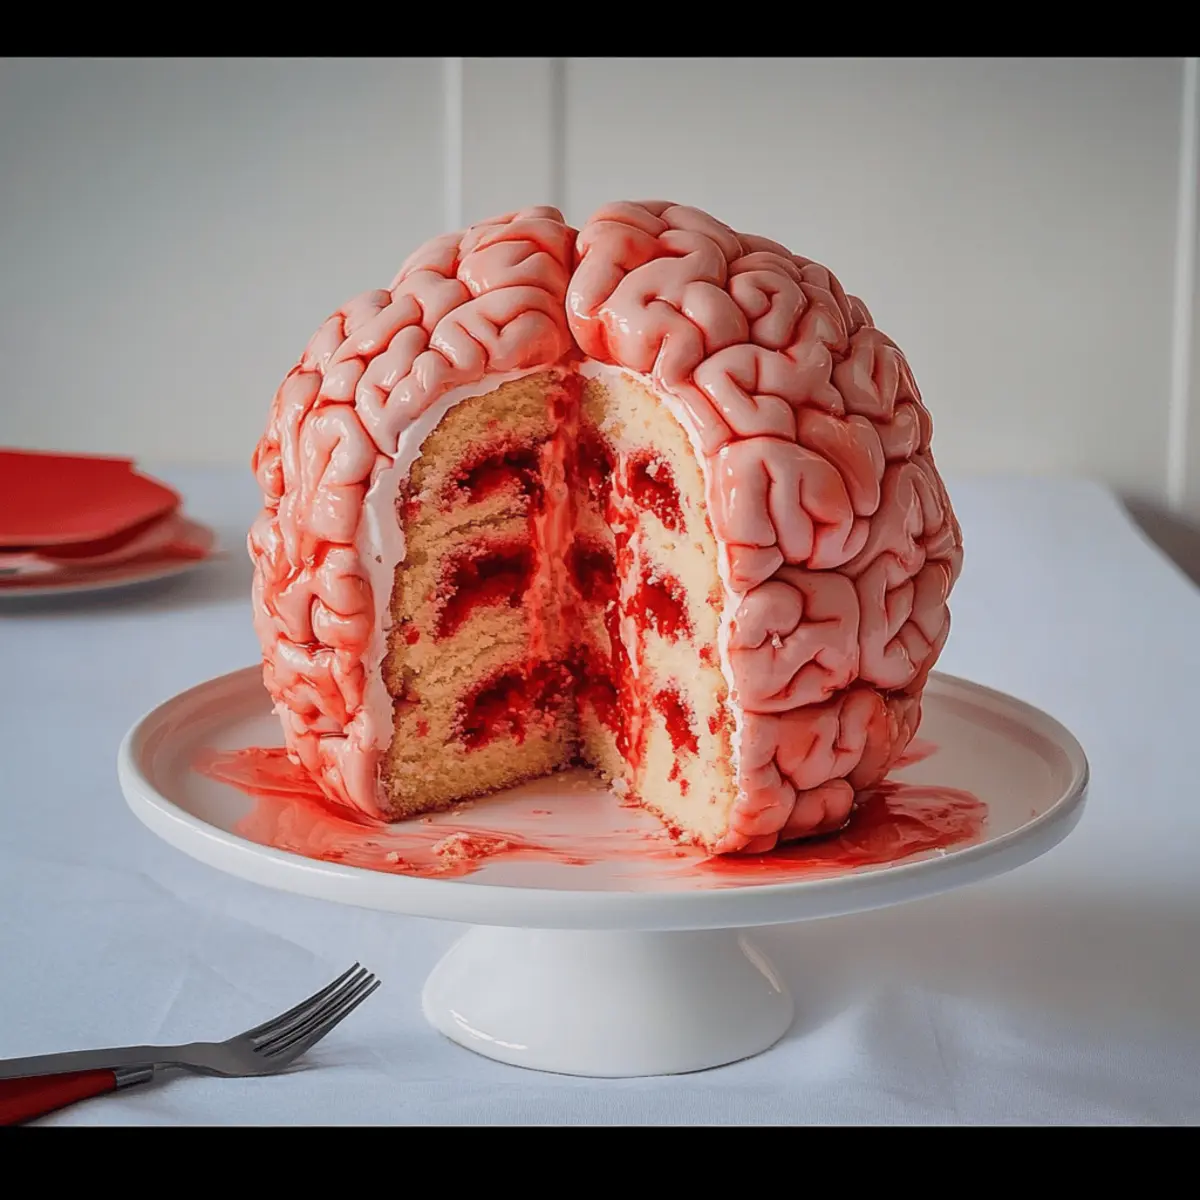
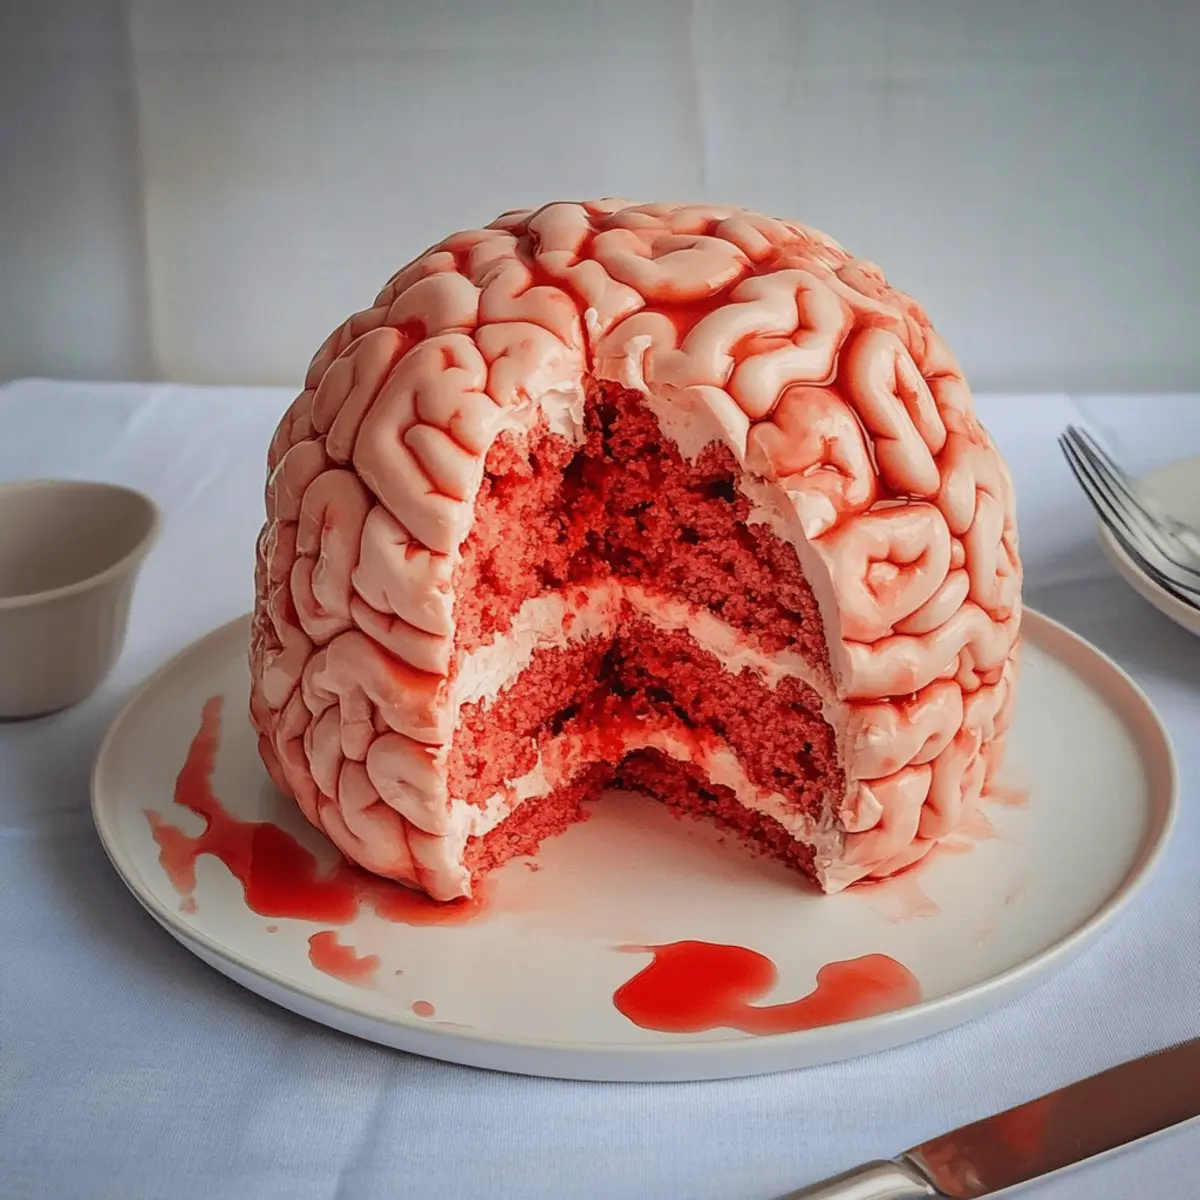
Brain Cake is a fun and visually striking dessert that mimics the appearance of a human brain. It combines layers of moist vanilla cake with a sweet raspberry filling and is finished with a creamy pink buttercream frosting. Not just a feast for the eyes, this cake also boasts delightful flavors and textures, making it a hit at any celebration, especially around Halloween. The whimsical design makes it perfect for parties, and the taste keeps everyone coming back for more.
How can I customize my Brain Cake?
Customization is key to making your Brain Cake uniquely yours. You can experiment with different fruit fillings like strawberries or blueberries, and swapping out vanilla extract for almond extract adds a fun twist. Consider using a rainbow of colored frostings for a layered effect, or sprinkle edible glitter on top for extra flair. The possibilities are as endless as your imagination, so have fun with it!
How should I store my Brain Cake?
To keep your Brain Cake fresh, store it in an airtight container in the refrigerator for up to five days. If you want to prolong its shelf life, consider slicing it and wrapping each piece in plastic wrap before freezing. When you’re ready to enjoy it, let it thaw at room temperature for the best texture. Proper storage ensures all that delicious raspberry and buttery flavor stays intact until you’re ready for a bite.
Can I make Brain Cake in advance?
Absolutely! You can prepare the cake layers and raspberry filling a day or two in advance to save time. Just store the cooled layers wrapped in plastic wrap to prevent them from drying out. The buttercream can also be made ahead and kept in the refrigerator. When the time comes to assemble, all you need is a little creativity and a steady hand to create your masterpiece. Making it ahead of time means more relaxation and enjoyment during your event!
Conclusion for Brain Cake
In summary, the Brain Cake is a delightful dessert that combines stunning visuals with delicious flavors, making it the perfect addition to any gathering. This recipe allows for plenty of customization, so you can personalize it to match your event. Remember to store it properly and feel free to prep it in advance for convenience. Whether it’s for a holiday party or just a fun treat, the Brain Cake will surely leave a lasting impression on your guests. Enjoy creating and sharing this memorable dessert!
Delicious Vanilla Raspberry Brain Cake
Ingredients
Equipment
Method
- Preheat your oven to 350°F (175°C). Grease and flour three 6-inch round cake pans and line the bottoms with parchment paper.
- In a medium-sized mixing bowl, whisk together flour, baking powder, baking soda, and salt. Set aside.
- In a large mixing bowl, beat butter and sugar together until light and fluffy, about 2-3 minutes.
- Add canola oil and mix until combined.
- Beat in the eggs one at a time, ensuring each is fully incorporated before adding the next.
- Mix in vanilla extract and food dye until desired color is achieved.
- Gradually add dry ingredient mixture to wet ingredients, alternating with buttermilk, beginning and ending with dry ingredients. Mix until just combined.
- Divide the batter evenly among the prepared cake pans.
- Bake for about 25-30 minutes, or until a toothpick inserted in the center comes out clean.
- Cool cakes in pans for about 10 minutes before transferring to a wire rack to cool completely.
- For the raspberry jam filling, combine frozen raspberries, sugar, and lemon juice in a saucepan. Cook over medium heat, stirring frequently until raspberries break down.
- Strain the mixture into a bowl, reserving 1/2 cup of juice, then return the mixture to the pan.
- Stir continuously as the mixture thickens, about 5-7 minutes.
- In a small bowl, mix cornstarch and cold water to create a slurry.
- Add cornstarch slurry to the raspberry mixture and stir to combine. Cook until thickened, about 1-2 minutes. Remove from heat and cool.
- For the reduction, bring reserved raspberry juice to a low boil and reduce until sticky. Set aside to cool.
- Prepare the buttercream with pink food dye to achieve desired color.
- Stack the first cooled cake layer on a surface and spread buttercream on top. Create a dam of buttercream around the edge.
- Fill the center with raspberry jam filling. Place the second cake layer on top and repeat with buttercream and jam.
- Top with the final cake layer.
- Apply a crumb coat of buttercream to the entire cake. Chill for about 30 minutes.
- After chilling, carve the cake into a brain shape and apply a second crumb coat. Chill again until firm.
- Pipe a squiggly brain pattern onto the cake with pink buttercream.
- Gently brush the entire cake with raspberry jam reduction to create a 'blood' effect. Allow to set in the refrigerator.