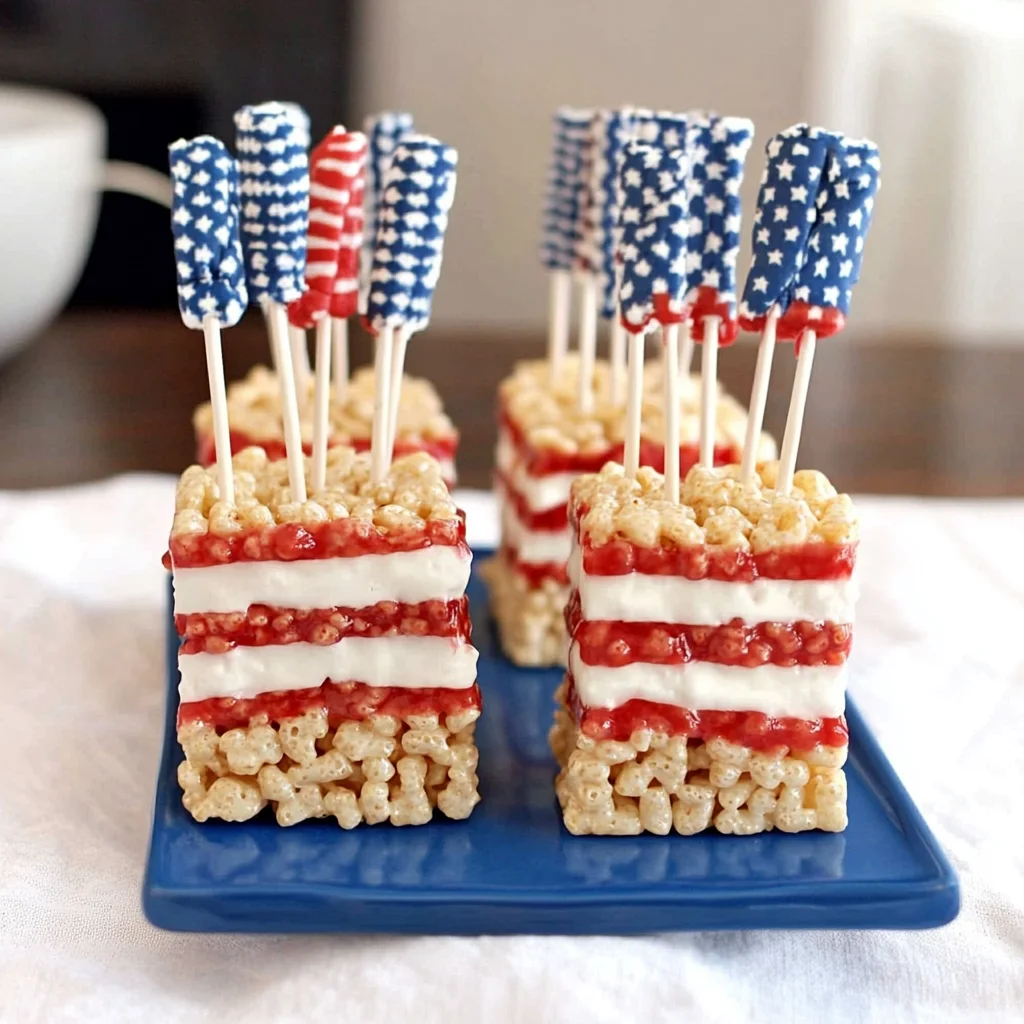
Imagine biting into a chewy, marshmallow-infused delight that captures the spirit of patriotism in every colorful layer. The American Flag Rice Krispie Treats burst with a playful crunch, their vibrant reds, whites, and blues promising a celebration of flavor and nostalgia that beckons you to take another bite, especially during holiday barbecues or family gatherings.
Jump to:
- Why Is American Flag Rice Krispie Treats So Irresistibly Good?
- American Flag Rice Krispie Treats Ingredients
- Step-by-Step American Flag Rice Krispie Treats
- Expert Tips
- How to Store and Freeze American Flag Rice Krispie Treats
- American Flag Rice Krispie Treats Variations
- Make-Ahead Tips for American Flag Rice Krispie Treats
- American Flag Rice Krispie Treats Recipe FAQs
As I recall the excitement of making these treats with my kids for Fourth of July picnics, laughter mingled with the sweet aroma of melted marshmallows filled our kitchen. These delightful squares not only bring joy but also create memories that linger long after the last bite—perfect for sparking conversations and sharing smiles at any festive occasion!
Why Is American Flag Rice Krispie Treats So Irresistibly Good?
Quick and Easy: With just 15 minutes of prep time, you can whip up this delightful dessert without any baking!
Vibrant Colors: The red, white, and blue candy melts bring a festive flair, making it perfect for patriotic celebrations.
Crowd-Pleaser: Everyone loves these chewy, crispy treats—ideal for parties, picnics, or family gatherings!
Customizable: You can easily adapt the colors and shapes to fit any occasion or theme.
Fun Activity: Involve the kids in the process for a memorable cooking experience that’s both enjoyable and tasty!
American Flag Rice Krispie Treats Ingredients
- For the Base
- 3 tablespoons butter (melted) – This adds richness and helps bind the treats together for a delightful texture.
- 1 package marshmallows (10 oz) – Choose mini or regular marshmallows for that gooey sweetness that holds everything together.
- 6 cups Rice Krispies cereal – Provides the perfect crunch and structure for your festive creation.
- For the Colorful Topping
- 1 cup red candy melts – These will give your American Flag Rice Krispie Treats a vibrant red color that pops with excitement.
- 1 cup blue candy melts – Adds a bold blue hue to represent the flag’s stars in a deliciously sweet way.
- 1 cup white candy melts – Ensures that your treats have a beautiful and creamy finish, just like the stars on Old Glory.
Step-by-Step American Flag Rice Krispie Treats
1. Melt Together: In a large microwave-safe bowl, melt 3 tablespoons of butter and 1 package (10 oz) of marshmallows together in 30-second intervals, stirring until smooth and creamy. This will create a deliciously sticky base!
2. Mix in Cereal: Stir in 6 cups of Rice Krispies cereal until every piece is fully coated. The mixture should look fluffy and inviting, perfect for shaping into treats.
3. Press into Dish: Firmly press the mixture into a greased 9×13 inch baking dish, ensuring it’s evenly spread out. This step is crucial for achieving uniform squares later on.
Add Colors:
4. Melt Candy Melts: Melt 1 cup each of red, white, and blue candy melts separately according to package instructions. Pay attention to the texture; they should be smooth and pourable for easy drizzling.
5. Drizzle Colors: Drizzle the melted red candy melts over the top of the Rice Krispie base first, followed by the white and then blue candy melts. Let your creativity shine as you layer these festive colors!
6. Create Effect: Use a spatula to gently swirl the colors together if desired, creating a marbled effect that resembles the stars and stripes of our beautiful flag.
7. Cool Completely: Allow the treats to cool completely before cutting them into squares. This usually takes about 15 minutes but can depend on your kitchen’s temperature.
8. Serve and Enjoy: Once cooled, slice into squares and serve your festive American Flag Rice Krispie Treats! These are sure to be a hit at any patriotic celebration!
Optional: For extra flair, sprinkle some edible glitter on top before serving!
Exact quantities are listed in the recipe card below.
Expert Tips
- Butter Choice: Use unsalted butter for better control over the sweetness; it balances perfectly with the marshmallows in your American Flag Rice Krispie Treats.
- Marshmallow Melting: Stir frequently while melting marshmallows to prevent burning. A smooth mixture ensures even coating of the Rice Krispies.
- Press Firmly: When pressing the Rice Krispie mixture into the pan, use a greased spatula or your hands to create a compact base that holds together well.
- Color Melting Time: Melt candy melts in short bursts to avoid overheating. This prevents them from seizing and maintains their vibrant colors for decorating.
- Cool Completely: Ensure the treats are fully cooled before cutting them into squares. This helps them hold their shape and prevents a gooey mess.
- Marbling Technique: Experiment with swirling colors using a spatula for a fun marbled effect, but don’t overdo it—too much mixing can muddle the colors of your American Flag Rice Krispie Treats!
How to Store and Freeze American Flag Rice Krispie Treats

- Room Temperature: Keep your American Flag Rice Krispie Treats in an airtight container for up to 3 days to maintain their freshness and texture.
- Fridge: For extended freshness, store them in the refrigerator in an airtight container for up to 1 week. Just allow them to come to room temperature before serving.
- Freezer: If you want to enjoy them later, freeze the treats wrapped tightly in plastic wrap and placed in a freezer bag for up to 2 months. Thaw them overnight in the fridge before enjoying.
- Reheating: Although best enjoyed fresh, if needed, microwave individual pieces for about 10 seconds to soften slightly before serving.
American Flag Rice Krispie Treats Variations
Feel free to let your creativity shine and personalize this delightful dessert to suit your taste!
- Vegan: Substitute butter with coconut oil and use vegan marshmallows for a plant-based treat. This option keeps the festive spirit alive while catering to dietary preferences, allowing everyone to join in on the fun.
- Gluten-Free: Ensure your Rice Krispies are labeled gluten-free, and you can enjoy this treat without worry. It’s perfect for gatherings where you want all guests to feel included, no matter their dietary restrictions.
- Chocolate Drizzle: Melt dark or white chocolate and drizzle over the finished treats for an extra layer of flavor. The rich chocolate contrasts beautifully with the sweetness of the candy melts, creating a dessert that’s as pleasing to the eye as it is to the palate.
- Nutty Crunch: Add chopped nuts like almonds or pecans for added texture and flavor. They bring a delightful crunch that contrasts perfectly with the soft marshmallow base, making each bite more satisfying.
- Marshmallow Swirl: Mix in some mini marshmallows before pressing down into the pan for extra gooeyness. This twist enhances the classic Rice Krispie texture, making every bite chewy and delicious.
- Fruit Infusion: Incorporate dried cranberries or blueberries for a fruity pop of flavor. These additions not only complement the color scheme but also provide a slight tartness that balances out the sweetness.
- Spicy Kick: Add a pinch of cayenne pepper or chili powder to the melted marshmallows for a surprising heat. This unexpected twist will excite adventurous eaters who crave bold flavors in their treats.
Make-Ahead Tips for American Flag Rice Krispie Treats
If you’re looking to save time while preparing for your next patriotic celebration, these American Flag Rice Krispie Treats are the perfect candidate for meal prep. You can easily prepare the base ingredients—3 tablespoons of melted butter, a 10 oz package of marshmallows, and 6 cups of Rice Krispies cereal—up to 24 hours in advance. Simply combine the melted butter and marshmallows in a large microwave-safe bowl, then stir in the Rice Krispies until fully coated and press the mixture into your greased 9×13 inch baking dish. Additionally, you can melt the red, white, and blue candy melts separately ahead of time and store them in airtight containers at room temperature for up to three days. When you’re ready to serve, just drizzle the colored melts over the cooled base, create that fun marbled effect, cut into squares, and enjoy your festive American Flag Rice Krispie Treats! This approach not only saves you valuable time but also ensures that your treats remain fresh and delicious for your gathering.
American Flag Rice Krispie Treats Recipe FAQs
What type of butter should I use for the Rice Krispie treats?
You can use unsalted butter for a balanced flavor, but if you only have salted butter on hand, it will work too! Just be mindful that it may add a touch more saltiness to your treats.
Can I substitute the marshmallows with a different ingredient?
While marshmallows are essential for that classic gooey texture, you could use marshmallow fluff in a pinch. Just keep in mind you’ll need about 2 cups of fluff to replace the 10 oz package of marshmallows.
How should I store my American Flag Rice Krispie Treats?
To keep your treats fresh, store them in an airtight container at room temperature. They’ll stay delicious for up to 3 days. If you want to keep them longer, consider wrapping them tightly in plastic wrap before placing them in the container.
Can I freeze these treats for later enjoyment?
Yes, you can freeze your Rice Krispie treats! Cut them into squares and wrap each one individually in plastic wrap. Place them in a freezer-safe bag or container, and they’ll last up to 2 months. Thaw at room temperature when you’re ready to enjoy!
What is the best way to cut the Rice Krispie treats once they’ve cooled?
Once fully cooled, use a sharp knife or pizza cutter for clean cuts. To prevent sticking, lightly grease the blade with cooking spray. This will help you achieve those perfect squares without any tearing!
How many servings does this recipe make?
This recipe yields about 4 delightful servings, with each serving containing around 150 calories. You can easily double or triple the recipe if you’re planning to share these festive treats at a gathering!