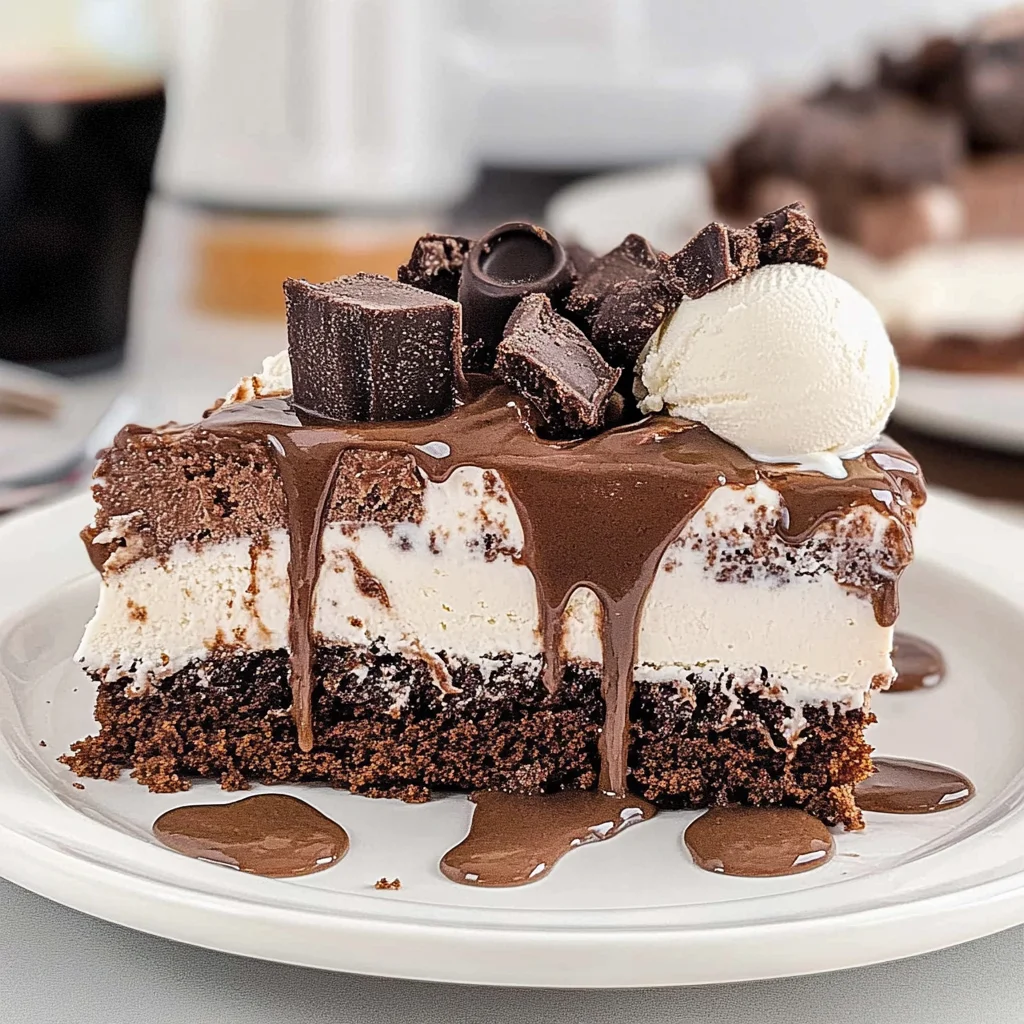
Imagine slicing into a Dairy Queen ice cream cake, where the soft serve ice cream meets rich chocolate or vanilla cake, creating a delightful blend of flavors and textures that dance on your palate. The cold, creamy layers evoke childhood memories of summer birthdays, with each bite offering a playful mix of sweetness and nostalgia that leaves you grinning from ear to ear.
Jump to:
This dessert is the ultimate showstopper for birthday parties and celebrations, turning any gathering into a festive occasion. Picture friends gathered around, laughter filling the air as they dive into this indulgent treat, eager for that first heavenly spoonful. With its irresistible charm and deliciousness, the Dairy Queen ice cream cake promises an unforgettable flavor experience that will keep you coming back for more.
Why Is dairy queen ice cream cake So Irresistibly Good?
Layers of indulgence come together in this delightful treat, blending rich chocolate cake with creamy soft serve ice cream. Quick and easy, you can whip this up in just 30 minutes?perfect for unexpected guests or last-minute celebrations. Versatility shines as you can customize flavors to suit any occasion, whether it’s a birthday party or a summer barbecue. Crowd-pleaser guaranteed, everyone will love the combination of textures and flavors that make each slice a celebration on its own!
dairy queen ice cream cake Ingredients
For the Cake Layer
- 1 box chocolate cake mix (or any preferred flavor) ? This provides the rich base for your cake, making it deliciously moist.
- 3 large eggs ? Essential for binding the ingredients together and adding richness to the cake.
- 1 cup water ? This keeps the cake batter at the right consistency for baking.
- 1/2 cup vegetable oil ? Ensures a tender crumb and adds moisture to your cake.
For the Ice Cream Layer
- 1 quart vanilla ice cream (softened) ? This creamy layer adds a sweet, classic flavor that pairs beautifully with chocolate.
- 1 quart chocolate ice cream (softened) ? Adds an indulgent, rich taste that complements the vanilla perfectly.
- 1 cup whipped topping (for decoration) ? Use this fluffy topping to create beautiful swirls on top of your cake.
For the Filling
- 1 cup chocolate syrup (for layering) ? Drizzle this between layers for added sweetness and a delightful chocolaty experience in every bite.
How to Make dairy queen ice cream cake
1. Preheat the oven to 350?F (175?C). Prepare the cake mix using 3 large eggs, 1 cup of water, and 1/2 cup of vegetable oil according to package instructions for a delightful base.
2. Pour the batter into a greased 9-inch round cake pan. Bake for 25-30 minutes or until a toothpick inserted comes out clean, ensuring a perfectly fluffy cake layer.
3. Cool the cake completely in the pan before removing it. This step is crucial for maintaining its structure as you assemble your delicious ice cream cake.
Assemble the Ice Cream Cake:
4. Slice the cooled cake in half horizontally to create two even layers. This will allow for luscious layers of ice cream and syrup between each segment.
5. Place one layer of cake on a serving plate and generously spread a layer of chocolate syrup over it. This will infuse rich flavor into your dessert.
6. Scoop half of the softened vanilla ice cream onto the first cake layer and spread it evenly. The creamy texture will beautifully complement the chocolate syrup beneath.
7. Add the second layer of cake on top and repeat with another layer of chocolate syrup and the remaining vanilla ice cream, creating a delightful contrast with each bite.
8. Top with softened chocolate ice cream and smooth out the surface to create a lovely finish for your Dairy Queen ice cream cake masterpiece.
9. Cover with plastic wrap and freeze for at least 2 hours or until firm, allowing all flavors to meld together harmoniously.
Decorate and Serve:
10. Remove the cake from the freezer and spread whipped topping over the top and sides for decoration, adding that final touch of indulgence your family will adore.
11. Slice and serve chilled to enjoy every creamy, chocolaty bite! Your homemade Dairy Queen ice cream cake is ready to impress!
Optional: Decorate with chocolate shavings or sprinkles for added flair!
Exact quantities are listed in the recipe card below.
Expert Tips
- Cool Completely: Allow the cake to cool fully in the pan; this prevents it from breaking apart during assembly and ensures a sturdy base for your Dairy Queen ice cream cake.
- Soften Ice Cream: Let your ice cream sit at room temperature for about 10-15 minutes before scooping. This makes spreading easier and prevents the cake layers from crumbling.
- Even Layers: When slicing the cake, use a serrated knife and a gentle sawing motion for even layers. This helps maintain structure and balance in your ice cream cake.
- Decorative Whipped Topping: For best results, use a piping bag to apply whipped topping. It gives a professional look and enhances the visual appeal of your homemade Dairy Queen ice cream cake.
- Freezing Time: Ensure you freeze the assembled cake long enough?at least 2 hours?to achieve that perfect firm texture. Rushing this step can lead to slippage when slicing.
How to Store and Freeze dairy queen ice cream cake
- Fridge: Keep any leftover dairy queen ice cream cake in the fridge, covered with plastic wrap or foil, for up to 3 days.
- Freezer: If you want to enjoy it later, store the cake in an airtight container in the freezer for up to 2 months.
- Thawing: To serve, transfer your frozen cake to the fridge and let it thaw for about 2 hours before slicing for optimal taste and texture.
- Decoration: If decorated with whipped topping, consume within 1 day for the best texture and flavor.
dairy queen ice cream cake Your Way
Feel free to mix and match these variations to create a delightful twist on your classic dessert!
- Gluten-Free: Substitute the chocolate cake mix with a gluten-free blend. This way, everyone can enjoy a slice without worry, making it perfect for gatherings.
- Nutty Surprise: Add 1 cup of crushed nuts to the cake batter for added crunch. The nutty flavor pairs beautifully with the creamy ice cream layers.
- Cocoa Boost: Replace half of the water in the cake mix with brewed coffee for a richer chocolate flavor. This small change elevates the taste, making every bite more indulgent.
- Fruit Infusion: Layer in fresh berries or sliced bananas between ice cream layers. The fresh fruit adds a delightful contrast to the rich creams and makes it extra refreshing.
- Minty Fresh: Incorporate 1 teaspoon of peppermint extract into the vanilla ice cream layer. This twist gives your cake a cool, minty kick that?s perfect for summer celebrations.
- Caramel Delight: Drizzle caramel sauce instead of chocolate syrup in the filling. The sweet caramel complements the cake and ice cream beautifully, elevating your dessert experience.
- Spice It Up: Add 1 teaspoon of cinnamon to the chocolate cake mix for a warm spice note. This simple addition brings a cozy flavor that pairs wonderfully with vanilla ice cream.
Make Ahead Options
Preparing your delicious Dairy Queen ice cream cake in advance is a fantastic way to save time and ensure you can easily celebrate any occasion. You can make the cake layer using 1 box of chocolate cake mix, 3 large eggs, 1 cup of water, and 1/2 cup of vegetable oil up to 24 hours ahead. Just bake the cake as directed, let it cool completely, then slice it in half horizontally. For the ice cream layers, both the quart of softened vanilla ice cream and quart of softened chocolate ice cream can be prepped a day in advance along with the chocolate syrup filling for layering. Simply assemble everything by spreading chocolate syrup on each layer and placing the ice cream between them before covering and freezing for at least 2 hours or until firm. When you?re ready to serve, just add your whipped topping and slice into this delightful homemade Dairy Queen ice cream cake! By prepping these components ahead of time, you?ll have a scrumptious dessert that?s ready to impress without any last-minute stress.
dairy queen ice cream cake Questions Answered
What type of cake mix can I use for this recipe?
You can use any flavor of cake mix that you love! While a classic chocolate cake mix pairs beautifully with the ice cream layers, vanilla or even funfetti could add a delightful twist. Just follow the package instructions to prepare it perfectly!
How should I store leftover ice cream cake?
After enjoying your homemade Dairy Queen ice cream cake, be sure to wrap any leftovers tightly in plastic wrap or place them in an airtight container. This will keep it fresh for up to a week in the freezer. Make sure to let it sit out for a few minutes before slicing again, as it will be quite firm from the freezer.
Can I make this ice cream cake ahead of time?
Absolutely! You can prepare the cake up to two days in advance. Just ensure that you freeze it tightly wrapped in plastic wrap after layering. This makes it perfect for parties or celebrations; just decorate it with whipped topping right before serving!
Is there a way to make this recipe gluten-free?
Yes! You can substitute the regular chocolate cake mix with a gluten-free version. Just ensure that all other ingredients like the ice creams and toppings are also gluten-free. Many brands offer delicious gluten-free cake mixes that won?t compromise on flavor.
How long does it take to freeze the ice cream cake?
For best results, allow your assembled ice cream cake to freeze for at least 2 hours or until firm. This allows the layers to set properly and makes slicing much easier later on. If you want it super firm, feel free to leave it in longer!
What is the serving size for this recipe?
This delightful treat serves about 8 people. Each slice packs around 350 calories of creamy, chocolaty goodness and is sure to satisfy your guests? sweet cravings. Perfect for sharing during family gatherings or special occasions!