There’s nothing quite like the sight of a beautifully decorated cupcake that looks too good to eat—at least for a few moments. Gerbera Daisy Cupcakes capture that delightful charm, standing tall atop their fluffy bases, resembling vibrant little flowers of joy perfect for any celebration. Whether it’s a birthday bash, a springtime gathering, or just a Tuesday afternoon when you need a sugar pick-me-up, these delightful creations promise to bring a smile to your face and a burst of flavor to your tastebuds.
Jump to:
- <strong>Ingredients for Gerbera Daisy Cupcakes</strong>
- <strong>How to Make Gerbera Daisy Cupcakes</strong>
- <strong>Perfecting Gerbera Daisy Cupcakes Cooking Process</strong>
- <strong>Add Your Touch to Gerbera Daisy Cupcakes</strong>
- <strong>Storing & Reheating Gerbera Daisy Cupcakes</strong>
- FAQs About Gerbera Daisy Cupcakes
- What are Gerbera Daisy Cupcakes?
- How do I make the icing for Gerbera Daisy Cupcakes?
- Can I customize the flavor of Gerbera Daisy Cupcakes?
- How should I store Gerbera Daisy Cupcakes?
- Conclusion for Gerbera Daisy Cupcakes
Whenever I whip up these delightful sweets, I can’t help but get lost in a floral fantasy. The luscious buttercream, with its soft, silky petals, transforms the ordinary cupcake into a stunning centerpiece. Each bite feels like a little party in your mouth, and I can absolutely promise they’ll have your friends and family shoving their phones in your face to snap the perfect Instagram shot before they devour them. If you’ve been searching for a way to impress your guests or just want to treat yourself to a bit of culinary happiness, you’re in for a real treat with these Gerbera Daisy Cupcakes.
Why You'll Love This Gerbera Daisy Cupcakes
- This incredible Gerbera Daisy Cupcakes transforms simple everyday ingredients into restaurant-quality flavors that will blow your mind completely.
- Foolproof recipe techniques guarantee perfect results every single time, making even novice cooks feel like professional chefs instantly.
- Stunning visual appeal with gorgeous colors and mouthwatering aromas creates the ultimate Instagram-worthy dish for any special occasion.
- Endlessly adaptable for different dietary needs while working beautifully for meal prep, date nights, or entertaining large groups effortlessly.
Ingredients for Gerbera Daisy Cupcakes
Here’s what you’ll need to make this delicious Gerbera Daisy Cupcakes:
½ cup vegetable shortening – This will give your buttercream a sturdy texture, ensuring it holds up well when piped onto your cupcakes.
½ cup unsalted butter, softened – Use high-quality butter for the best flavor. Ensure it’s at room temperature for easy mixing.
1 teaspoon vanilla extract – A must-have for any sweet recipe, adding a warm, aromatic flavor.
4 cups confectioners sugar, sifted – Sifting prevents clumps, resulting in a smooth and creamy frosting.
2 tablespoons milk – This will help achieve the perfect frosting consistency, making it spreadable and fluffy.
24 cupcakes, any flavor – You can use store-bought or homemade cupcakes. Vanilla or chocolate works beautifully for pairing with the floral frosting.
2 16-inch disposable piping bags – These bags make clean-up a breeze while allowing for effective decorating.
#104 decorating tip – This petal tip is essential for creating those lovely daisy petals.
#2 decorating tip – Use this for adding cute dots to the centers of your daisies.
Food coloring – Use your favorite colors to bring the daisies to life!
How to Make Gerbera Daisy Cupcakes
Follow these simple steps to prepare this delicious Gerbera Daisy Cupcakes:
Step 1: Prepare the Buttercream
In a large mixing bowl, beat together the shortening and softened butter with the paddle attachment of your electric mixer. Mix until it’s light, fluffy, and smoother than a jazz tune. Once creamy, add in the vanilla extract and whip until well incorporated.
Step 2: Add the Sugar
Gradually add in the confectioners sugar, one cup at a time, while beating on medium speed. Be sure to scrape down the sides and bottom of the bowl frequently. This guarantees everything is blended beautifully, like a smooth jazz band working together.
Step 3: Incorporate the Milk
Once your sugar is added, gradually stir in the milk. Keep beating at medium speed until the frosting is fluffy and light—almost like a cloud. The key here is to get that perfect frosting consistency, so you might need to adjust with extra sugar or milk as needed.
Step 4: Color the Frosting
Separate about one-quarter of your icing into a smaller bowl. To the larger portion, add one drop of your desired petal color. Beat until the color is uniform. Feel free to add more coloring, drop by drop, until you achieve your dream daisy hues. Do the same for the smaller bowl but for the center color—get creative!
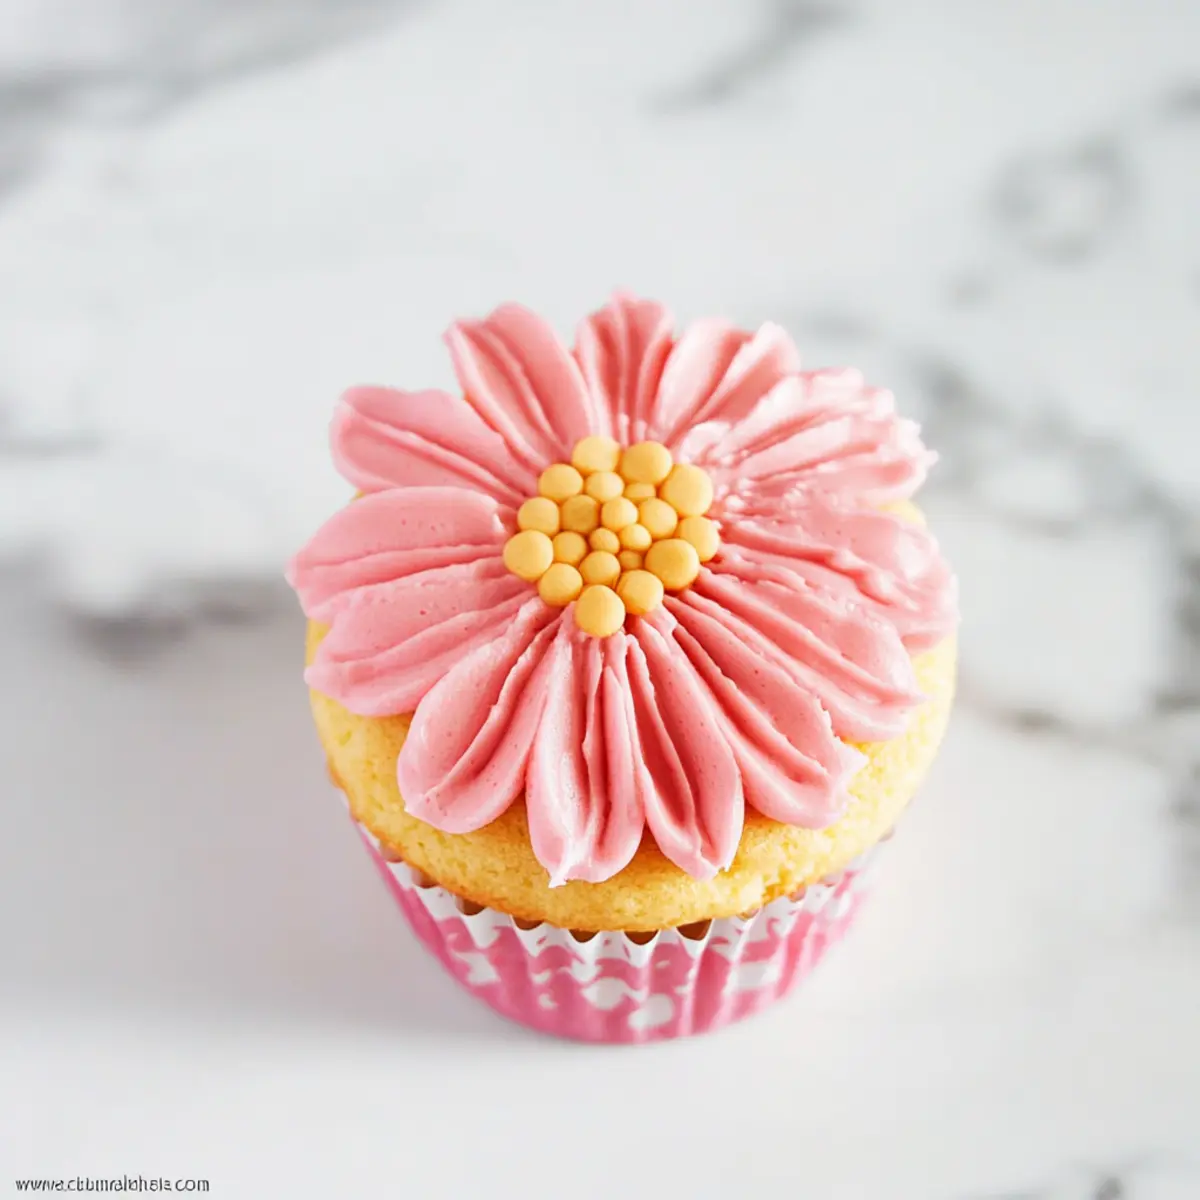
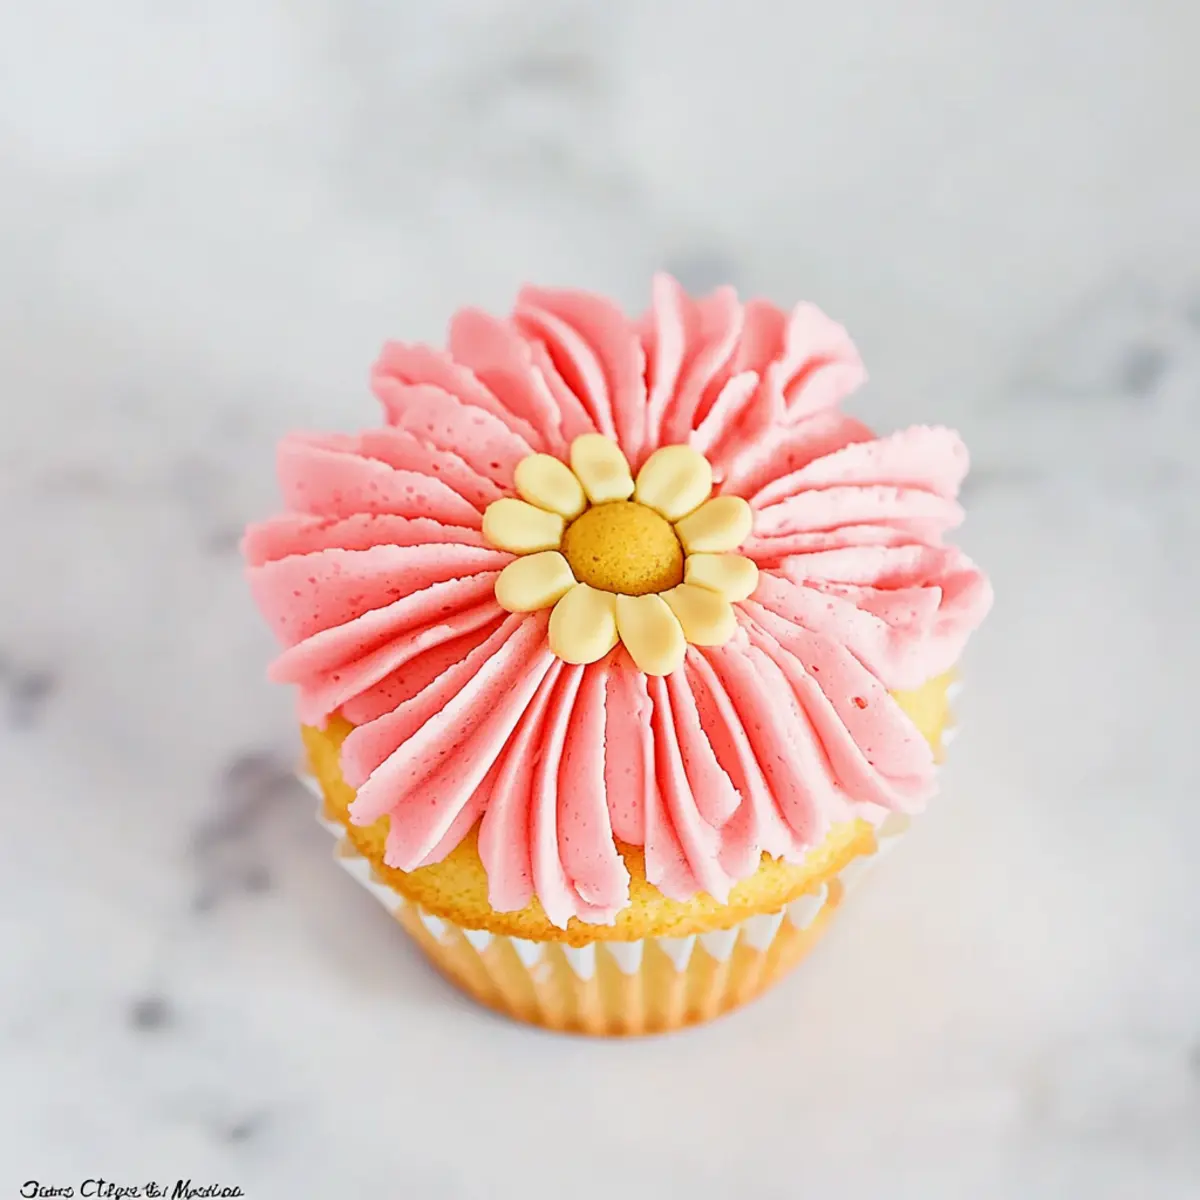
Step 5: Pipe the Daisies
Fit the #104 petal tip into your first piping bag and fill it halfway with the colored petal icing. Hold the piping bag at a 45° angle to the cupcake surface—wide end facing out! Start by gently squeezing some icing out, moving the tip around to create those delicate petals. Repeat this all around the cupcake until you’ve got an adorable floral look.
Step 6: Create the Centers
With the #2 tip in another piping bag, fill it halfway with the contrasting icing for the center. Hold this bag at a 90° angle to the cupcake, gently piping circles of tiny dots where the petals meet. Voila! The cupcakes are blossoming beautifully before your eyes!
These Gerbera Daisy Cupcakes can be stored at room temperature for up to three days—or longer if you can resist diving in. They also make for a fantastic centerpiece at parties. So, make a batch, grab your friends, and enjoy a cupcake decorating session filled with laughter and flavor!
You Must Know About Gerbera Daisy Cupcakes
- This showstopping Gerbera Daisy Cupcakes delivers restaurant-quality results using simple ingredients you probably already have at home.
- The perfect balance of textures and flavors creates an unforgettable dining experience that will have everyone asking for seconds.
- Picture-perfect presentation with vibrant colors makes this dish absolutely Instagram-worthy and guaranteed to impress any dinner guest.
- Incredibly versatile recipe that works beautifully for weeknight dinners, meal prep, special occasions, or even outdoor entertaining sessions.
Perfecting Gerbera Daisy Cupcakes Cooking Process
Start by beating together the butter and shortening to achieve the perfect fluffiness. While that’s happening, sift your confectioners’ sugar. Once combined, gradually add the sugar and milk, allowing for a smooth consistency before getting to the decorating part.
Add Your Touch to Gerbera Daisy Cupcakes
Feel free to swap the flavors of the cupcakes to match your preferences, using chocolate, vanilla, or even red velvet. You can also customize the buttercream colors, adding unique shades to mimic real gerbera daisies or try flavor extracts like almond or lemon for an unexpected twist.
Storing & Reheating Gerbera Daisy Cupcakes
Store your Gerbera Daisy Cupcakes at room temperature in a cake container or covered with foil for up to three days. If you want to enjoy them later, refrigerate them for about a week, though they are best fresh!
Chef's Helpful Tips for Gerbera Daisy Cupcakes
- This professional-quality Gerbera Daisy Cupcakes relies on precise timing and temperature control to achieve restaurant-standard results consistently.
- Master the art of mise en place by prepping all ingredients beforehand, ensuring smooth execution and preventing any last-minute cooking disasters.
- The secret lies in layering flavors throughout the cooking process rather than seasoning only at the end for maximum depth.
- Pro tip: let the finished dish rest for optimal texture and flavor development before serving to hungry guests waiting eagerly.
Every time I whip up these Gerbera Daisy Cupcakes, my friends rave about how they look just like the flowers, but they taste even better. It’s such a joy to see their faces light up with that first bite!

FAQs About Gerbera Daisy Cupcakes
What are Gerbera Daisy Cupcakes?
Gerbera Daisy Cupcakes are delightful confections resembling the beautiful gerbera daisy flowers. They feature fluffy cupcakes topped with vibrant buttercream icing crafted to mimic flower petals. The cupcakes can be made in various flavors, providing a tasty treat that also serves as a stunning centerpiece for any gathering. These treats are perfect for birthdays, weddings, or simply to brighten up your afternoon coffee. Not only are they visually appealing, but they also deliver a delicious experience with every bite.
How do I make the icing for Gerbera Daisy Cupcakes?
To create the icing, you mix vegetable shortening, softened butter, vanilla, and confectioners’ sugar until fluffy. Adding milk gradually helps achieve a smooth consistency. For the signature flower look, you’ll separate some icing and add food coloring to create different shades for the petals and the center of the cupcakes. Remember, the key is to beat it well to maintain a light texture, facilitating easy piping and a beautiful finish.
Can I customize the flavor of Gerbera Daisy Cupcakes?
Absolutely! One of the beauties of Gerbera Daisy Cupcakes is their versatility. You can use any flavor of cupcake base that you enjoy—chocolate, vanilla, red velvet, or even lemon. To add even more flair, incorporate various extracts or even mix in colorful sprinkles. This way, you can tailor the cupcakes to fit any theme or personal taste preferences, making them a delightful treat for everyone.
How should I store Gerbera Daisy Cupcakes?
After baking and decorating your Gerbera Daisy Cupcakes, it’s best to store them in a cake container or cover them with foil. They can sit at room temperature for up to three days. If you plan to enjoy them later, refrigerating them can extend their shelf life to about a week, though they always taste best when fresh. However, be sure to let them come back to room temperature for the best flavor experience before serving.
Conclusion for Gerbera Daisy Cupcakes
In conclusion, Gerbera Daisy Cupcakes are not only visually stunning but also incredibly versatile and delicious. Their unique design makes them a perfect choice for any celebration, while their customizable flavors can suit anyone’s palate. Whether you’re hosting a party or enjoying a quiet moment at home, these cupcakes will bring joy to everyone. So grab your piping bags and get ready to create some unforgettable Gerbera Daisy Cupcakes that will leave everyone asking for your secret recipe!
Gerbera Daisy Cupcakes
Ingredients
Equipment
Method
- In a large mixing bowl, beat together the shortening and butter with the paddle attachment of an electric mixer until light and fluffy. Beat in vanilla.
- Gradually add sugar, one cup at a time, beating well on medium speed. Scrape sides and bottom of bowl often.
- Gradually add milk; beat at medium speed until light and fluffy.
- Remove one quarter of the icing to a separate bowl. To the larger amount of icing, add one drop of desired petal color and beat until thoroughly mixed in. Add additional color, one drop at a time, until desired color is achieved. Repeat with the smaller bowl, using desired flower center color.
- Fit #104 petal tip into one of the disposable decorating bags. Snip off the tip of the bag. Fill the piping bag halfway with petal icing. Hold the piping bag at a 45° angle to the surface of the cupcake, with the wide end toward the outer edge and the narrow end at the center. Gently squeeze out some icing, and move the piping tip toward the outer edge of the cupcake, then back in toward the center to create a narrow petal. Repeat all the way around the edge of the cupcake.
- Fit #2 tip into the other disposable decorating bag. Snip off the tip of the bag. Fill the piping bag halfway with the other color of icing. Hold the piping bag at a 90° angle to the surface of the cupcake, gently pipe a circle of small dots in the center of the cupcake, over the top of where the petals meet.
- Cupcakes can be stored at room temperature for up to 3 days.