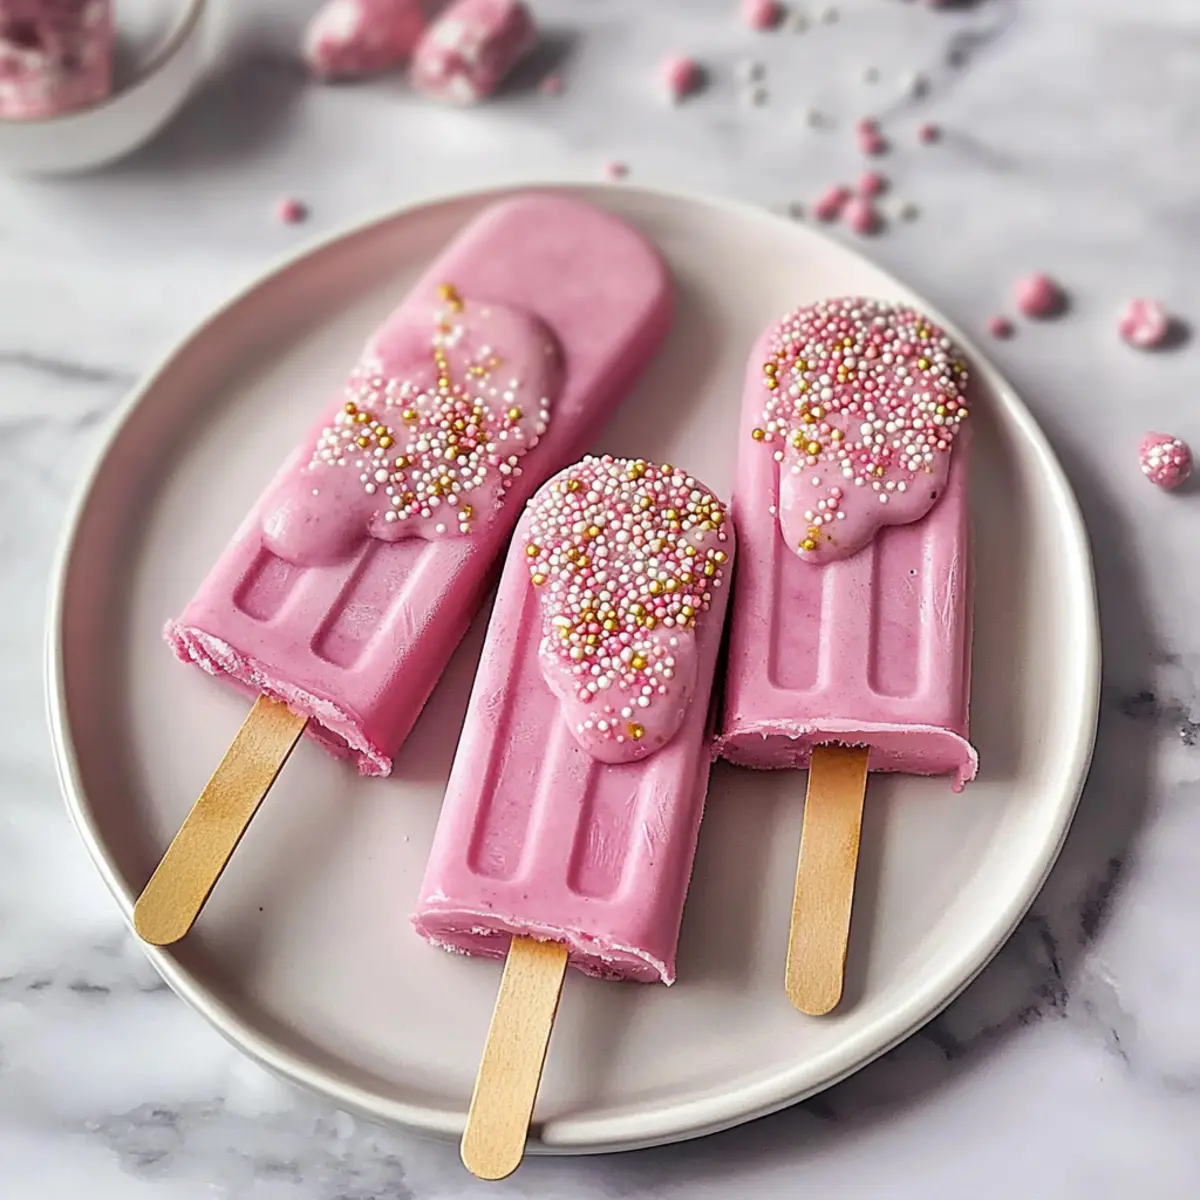
This delightful Pink Cakesicles recipe is an exciting twist on the classic red velvet cake that will make your taste buds sing. With its luscious red hue and creamy frosting-filled centers, these cakesicles are perfect for parties or a cozy night in.
Jump to:
- <strong>Ingredients for Pink Cakesicles</strong>
- <strong>How to Make Pink Cakesicles</strong>
- <strong>Perfecting Pink Cakesicles Cooking Process</strong>
- <strong>Add Your Touch to Pink Cakesicles</strong>
- <strong>Storing & Reheating Pink Cakesicles</strong>
- FAQs About Pink Cakesicles
- What are Pink Cakesicles?
- How do I make Pink Cakesicles?
- Can I customize my Pink Cakesicles?
- How should I store my Pink Cakesicles?
- Conclusion for Pink Cakesicles
Imagine biting into one of these frosty treats, experiencing the velvety crumb giving way to sweet cream cheese frosting, and getting a burst of joy that?s nothing short of a celebration on a stick. They make for an Instagram-ready dessert that?s just begging to be the star of your next gathering!
Why You'll Love This Pink Cakesicles
- This incredible Pink Cakesicles transforms simple everyday ingredients into restaurant-quality flavors that will blow your mind completely.
- Foolproof recipe techniques guarantee perfect results every single time, making even novice cooks feel like professional chefs instantly.
- Stunning visual appeal with gorgeous colors and mouthwatering aromas creates the ultimate Instagram-worthy dish for any special occasion.
- Endlessly adaptable for different dietary needs while working beautifully for meal prep, date nights, or entertaining large groups effortlessly.
Ingredients for Pink Cakesicles
Here’s what you’ll need to make this delicious Pink Cakesicles:
1 ? cups All-purpose Flour ? Essential for structure; opt for a brand that’s finely milled for the best texture.
1 cup Granulated Sugar ? Sweetens the cake; you can substitute with coconut sugar for a less refined option.
1 tablespoon Cocoa Powder ? Adds a subtle chocolate flavor that complements the red velvet.
1 teaspoon Salt ? Balances the sweetness and enhances overall flavor.
1 teaspoon Baking Soda ? Provides leavening to make your cakes lighter and fluffier.
1 Large Egg ? Binds ingredients together and adds moisture; for a vegan option, use flaxseed meal.
? cups Vegetable Oil ? Ensures a moist texture; can substitute with melted coconut oil if desired.
? cup Buttermilk ? Provides acidity that reacts with baking soda; can be replaced with plant-based milk and vinegar blend.
1 tablespoon White Wine Vinegar ? Adds acidity, enhancing the red color and helping with leavening.
1 teaspoon Vanilla Extract ? Adds a warm, sweet flavor; use pure extract for the best quality.
? teaspoon Red Gel Food Colour ? Enhances the vibrant color of the cakesicles; use a gel-based color for better results.
? cup Cream Cheese ? For the frosting; look for full-fat cream cheese for a rich texture.
? cup Unsalted Butter ? Adds creaminess to the frosting; ensure it’s at room temperature for easy mixing.
4 cups Powdered Sugar ? Sweetens and thickens the frosting; you can use a mix of powdered and granulated for texture.
1 teaspoon Vanilla Extract ? A duplicate, but always a good choice for flavor enhancement.
250 g Candy Melts OR Chocolate ? Used for coating; choose high-quality for a smooth finish.
Sprinkles ? For that celebratory touch; pick colorful varieties to jazz up your cakesicles.
How to Make Pink Cakesicles
Follow these simple steps to prepare this delicious Pink Cakesicles:
Step 1: Preheat the Oven
Preheat your oven to 325?F (170?C) and line a sheet pan with baking paper, creating a perfect canvas for your delicious batter.
Step 2: Mix Wet Ingredients
In a large bowl, gently whisk together the egg, buttermilk, vegetable oil, and vanilla extract. This will be the foundation for the moisture in your cakes.
Step 3: Combine Dry Ingredients
Add the sugar, flour, cocoa powder, salt, and baking soda to the wet mixture, stirring until combined. You?re just aiming for no visible flour!
Step 4: Color the Batter
Introduce the red gel food coloring into the batter, mixing until you reach that eye-popping red that screams indulgence.
Step 5: Make the Cake
Pour your vibrant batter into the prepared sheet pan and bake for about 20 minutes, or until a skewer comes out clean. Your kitchen will smell heavenly!
Step 6: Prepare the Frosting
Cream together the cream cheese and unsalted butter until smooth, then gradually add the powdered sugar and vanilla. Beat it on high until fluffy because fluffiness is key to a good frosting!
Step 7: Crumble the Cake
Allow the baked cake to cool completely, then crumble it into fine pieces using your fingers?think of it as a stress reliever!
Step 8: Combine Cake and Frosting
Mix about ? cup of frosting into your cake crumbs until well combined, giving a deliciously moist consistency.
Step 9: Prepare the Cakesicle Mold
Melt your candy melts or temper your chocolate. Pour it into the molds, ensuring it coats the sides evenly. Tap the mold gently to remove excess.
Step 10: Assemble and Chill
Insert popsicle sticks into the molds and let them chill in the fridge until set for about 5 minutes. Then, press the cakesicle mixture into each mold, leaving a small gap at the top.
Step 11: Finish the Cakesicles
Seal the top with another layer of the melted candy or chocolate, smoothing it out. Chill again for 10 minutes.
Step 12: Unmold and Decorate
Carefully unmold your cakesicles and adorn them with any leftover candy melts or sprinkles for that fun, festive finish.
Transfer to a serving platter and get ready to witness pure joy when your family and friends take that first bite! These Pink Cakesicles are perfect for celebrations or just a cute way to elevate a regular Tuesday. Enjoy!
You Must Know About Pink Cakesicles
- This showstopping Pink Cakesicles delivers restaurant-quality results using simple ingredients you probably already have at home.
- The perfect balance of textures and flavors creates an unforgettable dining experience that will have everyone asking for seconds.
- Picture-perfect presentation with vibrant colors makes this dish absolutely Instagram-worthy and guaranteed to impress any dinner guest.
- Incredibly versatile recipe that works beautifully for weeknight dinners, meal prep, special occasions, or even outdoor entertaining sessions.
Perfecting Pink Cakesicles Cooking Process
Begin by preheating your oven and preparing your baking pan. Focus on creating the cake batter first, while the cake bakes, prepare the frosting. This sequential approach keeps everything organized and efficient, ensuring your Pink Cakesicles turn out just right.
Add Your Touch to Pink Cakesicles
Feel free to experiment with the cake flavor! Swap out the cocoa powder for more vanilla, or add extra spices like cinnamon for a flavor twist. You can also try different toppings, making every batch uniquely yours.
Storing & Reheating Pink Cakesicles
Store leftover Pink Cakesicles in an airtight container in the fridge for up to a week. These treats can also be frozen for a longer shelf life. To enjoy them later, let them thaw in the fridge before serving.
Chef's Helpful Tips for Pink Cakesicles
- This professional-quality Pink Cakesicles relies on precise timing and temperature control to achieve restaurant-standard results consistently.
- Master the art of mise en place by prepping all ingredients beforehand, ensuring smooth execution and preventing any last-minute cooking disasters.
- The secret lies in layering flavors throughout the cooking process rather than seasoning only at the end for maximum depth.
- Pro tip: let the finished dish rest for optimal texture and flavor development before serving to hungry guests waiting eagerly.
It reminds me of the time I brought these delicious Pink Cakesicles to a family gathering. Everyone went wild for them, and my niece declared them the best treat she?d ever tasted, making my heart swell with pride.
FAQs About Pink Cakesicles
What are Pink Cakesicles?
Pink Cakesicles are delightful frozen treats made from cake crumbs mixed with frosting, then coated in colorful candy melts or chocolate. They resemble popsicles, making them perfect for summer parties or celebrations. These cakesicles are not just visually appealing with their vibrant colors but also offer a sweet and creamy bite that is sure to please anyone with a sweet tooth. You can easily customize them with various flavors, making them a versatile and fun treat for kids and adults alike.
How do I make Pink Cakesicles?
Making Pink Cakesicles involves a few easy steps. First, bake a velvety red velvet cake and crumble it once cooled. Then, mix the cake crumbs with cream cheese frosting. After that, coat the inside of a molds with melted candy melts or chocolate and fill them with the cake mixture. Seal them with another layer of chocolate and freeze until firm. Unmold and decorate with whatever toppings you fancy, such as sprinkles or additional melted chocolate, for an extra touch.
Can I customize my Pink Cakesicles?
Absolutely! One of the best things about Pink Cakesicles is how customizable they are. You can change the cake flavor to vanilla or chocolate, swap out the frosting for different flavors, or even add mix-ins like nuts or chocolate chips. Additionally, the outer coating can vary from white chocolate to dark chocolate, allowing you to experiment with flavors and colors, making each batch a unique dessert masterpiece.
How should I store my Pink Cakesicles?
To keep your Pink Cakesicles fresh, store them in an airtight container in the refrigerator for up to a week. They can also be frozen for longer storage. If you decide to freeze them, make sure they are wrapped well to avoid freezer burn. When you’re ready to enjoy them, let the cakesicles thaw in the refrigerator for a few hours before serving to restore their creamy texture.
Conclusion for Pink Cakesicles
In summary, Pink Cakesicles are a fun and versatile dessert that can elevate any occasion. With their vibrant colors and delicious flavors, they’re perfect for parties, gatherings, or simply satisfying a sweet craving. Remember, you can experiment with different cakes and coatings to create a unique treat every time. So grab your molds and get creative with your own Pink Cakesicles for a delightful dessert experience!
Delicious Red Velvet Pink Cakesicles Recipe for Sweet Treats
Ingredients
Equipment
Method
- Preheat oven to 325?F / 170?C and line a sheet pan with baking paper.
- Lightly whisk the egg, buttermilk, oil, and vanilla together until blended.
- Add the sugar, flour, cocoa powder, and salt and mix for about a minute.
- Add red food coloring and mix until the batter is the desired shade of red.
- In a small bowl, pour the white wine vinegar over the baking soda, quickly mix together, and then pour into the batter. Mix the batter together.
- Pour into a sheet pan and bake for 20 minutes or until a skewer comes out clean.
- Cream together the cream cheese and butter until smooth.
- Add powdered sugar and vanilla and mix slowly until the powdered sugar is incorporated.
- Turn the mixer on high and beat for 2-3 minutes until fluffy.
- Rub the cooled cake between your fingers until it is all crumbs.
- Add frosting and squish together with your hands to combine. Use about ? cup of frosting for every 3 cups of cake crumbs.
- Melt candy melts or temper chocolate and pour into the cakesicle mold, pushing it up the sides to coat entirely.
- Tip the mold upside down over the bowl to remove excess.
- Insert popsicle sticks into the mold and place in the fridge for a few minutes to set.
- Once set, gently press the cakesicle mixture into the mold, ensuring it fills to the top without bulging. Leave about 1-2mm of a gap at the top.
- Check chocolate/candy melts and reheat if needed. Pour a thin layer over the back of the cakesicles to seal and smooth out with a palette knife.
- Place in the fridge for 10 minutes.
- Gently unmold the cakesicles and decorate using leftover candy melts/chocolate and sprinkles.