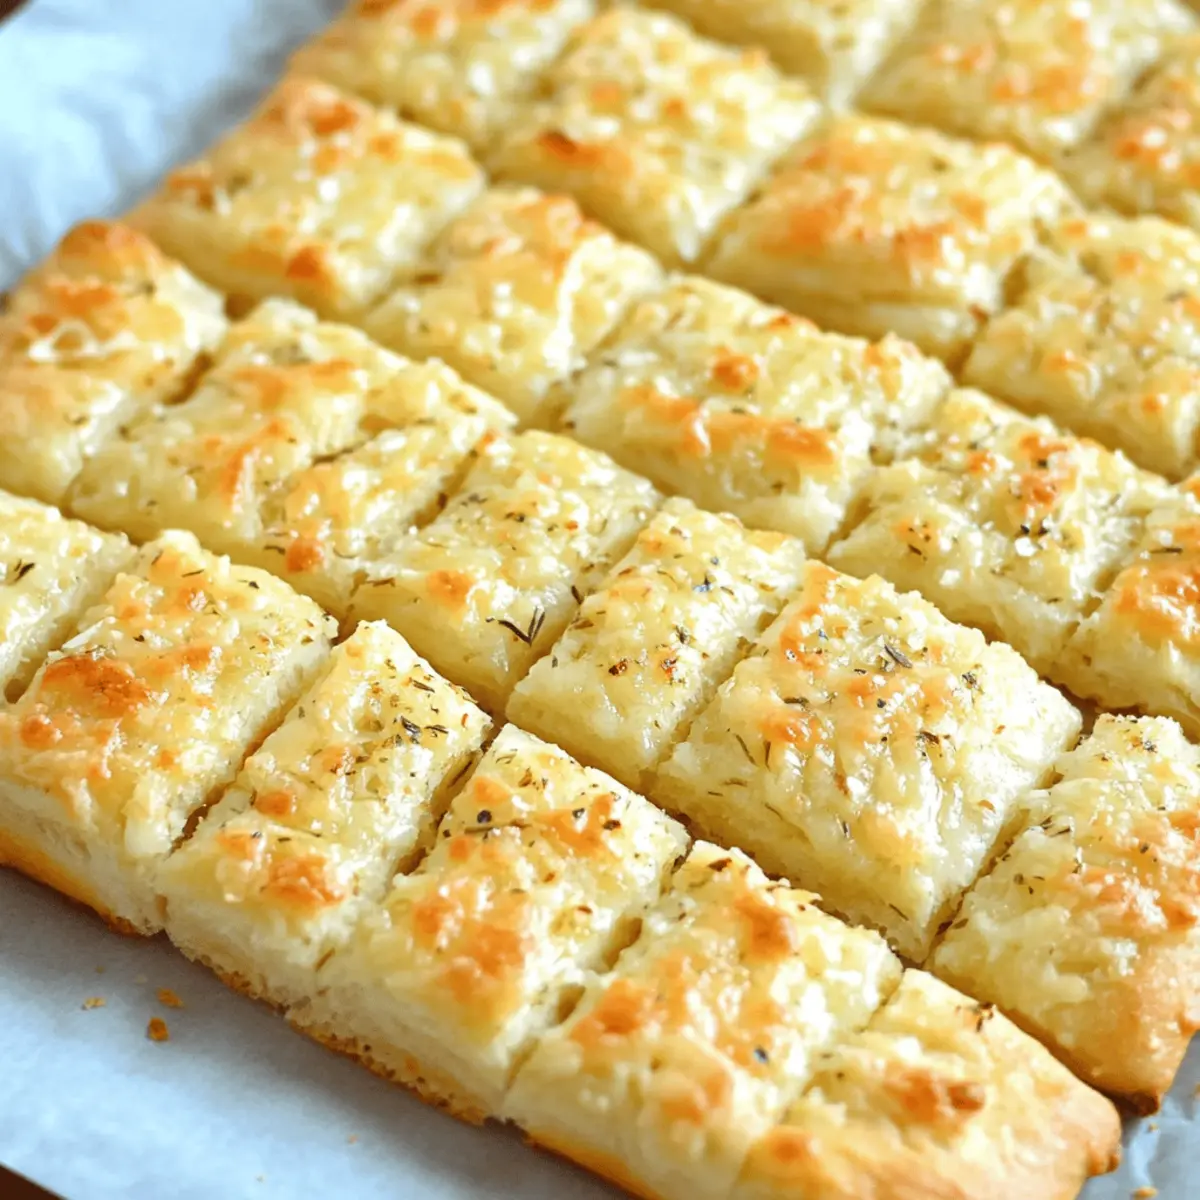
The warmth of freshly baked Cheesy Garlic Breadsticks wafts through the kitchen, wrapping around you like a cozy blanket. The crispy golden-brown edges combined with the gooey, melted cheese beckon you to take your first bite, and just wait until the aromatic garlic dances through the air?think of it as an irresistible hug from your favorite comfort food.
Jump to:
- <strong>Ingredients for Cheesy Garlic Breadsticks</strong>
- <strong>How to Make Cheesy Garlic Breadsticks</strong>
- <strong>Perfecting Cheesy Garlic Breadsticks Cooking Process</strong>
- <strong>Add Your Touch to Cheesy Garlic Breadsticks</strong>
- <strong>Storing & Reheating Cheesy Garlic Breadsticks</strong>
- FAQs About Cheesy Garlic Breadsticks
- What are Cheesy Garlic Breadsticks?
- How do I make Cheesy Garlic Breadsticks from scratch?
- Can I customize my Cheesy Garlic Breadsticks?
- How should I store leftover Cheesy Garlic Breadsticks?
- Conclusion for Cheesy Garlic Breadsticks
Picture this: a family gathering where laughter fills the room, and there you are, proudly pulling apart those cheesy, garlic-infused breadsticks that everyone can?t resist. You get to share more than just food; you create memories as your loved ones eagerly reach for the next piece. This recipe for Cheesy Garlic Breadsticks not only pleases the palate but also adds a touch of warmth and joy to any occasion.
Why You'll Love This Cheesy Garlic Breadsticks
- This incredible Cheesy Garlic Breadsticks transforms simple everyday ingredients into restaurant-quality flavors that will blow your mind completely.
- Foolproof recipe techniques guarantee perfect results every single time, making even novice cooks feel like professional chefs instantly.
- Stunning visual appeal with gorgeous colors and mouthwatering aromas creates the ultimate Instagram-worthy dish for any special occasion.
- Endlessly adaptable for different dietary needs while working beautifully for meal prep, date nights, or entertaining large groups effortlessly.
Ingredients for Cheesy Garlic Breadsticks
Here’s what you’ll need to make this delicious Cheesy Garlic Breadsticks:
1 tube of refrigerated pizza crust ? This is the base that gives your breadsticks a delightful chewy texture and easy preparation. Look for a brand that rises well for the best results.
1 Tablespoon butter, melted ? Butter adds richness and helps the garlic flavor sing. You can substitute with olive oil if you want a healthier option.
1 clove garlic, crushed ? Fresh garlic is essential for that aromatic punch. Feel free to adjust the amount according to your garlic-loving tendencies.
3/4 cup grated mozzarella cheese ? Mozzarella brings all that gooey, stretchy happiness to the breadsticks. You can never have too much cheese; trust me.
1 Tablespoon Parmesan cheese ? This adds a delightful nutty flavor that complements the mozzarella beautifully.
1 teaspoon dried oregano leaves, optional ? Oregano offers herby notes, adding depth to the flavor profile; it?s totally okay to skip this if you’re not a fan.
How to Make Cheesy Garlic Breadsticks
Follow these simple steps to prepare this delicious Cheesy Garlic Breadsticks:
Step 1: Preheat the Oven
Start by preheating your oven to 425?F (220?C). It?s like giving your oven a warm-up before the main event!
Step 2: Roll Out the Pizza Crust
Grab your tube of refrigerated pizza crust and roll it out onto a parchment-lined baking sheet. Feel free to stretch it a bit to fit the pan, because who doesn?t love a little extra crust?
Step 3: Prepare the Garlic Butter
In a small bowl, mix the melted butter and crushed garlic together. Once you have your magical garlic brew, brush it evenly over the entire pizza crust. This is where the magic begins!
Step 4: Add the Cheeses
Sprinkle the mozzarella cheese generously over the butter-coated crust, then add the Parmesan cheese on top. If you decided to use oregano, now’s your chance to sprinkle that on. Believe me, your taste buds will thank you later.
Step 5: Cut the Breadsticks
Now, before you bake, grab a pizza slicer or a large knife and cut the cheesy, covered pizza crust into 16 equal rectangles. This way, everyone can have their fair share without argument (you can thank me later).
Step 6: Bake to Perfection
Place your masterpiece into the preheated oven and bake for about 12 minutes. Keep an eye on your creation; you want it to be toasted to a bubbly, slightly golden perfection.
Once you?re done, remove them from the oven and cut the breadsticks again along those lines you made earlier. Serve them hot and watch your guests dive in, perhaps with a hint of garlic butter drizzled on top.
There’s something incredibly satisfying about pulling apart a hot, cheesy garlic breadstick that makes you downright giddy. Not only can these be served as a delightful appetizer, but they?re also perfect as a side dish with pasta, salads, or just on their own while you?re binging on your favorite show.
In just about 20 minutes from start to finish, you can create Cheesy Garlic Breadsticks that are sure to steal the spotlight at your next gathering. So, grab those ingredients, roll up your sleeves, and get ready to rave about your incredible new culinary creation. Your taste buds will be thanking you!
You Must Know About Cheesy Garlic Breadsticks
- This showstopping Cheesy Garlic Breadsticks delivers restaurant-quality results using simple ingredients you probably already have at home.
- The perfect balance of textures and flavors creates an unforgettable dining experience that will have everyone asking for seconds.
- Picture-perfect presentation with vibrant colors makes this dish absolutely Instagram-worthy and guaranteed to impress any dinner guest.
- Incredibly versatile recipe that works beautifully for weeknight dinners, meal prep, special occasions, or even outdoor entertaining sessions.
Perfecting Cheesy Garlic Breadsticks Cooking Process
Preheat your oven first to get it nice and hot while you prepare the ingredients. Roll out the pizza crust, brush it with the garlic butter, add the cheeses, and slice before baking for an even cook. This sequence ensures irresistible, gooey perfection.
Add Your Touch to Cheesy Garlic Breadsticks
Feel free to switch up the cheese! Try adding cheddar for an extra sharp flavor or a sprinkle of crushed red pepper flakes for some heat. Fresh herbs can also elevate the taste, making it unique to your liking.
Storing & Reheating Cheesy Garlic Breadsticks
Store any leftovers in an airtight container in the fridge for up to three days. To reheat, pop them in a toaster oven or regular oven for a couple of minutes until warm and crispy?no one likes soggy breadsticks!
Chef's Helpful Tips for Cheesy Garlic Breadsticks
- This professional-quality Cheesy Garlic Breadsticks relies on precise timing and temperature control to achieve restaurant-standard results consistently.
- Master the art of mise en place by prepping all ingredients beforehand, ensuring smooth execution and preventing any last-minute cooking disasters.
- The secret lies in layering flavors throughout the cooking process rather than seasoning only at the end for maximum depth.
- Pro tip: let the finished dish rest for optimal texture and flavor development before serving to hungry guests waiting eagerly.
There was this one time I made Cheesy Garlic Breadsticks for a game night. My friends couldn?t stop raving about them?and neither could I! We had the perfect amount of cheesy, garlicky goodness mingling with laughter, and it turned into our unofficial tradition.
FAQs About Cheesy Garlic Breadsticks
What are Cheesy Garlic Breadsticks?
Cheesy Garlic Breadsticks are a delicious appetizer or side dish made from refrigerated pizza crust, topped with buttery garlic and two types of cheese. They?re baked until golden and melty, offering a crispy exterior that contrasts perfectly with the gooey cheese inside. These breadsticks are perfect for sharing at parties or snacking while watching a movie, and they?re incredibly easy to whip up in just about 20 minutes. Once you make them, they?ll quickly become a family favorite, guaranteed to satisfy cravings for cheesy comfort food.
How do I make Cheesy Garlic Breadsticks from scratch?
Making Cheesy Garlic Breadsticks from scratch involves just a few simple steps. Start with your homemade dough or a store-bought pizza crust for convenience. Roll out the dough, brush it with a mixture of melted butter and garlic, and generously sprinkle mozzarella and Parmesan cheeses on top. Cut the dough into sticks before baking to ensure even cooking. Bake until golden brown, and you?ll have freshly made sticks that are bursting with cheesy, garlicky flavor ready to be enjoyed straight from the oven.
Can I customize my Cheesy Garlic Breadsticks?
Absolutely! One of the best things about Cheesy Garlic Breadsticks is their versatility. You can switch up the cheeses?add cheddar for a sharper taste or goat cheese for a unique twist. Feel free to toss in some fresh herbs like basil or rosemary, or add a little heat with crushed red pepper flakes. The options are endless, allowing you to create a version that suits your taste buds perfectly!
How should I store leftover Cheesy Garlic Breadsticks?
To keep your Cheesy Garlic Breadsticks fresh for later enjoyment, store any leftovers in an airtight container in the refrigerator for up to three days. When you’re ready to enjoy them again, simply reheat them in a toaster oven or regular oven until they are warm and crispy. Avoid using a microwave, as it can make the breadsticks soggy. Following these steps will ensure you can savor that cheesy, garlicky goodness another day!
Conclusion for Cheesy Garlic Breadsticks
In conclusion, Cheesy Garlic Breadsticks are an easy and delicious treat that can elevate any meal or gathering. With just a tube of pizza crust, some garlic, and a mix of cheeses, you can create a dish that impresses everyone at your table. Remember, personalizing the recipe is part of the fun, so don?t hesitate to experiment with different toppings and seasonings. Whether you’re serving them as a side or a snack, these breadsticks are bound to become a staple in your home. Enjoy making and devouring your Cheesy Garlic Breadsticks!
Easy Cheesy Garlic Breadsticks
Ingredients
Equipment
Method
- Preheat the oven to 425F.
- Roll out the pizza crust onto a parchment lined baking sheet.
- Mix together the melted butter and crushed garlic, then brush it evenly over the entire pizza crust.
- Sprinkle the mozzarella and Parmesan cheeses evenly onto the pizza crust. Then sprinkle the dried oregano evenly on top.
- Before you bake, cut the cheese covered pizza crust into 16 equal rectangles using a pizza slicer or large knife.
- Bake for about 12 minutes until the cheese is melted, bubbly and slightly golden.
- Remove from the oven and cut the breadsticks again before serving.