There?s something magical about sushi rice that makes your mouth water the moment you think about it. Now, imagine that sticky, fragrant rice wrapped around a delightfully spicy tuna filling, neatly held together with crunchy nori. Yes, my friends, this is the kind of flavor explosion you can expect from Easy Japanese Tuna Onigiri, a dish that effortlessly combines simplicity with sophistication. Whether you?re looking to impress guests or simply spice up your lunch routine, this recipe is your golden ticket to culinary fame.
Jump to:
- <strong>Ingredients for Easy Japanese Tuna Onigiri</strong>
- <strong>How to Make Easy Japanese Tuna Onigiri</strong>
- <strong>Perfecting Easy Japanese Tuna Onigiri Cooking Process</strong>
- <strong>Add Your Touch to Easy Japanese Tuna Onigiri</strong>
- <strong>Storing & Reheating Easy Japanese Tuna Onigiri</strong>
- FAQs About Easy Japanese Tuna Onigiri
- What is Easy Japanese Tuna Onigiri?
- How Do I Make the Rice for Easy Japanese Tuna Onigiri?
- Can I Customize the Filling for Easy Japanese Tuna Onigiri?
- How Should I Store Leftover Easy Japanese Tuna Onigiri?
- Conclusion for Easy Japanese Tuna Onigiri
Onigiri is often a nostalgic snack for many, reminding me of lazy afternoons in Japanese parks, where the air smells of lush greenery and delicate cherry blossoms. Picture yourself sitting on a picnic blanket, shade provided by a fully blossomed sakura tree, enjoying these tasty rice balls, paired with laughter and sunshine. You’re about to embark on a flavorful journey that transcends ordinary lunch boxes?so get ready for some taste bud adventure.
Why You'll Love This Easy Japanese Tuna Onigiri
- This incredible Easy Japanese Tuna Onigiri transforms simple everyday ingredients into restaurant-quality flavors that will blow your mind completely.
- Foolproof recipe techniques guarantee perfect results every single time, making even novice cooks feel like professional chefs instantly.
- Stunning visual appeal with gorgeous colors and mouthwatering aromas creates the ultimate Instagram-worthy dish for any special occasion.
- Endlessly adaptable for different dietary needs while working beautifully for meal prep, date nights, or entertaining large groups effortlessly.
Ingredients for Easy Japanese Tuna Onigiri
Here’s what you’ll need to make this delicious Easy Japanese Tuna Onigiri:
1? cups Japanese short-grain rice ? Also known as sushi rice, this sticky grain is key for holding your onigiri together perfectly.
15 fluid ounces cold water ? Don?t forget to use the right amount of water for cooking the rice to avoid any disasters.
Kosher salt ? Enhances overall flavor; just a sprinkle brings everything together beautifully.
1 (4.5-ounce) can Portofino Solid Albacore Tuna in Extra Virgin Olive Oil ? Opt for quality tuna for maximum flavor; the olive oil adds richness.
1? tablespoons mayonnaise ? This adds creaminess to the filling, making each bite go down even smoother.
1 teaspoon sriracha hot sauce ? Perfect for giving the tuna that spicy kick; adjust to your heat preference.
? teaspoon rice vinegar ? Balances the flavors with a hint of tang; it?s a key unifier in this creamy mix.
1 scallion (green parts only) finely sliced ? Adds a fresh, crisp bite to the filling; don?t skip this one!
Toasted black sesame seeds for sprinkling (optional) ? These little beauties not only add flavor but make your onigiri look fancy too.
3 sheets toasted nori cut crosswise in half ? Classic sushi wrap?crispy and slightly salty, nori completes the dish.
How to Make Easy Japanese Tuna Onigiri
Follow these simple steps to prepare this delicious Easy Japanese Tuna Onigiri:
Step 1: Rinse and Cook the Rice
Start by placing the rice in a fine-meshed sieve and rinse it well under cold water until the water runs clear. This step is essential for removing excess starch and achieving that desired sticky texture. Once rinsed, combine the rice and cold water, and cook it in a rice cooker according to the manufacturer?s directions. If you’re doing it on the stovetop, bring it to a boil, reduce heat to low, cover, and cook for about 16 to 18 minutes until all the water is absorbed. Afterward, remove it from heat, fluff the rice with a fork, cover with a kitchen towel and lid, and let it stand for about 10 minutes.
Step 2: Prepare the Tuna Filling
While the rice is cooking, grab a medium bowl and toss together the tuna, mayonnaise, sriracha hot sauce, and rice vinegar until everything is well mixed. Stir in the finely sliced scallions for that extra pop of flavor and texture. Set this tasty filling aside while the rice cools.
Step 3: Prepare for Shaping
Now that your sushi rice is cool enough to handle, it?s time to prepare for molding these delicious rice balls. Set aside a bowl of room-temperature water and a small bowl of kosher salt. Moisten your hands with water and sprinkle them with a bit of salt?this will prevent the rice from sticking to your hands.
Step 4: Shape the Onigiri
Take about ? cup of the sushi rice and press it into an oblong shape in one palm. Create a little pocket in the middle and add about a tablespoon of your spicy tuna filling right in there. Envelop the filling with the rice, firmly yet gently. Remember not to squish too hard; you want it to hold its shape without losing that lovely fluffiness.
Step 5: Final Touches
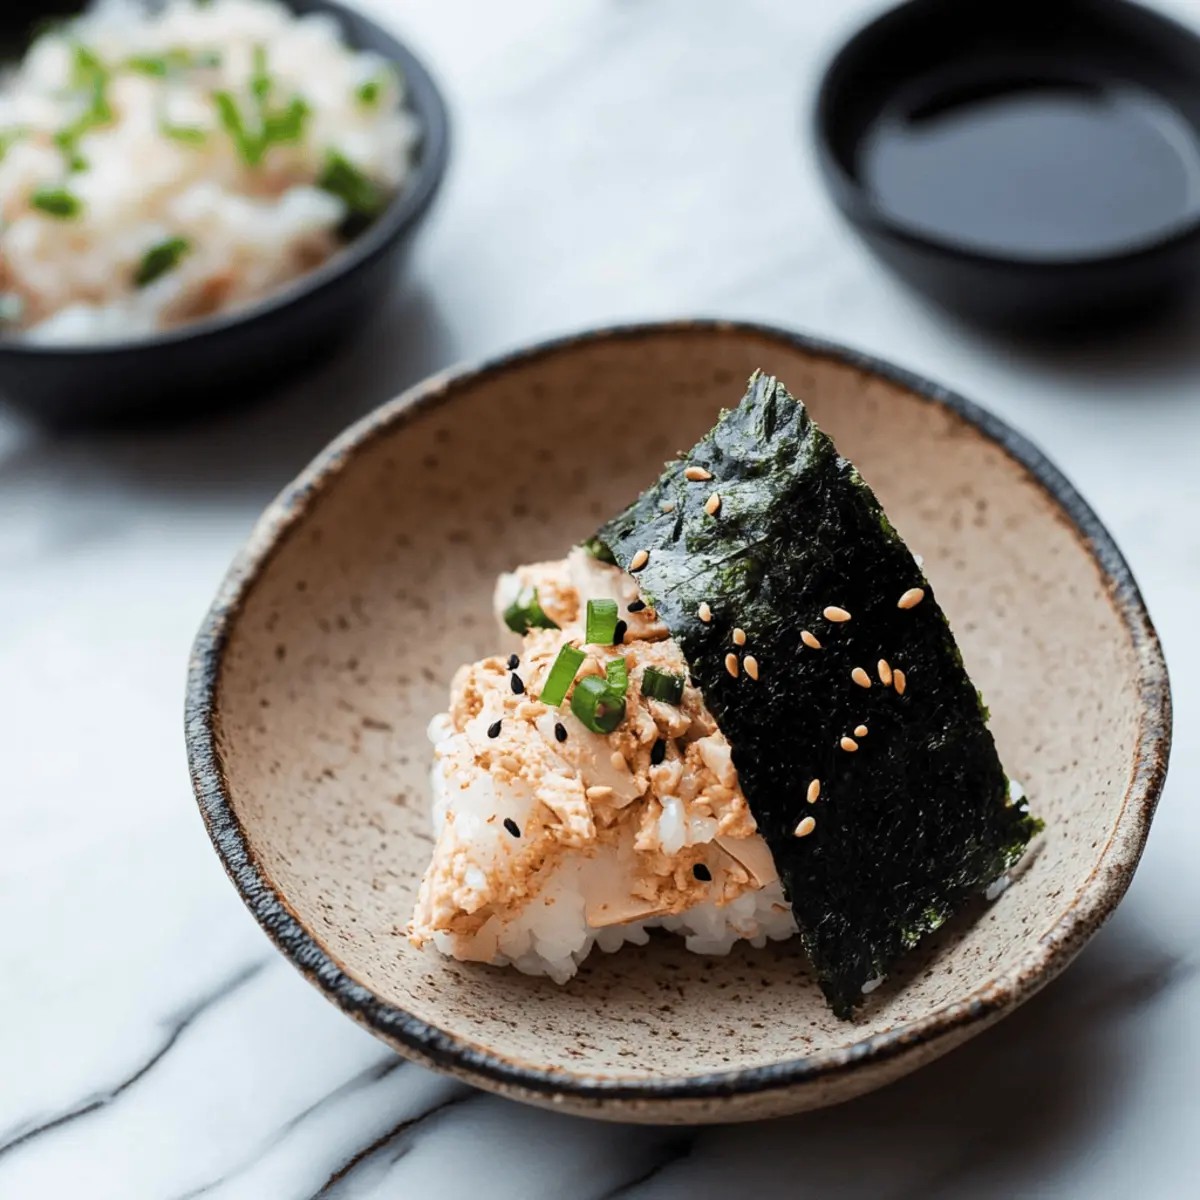
Here comes the fun part. Shape the rice ball into a triangular shape using your palms and fingers, ensuring it?s nice and compact. If desired, sprinkle the outside with toasted black sesame seeds for a crunchy finish. Grab your sheets of nori and wrap each onigiri snugly, placing a bit more tuna filling on top to make them extra delightful.
Step 6: Serve and Celebrate
And there you have it! Your Easy Japanese Tuna Onigiri is ready to be served?and devoured! Arrange the rice balls on a nice plate, and don?t forget to snap a picture before digging in. They make for the perfect snack, lunch, or even a fun party appetizer. Your friends will absolutely love you for this treat.
For an added dose of delight, pair these onigiri with pickled vegetables or a simple soy sauce for dipping. Now, who?s ready to experience onigiri like never before? Dive in and enjoy every spicy, savory bite!
You Must Know About Easy Japanese Tuna Onigiri
- This showstopping Easy Japanese Tuna Onigiri delivers restaurant-quality results using simple ingredients you probably already have at home.
- The perfect balance of textures and flavors creates an unforgettable dining experience that will have everyone asking for seconds.
- Picture-perfect presentation with vibrant colors makes this dish absolutely Instagram-worthy and guaranteed to impress any dinner guest.
- Incredibly versatile recipe that works beautifully for weeknight dinners, meal prep, special occasions, or even outdoor entertaining sessions.
Perfecting Easy Japanese Tuna Onigiri Cooking Process
Start by rinsing the sushi rice for optimal texture, then cook it while preparing the spicy tuna filling. Shape the rice into onigiri after it cools for the perfect balance during assembly.
Add Your Touch to Easy Japanese Tuna Onigiri
Feel free to swap out tuna for cooked salmon or shredded chicken for an alternative protein. Add kimchi for extra heat or diced cucumber for a refreshing crunch. Customize the spicy mayo to your liking.
Storing & Reheating Easy Japanese Tuna Onigiri
Store leftover onigiri in an airtight container in the fridge for up to two days. To reheat, lightly microwave for 10-15 seconds, ensuring the nori stays crispy by keeping it out of the microwave.
Chef's Helpful Tips for Easy Japanese Tuna Onigiri
- This professional-quality Easy Japanese Tuna Onigiri relies on precise timing and temperature control to achieve restaurant-standard results consistently.
- Master the art of mise en place by prepping all ingredients beforehand, ensuring smooth execution and preventing any last-minute cooking disasters.
- The secret lies in layering flavors throughout the cooking process rather than seasoning only at the end for maximum depth.
- Pro tip: let the finished dish rest for optimal texture and flavor development before serving to hungry guests waiting eagerly.
Creating Easy Japanese Tuna Onigiri always brings back those cozy memories of Japanese potlucks with friends. Their smiles and compliments were more satisfying than the dish itself, reminding me that food is all about love and connections.
FAQs About Easy Japanese Tuna Onigiri
What is Easy Japanese Tuna Onigiri?
Easy Japanese Tuna Onigiri is a delightful Japanese dish featuring seasoned sushi rice shaped into triangular or oval balls, filled with a savory mixture of tuna, mayonnaise, and a kick of spicy sriracha. It?s a versatile meal that can be enjoyed as a quick lunch, snack, or part of a more elaborate dinner. These tasty rice balls are often wrapped in nori for added flavor and texture, making them perfect for on-the-go eating or a picnic treat.
How Do I Make the Rice for Easy Japanese Tuna Onigiri?
Making the perfect sushi rice for Easy Japanese Tuna Onigiri is essential. Start by rinsing Japanese short-grain rice under cold water until it runs clear to remove excess starch. This ensures a fluffy texture. Cook the rice in a rice cooker or on the stovetop, allowing it to steam and cool slightly before shaping. Fluffing the rice and letting it rest will enhance the overall texture, making it easier to mold into those coveted onigiri shapes without being too sticky.
Can I Customize the Filling for Easy Japanese Tuna Onigiri?
Absolutely! One of the joys of Easy Japanese Tuna Onigiri is its versatility. You can swap the tuna for other proteins like cooked salmon or shredded chicken. If you’re looking for a spicy twist, try adding kimchi or diced jalape?os to the filling. For a refreshing crunch, diced cucumbers work wonders. You can also adjust the level of sriracha in the mayonnaise to suit your spicy preferences. The possibilities are endless, inviting you to get creative in your kitchen.
How Should I Store Leftover Easy Japanese Tuna Onigiri?
If you have some Easy Japanese Tuna Onigiri leftovers, storing them properly is key to maintaining their flavor and texture. Place the onigiri in an airtight container and refrigerate them for up to two days. To enjoy them again, lightly microwave them for about 10-15 seconds, making sure to remove the nori before microwaving to keep it crispy. Enjoying your homemade onigiri as a snack or meal the next day is still delicious when done right!
Conclusion for Easy Japanese Tuna Onigiri
Easy Japanese Tuna Onigiri offers a delightful balance of flavors, textures, and convenience, making it a fantastic addition to your cooking repertoire. With a simple base of sushi rice and a spicy tuna filling that you can customize to your liking, this dish is perfect for any occasion. Whether it’s a quick lunch or a picnic snack, the satisfying layers of flavor will surely impress your family and friends. Give this Easy Japanese Tuna Onigiri recipe a try, and savor every bite!
Easy Japanese Tuna Onigiri with Spicy Filling
Ingredients
Equipment
Method
- Place the rice in a fine-meshed sieve and rinse well under cold water until the water runs clear. Drain well.
- Combine the rice and cold water, and cook in a rice cooker according to the manufacturer?s directions. If using a saucepan, combine the rice and water, bring to a boil, reduce heat to low, cover, and cook for 16 to 18 minutes until the water is absorbed. Remove from heat, fluff the rice, cover with a kitchen towel and lid, and let stand for 10 minutes.
- In a medium bowl, combine the tuna, mayonnaise, hot sauce, and rice vinegar until evenly mixed. Stir in the scallions.
- Set aside a bowl of room temperature water and a small bowl of kosher salt. Once the sushi rice is cool enough to handle, moisten hands with water and sprinkle with salt.
- Grab roughly ? cup of sushi rice and press it into an oblong shape in one palm. Add a tablespoon of the tuna filling to the center of the rice and envelop the filling with the rice.
- Shape the rice ball into a triangular shape using your palms and fingers without compressing too hard. Sprinkle the outside with black sesame seeds. Wrap each onigiri in a nori sheet and place additional tuna filling on top. Serve immediately.