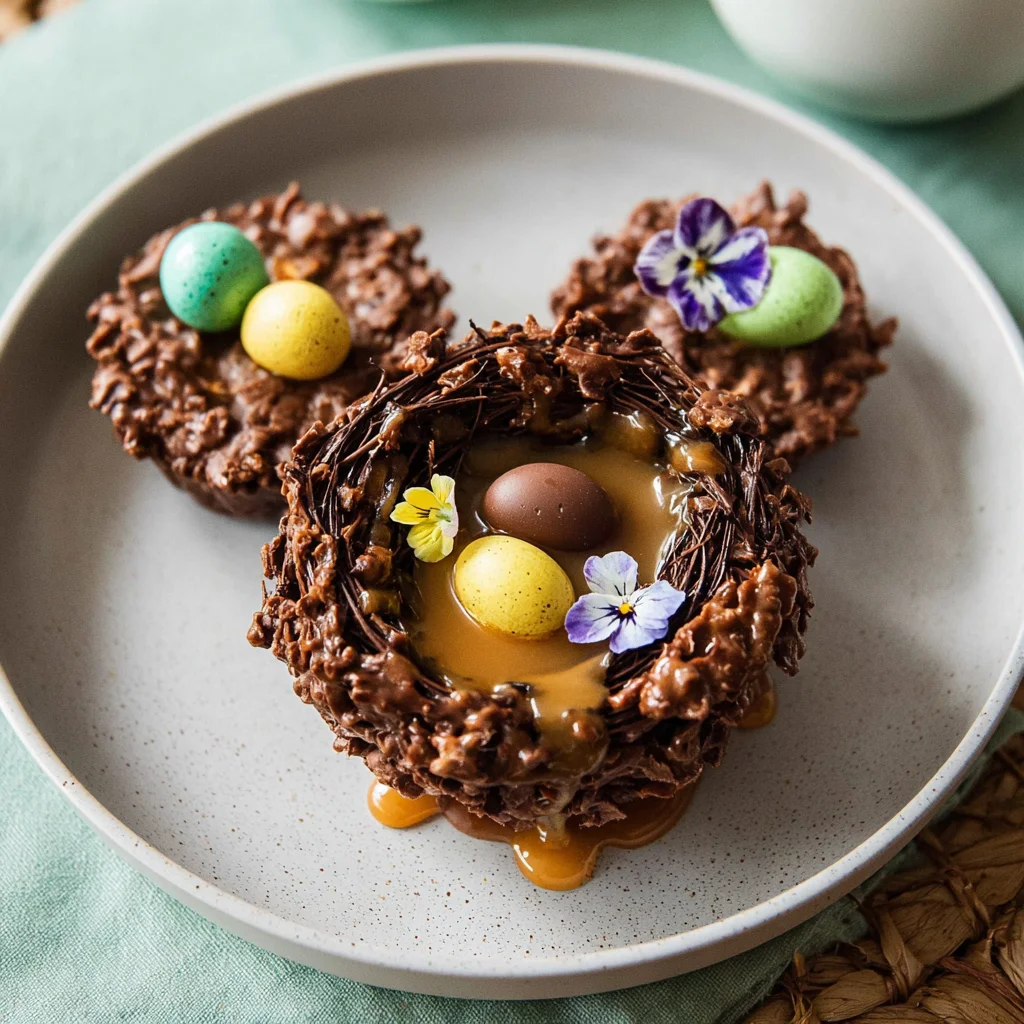
Picture a whimsical delight where rich, velvety chocolate hugs crunchy nests, creating a playful symphony of flavors and textures. As the aroma wafts through the air, it beckons you closer, promising a sweet adventure with each bite. These Chocolate Easter Nests are more than just treats; they?re edible memories waiting to happen, ready to make your Easter celebrations sparkle with joy and laughter.
Jump to:
Growing up, I remember eagerly crafting these nests with my family, the kitchen filled with giggles as we tried to outdo each other on creativity. Those moments of sticky fingers and chocolate smudges turn into cherished traditions that bring warmth to our hearts. Perfect for sharing at gatherings or hiding around the house for an exciting Easter egg hunt, these nests guarantee an explosion of delightful flavors that will have everyone smiling and reaching for seconds.
Why Is Chocolate Easter Nests So Irresistibly Good?
Delightful and easy to make, these Chocolate Easter Nests bring joy to any celebration! Indulgent chocolate chips combined with creamy peanut butter create a rich flavor that?s hard to resist. Crispy rice cereal adds a delightful crunch, making each bite memorable. Versatile, you can customize them with your favorite candy eggs or jelly beans. Plus, in just 25 minutes, you?ll have a stunning treat that?s sure to impress family and friends!
Chocolate Easter Nests Ingredients
- For the Chocolate Mixture:
- 2 cups chocolate chips (semi-sweet or milk chocolate) ? Choose your favorite type for a rich, creamy flavor that melts perfectly.
- 1 cup crispy rice cereal ? This adds delightful crunch and structure to your nests, making them fun to eat.
- 1/2 cup peanut butter (smooth or crunchy) ? Provides a delicious nutty taste and helps bind the mixture together.
- For the Decorations:
- 1 cup chocolate eggs (mini chocolate eggs or jelly beans) ? Use these to fill your nests, adding a pop of color and sweetness that everyone loves during Easter celebrations.
How to Make Chocolate Easter Nests
1. Melt Together: In a saucepan over low heat, melt 2 cups of chocolate chips and 1/2 cup of peanut butter together. Stir gently until the mixture is smooth and glossy, creating a delightful chocolate base.
2. Combine Cereal: Remove the saucepan from heat and stir in 1 cup of crispy rice cereal. Ensure each piece is well coated in the luscious chocolate-peanut butter mixture for that perfect crunch.
3. Prepare Baking Sheet: Line a baking sheet with parchment paper to prevent sticking. This step helps in easily removing your nests once they?ve set, keeping them intact and beautiful.
4. Form Nests: Using a spoon, scoop the chocolate mixture onto the parchment paper. Shape it into small nests, creating a little indentation in the center to hold your candy later on.
5. Chill to Set: Place the nests in the refrigerator for about 10 minutes to set. Watch as they firm up, turning from gooey to perfectly shaped nests!
6. Fill with Candy: Once set, it?s time for fun! Fill each nest with 1 cup of chocolate eggs or jelly beans, adding a pop of color and sweetness that makes these treats festive.
7. Serve or Store: Enjoy your delightful Chocolate Easter Nests immediately or store them in an airtight container for later. They make wonderful gifts or festive treats for gatherings!
Optional: Decorate with sprinkles for an extra festive touch!
Exact quantities are listed in the recipe card below.
Expert Tips
- Chocolate Melting Method: Use low heat to melt the chocolate and peanut butter together; high heat can scorch the chocolate, ruining your Chocolate Easter Nests.
- Cereal Coating: Make sure to mix the crispy rice cereal thoroughly until each piece is well-coated for even texture and flavor in your nests.
- Nest Shape: When forming nests, create a deeper indentation to hold more candy eggs or jelly beans, enhancing both presentation and taste.
- Chilling Time: Allow the nests to chill in the refrigerator long enough to set properly; this prevents them from falling apart when you fill them with decorations.
- Storage Tips: Store any leftover Chocolate Easter Nests in an airtight container at room temperature for up to a week, but they?re best enjoyed fresh!
How to Store and Freeze Chocolate Easter Nests
- Room Temperature: Store your Chocolate Easter Nests in an airtight container at room temperature for up to 3 days. Keep them away from direct sunlight and heat.
- Fridge: If you want to extend their freshness, place the nests in the fridge for up to a week. Just be sure they’re sealed well to prevent moisture.
- Freezer: For longer storage, freeze your Chocolate Easter Nests in an airtight container for up to 2 months. Thaw them in the fridge overnight before enjoying.
- Reheating: There’s no need to reheat these treats, but if you prefer a warm chocolate experience, microwave them for just a few seconds on low power.
Chocolate Easter Nests Your Way
Feel free to make these delightful treats your own with a few simple twists!
- Dairy-Free: Swap chocolate chips for dairy-free chocolate alternatives. Enjoy the same rich flavor while keeping it vegan-friendly.
- Nut-Free: Use sunflower seed butter instead of peanut butter. This keeps your nests safe for those with nut allergies without sacrificing taste.
- Crunchy Twist: Add 1/2 cup chopped nuts like almonds or walnuts to the mixture. This adds a delightful crunch that complements the smooth chocolate beautifully.
- Flavor Boost: Stir in 1 teaspoon of vanilla extract into the melted chocolate. This subtle enhancement elevates the flavor profile, making each bite even more delicious.
- Coconut Delight: Mix in 1/2 cup unsweetened shredded coconut for a tropical twist. The coconut adds a lovely chewiness that pairs wonderfully with the chocolate.
- Spicy Kick: Add a pinch of cayenne pepper or chili powder to the melted chocolate. This unexpected heat balances out the sweetness, creating a unique flavor experience.
- Fruit Fusion: Fold in 1/2 cup dried fruit like cranberries or cherries into the mixture. The fruit adds both color and a tart contrast to the rich chocolate nests.
- Mini Marshmallows: Incorporate 1 cup mini marshmallows for an extra sweet touch. These soft bites create a gooey texture that is simply irresistible!
Make Ahead Options
If you’re looking to save time during your Easter celebrations, these Chocolate Easter Nests are perfect for meal prep! You can melt the 2 cups of chocolate chips and 1/2 cup of peanut butter together ahead of time, stirring until smooth, and then mix in the 1 cup of crispy rice cereal. Once you’ve formed the nests on parchment paper, they can be refrigerated for up to 24 hours before decorating. To maintain their delightful crunch and flavor, store them in an airtight container until you’re ready to fill them with 1 cup of chocolate eggs or jelly beans. Simply add these decorations right before serving for that fresh, festive touch!
Chocolate Easter Nests Recipe FAQs
What type of chocolate chips should I use for the Chocolate Easter Nests?
You can use either semi-sweet or milk chocolate chips based on your preference. Semi-sweet chocolate gives a rich flavor that balances well with the sweetness of the candy eggs, while milk chocolate offers a creamier and sweeter taste. Choose what you and your family enjoy most!
Can I substitute the peanut butter in the recipe?
Absolutely! If you have nut allergies or prefer a different flavor, feel free to use sunflower seed butter or almond butter. These alternatives will provide a similar creamy texture and add a unique twist to your nests!
How should I store the Chocolate Easter Nests after making them?
To keep your nests fresh, store them in an airtight container at room temperature for up to 3 days. If you want to extend their shelf life, you can refrigerate them for about a week. Just make sure they are well covered to prevent them from absorbing any odors.
Can I freeze Chocolate Easter Nests for later enjoyment?
Yes, you can freeze these delightful treats! Place them in a single layer in an airtight container, separating layers with parchment paper to prevent sticking. They can be frozen for up to 2 months. Just remember to let them thaw at room temperature before serving!
What if my chocolate mixture is too thick?
If your mixture seems too thick to scoop easily, try gently reheating it over low heat while stirring continuously until it reaches a smoother consistency. This will help loosen it up, making it easier to form those adorable nests.
How many servings does this recipe yield?
This recipe yields about 4 generous servings, with each serving containing approximately 180 calories. You can always double or triple the recipe if you’re expecting more guests for your Easter celebration!
Chocolate Easter Nests
Ingredients
Method
- In a saucepan over low heat, melt the chocolate chips and peanut butter together, stirring until smooth.
- Remove from heat and stir in the crispy rice cereal until well coated.
- Line a baking sheet with parchment paper.
- Using a spoon, scoop the chocolate mixture onto the parchment paper and shape it into nests, creating a small indentation in the center.
- Place the nests in the refrigerator for about 10 minutes to set.
- Once the nests are set, fill each nest with chocolate eggs or jelly beans.
- Serve immediately or store in an airtight container.